Author: Brett Murphy

  • Grief of the Day: When It Is Their Birthday

    Grief of the Day: When It Is Their Birthday

    Advertisements

    There are certain dates you never have to write down.

    You don’t need a calendar reminder. You don’t need social media to tell you. You don’t need someone else to mention it.

    Your heart already knows.

    Their birthday is one of those dates.

    When someone you love has passed away, their birthday doesn’t disappear from your life simply because they are no longer physically here. The date still arrives every year, carrying memories, emotions, questions, and a love that never learned how to stop.

    You remember the birthdays when they were here.

    You remember the cakes.

    The candles.

    The presents.

    The phone calls.

    The laughter.

    The traditions.

    You may remember exactly what their voice sounded like when you told them, “Happy Birthday.”

    And now their birthday arrives again, except everything is different.

    There is still love.

    There are still memories.

    There is still a birthday.

    But the person you desperately want to celebrate is no longer standing beside you.

    That is one of the cruel realities of grief.

    A Birthday Becomes Something Completely Different

    Before loss, birthdays are usually about celebrating another year of life.

    After loss, a birthday can become a reminder of all the years that should have followed.

    You don’t only think about the age they were when they passed away. You may find yourself calculating how old they would be today.

    They would have been 25.

    They would have been 40.

    They would have been 70.

    Sometimes that number hits harder than expected.

    Because suddenly your mind starts imagining the life they might have been living.

    Where would they be?

    What would they look like?

    What would they be doing?

    Would they be married?

    Would they have children?

    Would they have accomplished the dreams they once talked about?

    Would they still laugh the same way?

    Would they still call you with the same stories?

    Grief doesn’t only mourn the life someone lived.

    It also mourns the life they never had the opportunity to live.

    Their birthday can bring all of those missing years directly to the surface.

    You Still Want to Say Happy Birthday

    One of the strangest parts of losing someone is continuing to have things you want to tell them.

    You may wake up on their birthday with the instinct to call them.

    For a fraction of a second, your mind may return to an older version of your life.

    Then reality catches up.

    There is no phone call to make.

    No birthday text to send.

    No gift to buy.

    No dinner reservation.

    No cake waiting at the house.

    But the words are still inside you.

    Happy Birthday.

    So say them.

    Say them quietly.

    Say them while looking at their photograph.

    Say them at their gravesite.

    Say them while sitting somewhere that reminds you of them.

    Say them in prayer.

    Write them in a letter.

    Speak them into the silence.

    Love does not require another person to physically stand in front of you before it can be expressed.

    If you still want to tell them happy birthday, you are allowed to.

    The Memories Can Be Beautiful and Painful at the Same Time

    You might look through old photographs on their birthday.

    At first, you smile.

    There they are.

    Maybe they’re standing behind a cake while everyone sings.

    Maybe they’re laughing because someone bought them a ridiculous gift.

    Maybe they’re surrounded by family.

    Maybe it’s simply an ordinary picture from an ordinary birthday that didn’t seem particularly important at the time.

    Now it is priceless.

    You look at their face and remember what it felt like when they were still part of your everyday life.

    And then the smile becomes tears.

    That is grief.

    Something can make you incredibly grateful and completely heartbroken at exactly the same time.

    You can be thankful they lived while wishing desperately that they had been given more time.

    You can laugh at a memory while tears run down your face.

    You can celebrate their life while grieving their absence.

    Those emotions do not contradict each other.

    They exist together because love and grief now occupy the same space.

    There Is No Correct Way to Spend Their Birthday

    Some grieving people want to make the day meaningful.

    Others simply want to survive it.

    Both are okay.

    You may want to gather family and friends and tell stories.

    You may want to visit the cemetery.

    You may want to cook their favorite meal.

    You may want to play their favorite music.

    You may want to light a candle.

    You may want to donate to something they cared about.

    You may want to do an activity they loved.

    Or you may want absolutely nothing to do with any of those things.

    Maybe you want to close the curtains, turn off your phone, and spend the day alone.

    Maybe you want to work because staying busy makes the hours easier.

    Maybe you want to cry.

    Maybe you don’t cry at all.

    There isn’t a grief rulebook telling you how their birthday must be observed.

    Do what helps you get through the day.

    And understand that what helps this year may be completely different next year.

    Sometimes Other People Forget

    One of the loneliest parts of these dates can be realizing that the rest of the world continues normally.

    People go to work.

    Traffic moves.

    Restaurants fill up.

    People complain about ordinary inconveniences.

    Your phone may remain strangely quiet.

    And somewhere inside you, you want to scream:

    Don’t you know what today is?

    It can hurt when people who once knew their birthday no longer mention it.

    But grief changes people’s relationship with dates.

    For you, the date may be permanently engraved into your heart.

    For someone else, it may slowly fade from their calendar.

    That doesn’t necessarily mean they stopped caring.

    Still, the silence can hurt.

    Sometimes all a grieving person wants is for someone to say their loved one’s name.

    To acknowledge:

    “I remember.”

    Those two words can mean everything.

    Their Birthday Can Make You Miss the Ordinary Things

    Grief often teaches us something we didn’t understand before loss.

    The extraordinary moments aren’t always what we miss most.

    Sometimes we miss the completely ordinary things.

    The random phone calls.

    The inside jokes.

    The annoying habits.

    The conversations about absolutely nothing.

    Hearing their footsteps.

    Seeing their name appear on your phone.

    Knowing they were somewhere in the world living their life.

    On their birthday, those ordinary memories can suddenly feel enormous.

    You realize you would give almost anything for one more ordinary day.

    Not a perfect day.

    Not a grand celebration.

    Just another day with them.

    You May Wonder Where They Are

    For people of faith, birthdays after loss can bring deeply spiritual thoughts.

    You may wonder what birthdays mean in Heaven.

    You may wonder whether your loved one can see you.

    You may wonder whether they know how much you still love them.

    You may imagine them surrounded by peace, free from suffering, pain, fear, and everything that made life difficult.

    Faith doesn’t necessarily eliminate grief.

    You can believe someone is with God and still desperately wish they were sitting beside you.

    Hope and heartbreak can exist together.

    You can trust Heaven while still missing Earth.

    That doesn’t make your faith weak.

    It means you loved someone deeply.

    Celebrate the Life, Not Only the Loss

    Their birthday can easily become another anniversary of what you no longer have.

    But when you are ready, it can also become a day to remember what you were fortunate enough to have.

    Their life mattered.

    Their laughter mattered.

    Their kindness mattered.

    Their mistakes mattered.

    Their dreams mattered.

    Their relationships mattered.

    The ways they changed people mattered.

    And your relationship with them mattered.

    Death ended their physical life.

    It did not erase their existence.

    They were here.

    They lived.

    They loved.

    They were loved.

    And their birthday is evidence that the world once received someone who became incredibly important to you.

    That deserves remembrance.

    Keep Their Name Alive

    Say their name.

    Tell their stories.

    Share photographs.

    Talk about the ridiculous things they did.

    Remember their favorite foods.

    Tell younger family members about them.

    Repeat the jokes they told a hundred times.

    Talk about their kindness.

    Talk about their stubbornness.

    Talk about who they really were—not a perfect version created after death, but the complicated, beautiful human being you knew and loved.

    Our loved ones remain part of our stories when we continue speaking their names.

    Their birthday can become an opportunity to tell the world:

    You were here. You mattered. You still matter to me.

    Light a Candle for Them

    Sometimes the simplest traditions become the most meaningful.

    Light one candle.

    Sit quietly for a few minutes.

    Look at their photograph.

    Remember a birthday when they were still here.

    Then think about one thing you are grateful they gave you.

    Maybe it was love.

    Maybe it was friendship.

    Maybe it was laughter.

    Maybe it was wisdom.

    Maybe it was simply the privilege of knowing them.

    You don’t have to turn the day into an elaborate memorial.

    Sometimes one flame in a quiet room says everything words cannot.

    Write Them a Birthday Letter

    If the words inside you feel too heavy, write them down.

    Start simply:

    Happy Birthday. I wish you were here.

    Then tell them everything.

    Tell them what has happened since they’ve been gone.

    Tell them what you miss.

    Tell them what made you laugh recently.

    Tell them about the moments when you desperately needed them.

    Tell them about the things you wish you could change.

    Tell them what you hope they knew while they were alive.

    Tell them you love them.

    There doesn’t have to be anyone physically present to receive the letter for writing it to matter.

    Sometimes grief needs somewhere to put all the love that still exists.

    Be Gentle With Yourself

    Their birthday may be harder than you expect.

    Or surprisingly peaceful.

    You may cry before breakfast.

    You may laugh while remembering them.

    You may feel angry.

    You may feel numb.

    You may experience all of those emotions before noon.

    Don’t judge yourself.

    Grief doesn’t follow schedules.

    There is no requirement that you be strong because years have passed.

    There is no deadline after which birthdays are supposed to become easy.

    When you deeply love someone, certain dates may always carry weight.

    You learn how to carry them differently.

    Happy Birthday in Heaven

    There is something incredibly painful about saying those words.

    Happy Birthday in Heaven.

    Because they contain both love and longing.

    They acknowledge the celebration while admitting the distance.

    Maybe today you would give anything to see them walk through the door.

    Maybe you would give anything to hear their voice.

    Maybe you wish you could buy one more birthday card.

    Maybe you would give anything to hug them and say:

    Happy Birthday. I love you.

    You cannot change what happened.

    You cannot bring back the birthdays you should have had together.

    But you can continue loving them.

    You can continue remembering them.

    You can continue honoring the life they lived.

    And you can carry a piece of them into every year you are given.

    Grief of the Day

    When it is their birthday, don’t feel like you have to pretend it is just another day.

    It isn’t.

    It is the birthday of someone who changed your life.

    Someone whose existence became part of your existence.

    Someone you loved.

    Someone you still love.

    So celebrate if you need to celebrate.

    Cry if you need to cry.

    Tell stories.

    Look at pictures.

    Visit somewhere meaningful.

    Pray.

    Light a candle.

    Write them a letter.

    Or simply sit quietly and remember.

    Because birthdays after loss are not only reminders that someone died.

    They are reminders that someone lived.

    Someone came into this world on this day.

    Someone became part of your story.

    Someone gave you memories that death cannot take away.

    And although you can no longer celebrate their birthday the way you once did, your love still reaches across the years.

    So when their birthday comes around again, perhaps the simplest words are still the most powerful:

    Happy Birthday.

    I remember you.

    I miss you.

    I love you.

    And I always will.

    How do you remember and honor someone you love when their birthday comes around?

  • Inspiration of the Day: Helping Others No Matter What Happens

    Advertisements

    Life will not always go the way we hoped.

    There will be days when everything seems to fall into place, but there will also be seasons when nothing makes sense. We may experience heartbreak, disappointment, grief, betrayal, financial struggles, loneliness, failure, or circumstances we never imagined we would have to face.

    Pain has a way of changing us.

    But it does not have to take away our kindness.

    One of the most powerful decisions we can make is to continue helping others no matter what happens in our own lives.

    That does not mean ignoring our struggles. It does not mean pretending everything is okay when it isn’t. And it certainly does not mean sacrificing ourselves until we have nothing left.

    It simply means refusing to allow the difficult things that happen to us to destroy the good that still exists within us.

    Sometimes the greatest strength we can show is continuing to care.

    You Never Know What Someone Else Is Carrying

    Every person you meet is living a story you cannot completely see.

    The person smiling at you may have cried before leaving home.

    The coworker who seems distracted may be dealing with a family crisis.

    The friend who suddenly became quiet may be struggling with something they do not know how to explain.

    The stranger standing beside you may be experiencing one of the hardest days of their life.

    We rarely know the full weight another person is carrying.

    That is why kindness matters.

    A simple act of compassion can reach someone at exactly the moment they need it.

    You might never know what your words meant to them.

    You might never know that your phone call made them feel less alone.

    You might never know that your encouragement gave them enough strength to keep moving forward.

    Not every meaningful act needs recognition.

    Sometimes helping someone quietly is enough.

    Pain Can Make Us Bitter or Compassionate

    When life hurts us, we eventually face a choice.

    We can allow our pain to convince us that the world is cruel and therefore kindness no longer matters.

    Or we can allow our experiences to deepen our compassion.

    Someone who has experienced loneliness understands how important it is to make another person feel included.

    Someone who has experienced heartbreak understands the importance of listening without judgment.

    Someone who has experienced grief understands that sometimes there are no perfect words.

    Someone who has struggled understands how meaningful it can be when another person simply says:

    “I’m here.”

    Your difficult experiences may give you the ability to recognize pain that other people overlook.

    What hurt you can eventually become part of what helps you understand someone else.

    You Don’t Have to Fix Someone’s Life

    Helping others does not mean having all the answers.

    We sometimes hesitate because we think we need to solve someone’s problems.

    Most of the time, we don’t.

    Sometimes helping means listening.

    Sometimes it means sitting beside someone.

    Sometimes it means sending a message saying you were thinking about them.

    Sometimes it means buying someone a meal.

    Sometimes it means giving encouragement.

    Sometimes it means praying for someone.

    Sometimes it means allowing another person to talk without immediately offering advice.

    And sometimes helping someone means simply reminding them that they matter.

    Small actions can have enormous meaning when they happen at the right moment.

    Keep Your Heart Kind Even When Life Isn’t

    One of life’s greatest challenges is remaining kind after experiencing things that could have made you cold.

    It is easy to be generous when everything is going well.

    It is harder when you are struggling yourself.

    That is when kindness becomes something deeper than a pleasant gesture.

    It becomes a reflection of character.

    You are essentially saying:

    What happened to me will not determine how I treat other people.

    Life may disappoint you.

    People may hurt you.

    Plans may fail.

    Relationships may change.

    You may experience losses you never expected.

    But you can still decide what kind of person you want to become.

    You cannot control everything that happens around you.

    You can control what you contribute to the world.

    Choose compassion.

    Choose encouragement.

    Choose generosity.

    Choose kindness.

    Helping Others Can Give Pain a Purpose

    There are some experiences we would never choose.

    If we could rewrite certain chapters of our lives, we probably would.

    Helping others does not suddenly make those experiences good.

    But sometimes something meaningful can grow from what we survived.

    Your story may become encouragement for someone who is just beginning the journey you have already walked.

    Your experience may help another person feel understood.

    Your mistakes may help someone avoid making the same ones.

    Your survival may show another person that getting through their darkest season is possible.

    You do not need a huge audience to make a difference.

    Helping one person matters.

    And that person may eventually help another.

    Kindness has a way of traveling farther than we realize.

    Help Without Expecting Something in Return

    There is another important part of helping people.

    Do it because it is right, not because you expect repayment.

    Not everyone you help will remember what you did.

    Not everyone will say thank you.

    Some people may disappear after you have been there for them.

    Others may never understand how much effort you made.

    That can hurt.

    But if your kindness depends entirely on recognition, disappointment will eventually discourage you from helping anyone.

    Instead, let your character determine your actions.

    Help because you want there to be more compassion in the world.

    Encourage because you know how much encouragement can matter.

    Show up because you remember what it felt like when someone showed up for you—or when nobody did.

    Your kindness still has value even when nobody applauds it.

    Remember to Take Care of Yourself Too

    Helping others does not require destroying yourself.

    There is an important difference between compassion and constantly ignoring your own needs.

    You are allowed to rest.

    You are allowed to establish boundaries.

    You are allowed to say no.

    You are allowed to step away from situations that are harming you.

    You can have a generous heart without allowing people to take advantage of it.

    Sometimes taking care of yourself is what allows you to continue being there for others.

    You cannot continually pour from an empty cup.

    Rest when you need to.

    Recover when you need to.

    Ask for help when you need it.

    Helping others and accepting help yourself are not opposites.

    Both are part of being human.

    Become the Person You Once Needed

    Think about one of the hardest moments of your life.

    What did you need?

    Maybe you needed someone to listen.

    Maybe you needed reassurance.

    Maybe you needed a friend who stayed when everyone else disappeared.

    Maybe you needed someone to tell you that tomorrow was worth reaching.

    Maybe you simply needed someone who understood that you were hurting.

    Now imagine becoming that person for somebody else.

    You cannot change what happened yesterday.

    But you can use what yesterday taught you to make someone else’s tomorrow a little easier.

    That is one of the most meaningful ways we can transform pain into purpose.

    Kindness Is Never Wasted

    We live in a world where negative stories often receive the most attention.

    Arguments are loud.

    Anger spreads quickly.

    Division attracts attention.

    But every day, millions of quiet acts of kindness happen without anyone noticing.

    Someone checks on a grieving friend.

    Someone feeds a person who is hungry.

    Someone encourages a stranger.

    Someone forgives.

    Someone volunteers.

    Someone helps a neighbor.

    Someone sits with a lonely person.

    Someone tells another human being, “You matter.”

    Those moments may never become headlines.

    But they matter.

    They remind us that goodness still exists.

    And each of us has an opportunity to contribute to it.

    No Matter What Happens, Keep Being You

    Life can take many things from us.

    It can change our plans.

    It can change our relationships.

    It can change our circumstances.

    It can even change how we see the future.

    But we do not have to surrender the best parts of ourselves.

    Keep caring.

    Keep encouraging.

    Keep loving.

    Keep helping.

    Keep showing compassion.

    Not because life has always treated you fairly, but because you have decided that pain will not have the final say over the person you become.

    There may come a day when someone tells you that something small you did changed their life.

    And there may be many more people who never tell you.

    That is okay.

    Keep planting seeds of kindness anyway.

    Inspiration of the Day

    No matter what happens to you, never let life’s hardest moments convince you to stop being a good person.

    You can be hurting and still encourage someone.

    You can be struggling and still show compassion.

    You can be rebuilding your own life and still offer someone a hand.

    Sometimes the people who understand pain most deeply are the ones capable of offering the greatest kindness.

    You do not have to change the entire world today.

    Help one person.

    Encourage one person.

    Listen to one person.

    Make one person feel less alone.

    Because you never know when one small act of kindness might become the reason someone believes there is still goodness in the world.

    No matter what happens in your life, what is one thing you can do today to make someone else’s day a little better?

  • Motivation of the Day: Starting Over After Being Heartbroken

    Advertisements

    Heartbreak has a way of making you question everything.

    You may question the relationship, the memories, the promises, your judgment, your future, and sometimes even your own worth.

    When you have loved someone deeply, losing that relationship can feel like losing part of yourself. The routines disappear. The messages stop. The plans you made together no longer exist. Places that once brought happiness suddenly carry memories you wish you could escape.

    And then, somehow, you are expected to start over.

    Starting over after being heartbroken is not as simple as deciding one morning that you are finished hurting.

    It is a process.

    Sometimes it is slow.

    Sometimes it is messy.

    Sometimes you will feel strong for several days and then hear a song, see a photograph, visit a familiar place, or remember one small moment that suddenly brings everything rushing back.

    That does not mean you are failing.

    It means you cared.

    But your heartbreak does not have to become the final chapter of your life.

    You can rebuild.

    You can rediscover yourself.

    You can learn to smile again without pretending.

    And one day, you may look back and realize that what felt like the ending of your life was actually the beginning of a completely different chapter.

    Heartbreak Changes More Than Your Relationship

    When a relationship ends, you are not only losing another person.

    Sometimes you are also losing the future you imagined.

    You may have pictured holidays together, vacations, growing older beside each other, building a home, creating traditions, or simply waking up next to that person for years to come.

    When the relationship disappears, those dreams disappear with it.

    That is why heartbreak can feel so overwhelming.

    You are grieving what happened, but you may also be grieving what will never happen.

    Give yourself permission to acknowledge that loss.

    You do not have to pretend the relationship meant nothing simply because it ended.

    Something can have mattered deeply and still not be meant to continue forever.

    The memories were real.

    The love may have been real.

    The happiness may have been real.

    And the ending is real too.

    Two things can exist at the same time.

    You can appreciate certain memories while accepting that the relationship is over.

    Stop Believing You Have to Be Okay Immediately

    There is no deadline for recovering from heartbreak.

    Friends may tell you to move on.

    People may say, “You deserve better.”

    Someone might tell you there are plenty of other people out there.

    Those words may come from good intentions, but when your heart is hurting, they rarely make the pain disappear.

    Healing takes time.

    Some mornings you may wake up feeling hopeful.

    Other mornings you may wake up thinking about the person before your feet even touch the floor.

    That does not mean you are moving backward.

    Healing is rarely a straight line.

    Think about physical injuries. A broken bone does not repair itself because someone tells you to hurry.

    Your heart deserves the same patience.

    You are recovering from emotional pain, disappointment, rejection, betrayal, loss, or perhaps all of them at once.

    Give yourself time.

    Starting Over Begins With Accepting What You Cannot Change

    One of the hardest parts of heartbreak is constantly replaying the past.

    What if I had said something differently?

    What if I had noticed the signs?

    What if I had tried harder?

    What if they come back?

    What if things could have worked?

    Your mind can create hundreds of different versions of the past.

    Unfortunately, none of them can change what actually happened.

    At some point, healing requires accepting reality instead of negotiating with it.

    Acceptance does not mean you approve of what happened.

    It does not mean you deserved it.

    It does not mean the other person was right.

    Acceptance simply means recognizing that you cannot rewrite yesterday.

    But you can decide what happens next.

    That decision gives you power again.

    You Are More Than Someone’s Decision to Leave

    Heartbreak can damage your confidence.

    You may wonder why you were not enough.

    You may compare yourself to someone else.

    You may look in the mirror and search for flaws.

    You may convince yourself that if you were more attractive, successful, interesting, affectionate, or confident, the relationship would have survived.

    Be careful with that thinking.

    Another person’s decision does not determine your value.

    Relationships end for countless reasons.

    Sometimes people grow apart.

    Sometimes trust is broken.

    Sometimes priorities change.

    Sometimes one person stops trying.

    Sometimes two good people simply are not good for each other.

    And sometimes someone fails to appreciate what they had until it is gone.

    Whatever happened, do not turn heartbreak into proof that you are unworthy of love.

    You still have value.

    You still have something to offer.

    You still deserve respect, loyalty, honesty, and affection.

    Rediscover Who You Were Before the Relationship

    Long relationships can quietly blend two identities together.

    You begin saying “we” instead of “I.”

    You choose restaurants together.

    You plan weekends together.

    You develop mutual friendships.

    You create shared routines.

    When the relationship ends, suddenly you may not know what to do with yourself.

    That is where rebuilding begins.

    Ask yourself some simple questions.

    What did you enjoy before the relationship?

    What hobbies did you stop doing?

    What goals did you put aside?

    What places have you always wanted to visit?

    What version of yourself have you neglected?

    Starting over gives you an opportunity to reconnect with yourself.

    Try something new.

    Return to an old hobby.

    Change your routine.

    Take yourself somewhere you have always wanted to go.

    Spend time with people who make you feel appreciated.

    Create memories that have nothing to do with the person who broke your heart.

    Little by little, your life begins to belong to you again.

    Stop Checking on Someone Who Is No Longer Choosing You

    One of the hardest habits to break after heartbreak is checking.

    Checking their social media.

    Checking whether they are online.

    Checking who liked their posts.

    Checking whether they are dating someone new.

    Checking whether they look happy without you.

    Every time you do this, you may reopen the wound.

    Social media can make healing incredibly difficult because it gives you access to a life you are trying to detach from.

    You may tell yourself you are simply curious.

    But curiosity can quickly become emotional punishment.

    Protect your peace.

    You do not need constant updates about someone who is no longer actively participating in your life.

    Sometimes healing requires distance.

    Not because you hate them.

    Because you need room to recover.

    Do Not Romanticize Only the Good Moments

    After a breakup, the mind has an interesting habit.

    It creates a highlight reel.

    You remember the laughter.

    The dates.

    The hugs.

    The inside jokes.

    The trips.

    The quiet nights together.

    And suddenly the relationship seems perfect.

    But relationships rarely end because everything was perfect.

    Remember the entire story.

    Remember the arguments.

    Remember how you felt when your needs were ignored.

    Remember the moments you questioned the relationship.

    Remember the disappointment.

    Remember the problems that were never resolved.

    You do not need to hate your former partner.

    But you also do not need to turn them into someone they were not.

    The goal is clarity.

    Not bitterness.

    Build a Life You Do Not Need Someone Else to Complete

    A relationship should add something meaningful to your life.

    It should not become your entire life.

    When starting over, focus on building a life that feels meaningful even when you are alone.

    Take care of your health.

    Strengthen friendships.

    Work toward financial goals.

    Learn something new.

    Spend time with family.

    Travel.

    Exercise.

    Read.

    Create.

    Volunteer.

    Build something.

    Find purpose.

    There is tremendous strength in realizing that your happiness is not dependent upon one person’s presence.

    When you reach that point, future relationships become healthier because you are no longer searching for someone to rescue you from loneliness.

    You are looking for someone who can walk beside the life you have already built.

    Being Alone Is Not the Same as Being Lonely

    At first, being alone may feel uncomfortable.

    You may miss having someone to call.

    You may miss receiving good morning messages.

    You may miss having someone waiting for you.

    Silence can feel incredibly loud after heartbreak.

    But eventually, solitude can become something different.

    It can become peaceful.

    Being alone gives you time to understand yourself without outside influence.

    You learn what makes you happy.

    You learn what you will tolerate and what you will never tolerate again.

    You learn what kind of relationship you actually want.

    Most importantly, you learn that being alone is better than being in a relationship that constantly hurts you.

    Do Not Rush Into Something New Just to Avoid the Pain

    There is nothing wrong with dating again.

    There is nothing wrong with finding love again.

    But make sure you are not using another person as medicine for a broken heart.

    A new relationship cannot erase unresolved pain.

    If anything, unresolved pain often follows you into the next relationship.

    Take time to heal.

    Take time to understand what happened.

    Take time to rebuild trust in yourself.

    When you eventually open your heart again, you want to be choosing someone because you genuinely want them in your life, not because you are terrified of being alone.

    Your Heart Can Love Again

    When heartbreak is fresh, you may believe you will never feel the same way about anyone again.

    You might even decide that you never want to risk loving someone again.

    That reaction makes sense.

    When something hurts badly, your natural instinct is to protect yourself from experiencing that pain again.

    But closing your heart completely also prevents you from experiencing something beautiful.

    You do not need to rush.

    You do not need to force anything.

    You do not even need to know when you will be ready.

    Just leave the possibility open.

    There may eventually be someone who shows you that love can feel safe again.

    Someone who communicates.

    Someone who stays consistent.

    Someone who chooses you without making you constantly question where you stand.

    Someone who respects the heart you worked so hard to rebuild.

    Starting Over Is Not Starting From Nothing

    Sometimes people say, “I have to start all over again.”

    But you are not starting from nothing.

    You are starting with experience.

    You know more about relationships now.

    You know more about yourself.

    You know what behaviors hurt you.

    You know what warning signs you ignored.

    You know what qualities matter most to you.

    You know what boundaries you need.

    You know how deeply you are capable of loving.

    You are beginning again with knowledge you did not have before.

    That is growth.

    One Day the Memories Will Hurt Less

    There may come a day when you think about the relationship without feeling that sharp pain in your chest.

    You may remember something good and smile instead of breaking down.

    You may drive past a familiar place and realize you did not feel anything.

    You may hear the song that once destroyed you and discover that it has become just another song.

    Healing often happens quietly.

    You may not notice it while it is happening.

    Then suddenly you realize you have gone an entire day without thinking about them.

    Then several days.

    Then weeks.

    Your heart slowly creates space for new experiences.

    Your Comeback Can Be Greater Than Your Heartbreak

    Heartbreak may have knocked you down.

    But it does not get to decide whether you stay there.

    There is still life ahead of you.

    There are people you have not met.

    Places you have not visited.

    Memories you have not created.

    Laughs you have not laughed.

    Opportunities you have not discovered.

    And possibly a love you cannot even imagine yet.

    Do not let someone who walked away convince you that your best days already happened.

    Maybe they haven’t.

    Maybe some of the most meaningful moments of your life are still waiting for you.

    Motivation of the Day

    Starting over after heartbreak requires courage.

    Not the dramatic kind of courage people notice.

    The quiet kind.

    The courage to get out of bed when you would rather hide.

    The courage to delete the message you keep rereading.

    The courage to stop checking their page.

    The courage to go somewhere alone.

    The courage to laugh again without feeling guilty.

    The courage to believe that your life can still become something beautiful.

    Every small step matters.

    You do not need to rebuild your entire life today.

    Just move forward a little.

    Tomorrow, move a little further.

    One day you will look behind you and realize how far you have traveled.

    The person who once felt impossible to live without will become part of your history instead of the center of your future.

    Your heart may have been broken.

    But you are still here.

    You are still growing.

    You are still capable of loving.

    And you are still capable of creating a life that feels worth waking up for.

    Sometimes starting over is frightening because you cannot see where the new road leads.

    But remember this:

    You already know where the old road ended.

    Maybe it is time to discover where the new one can take you.

    You did not lose your chance at happiness when your heart was broken. You simply reached the place where a new chapter has to begin.

    What is one part of your life you are ready to start rebuilding today?

  • Dessert of the Day: Chocolate and Cheesecake Twister

    Advertisements

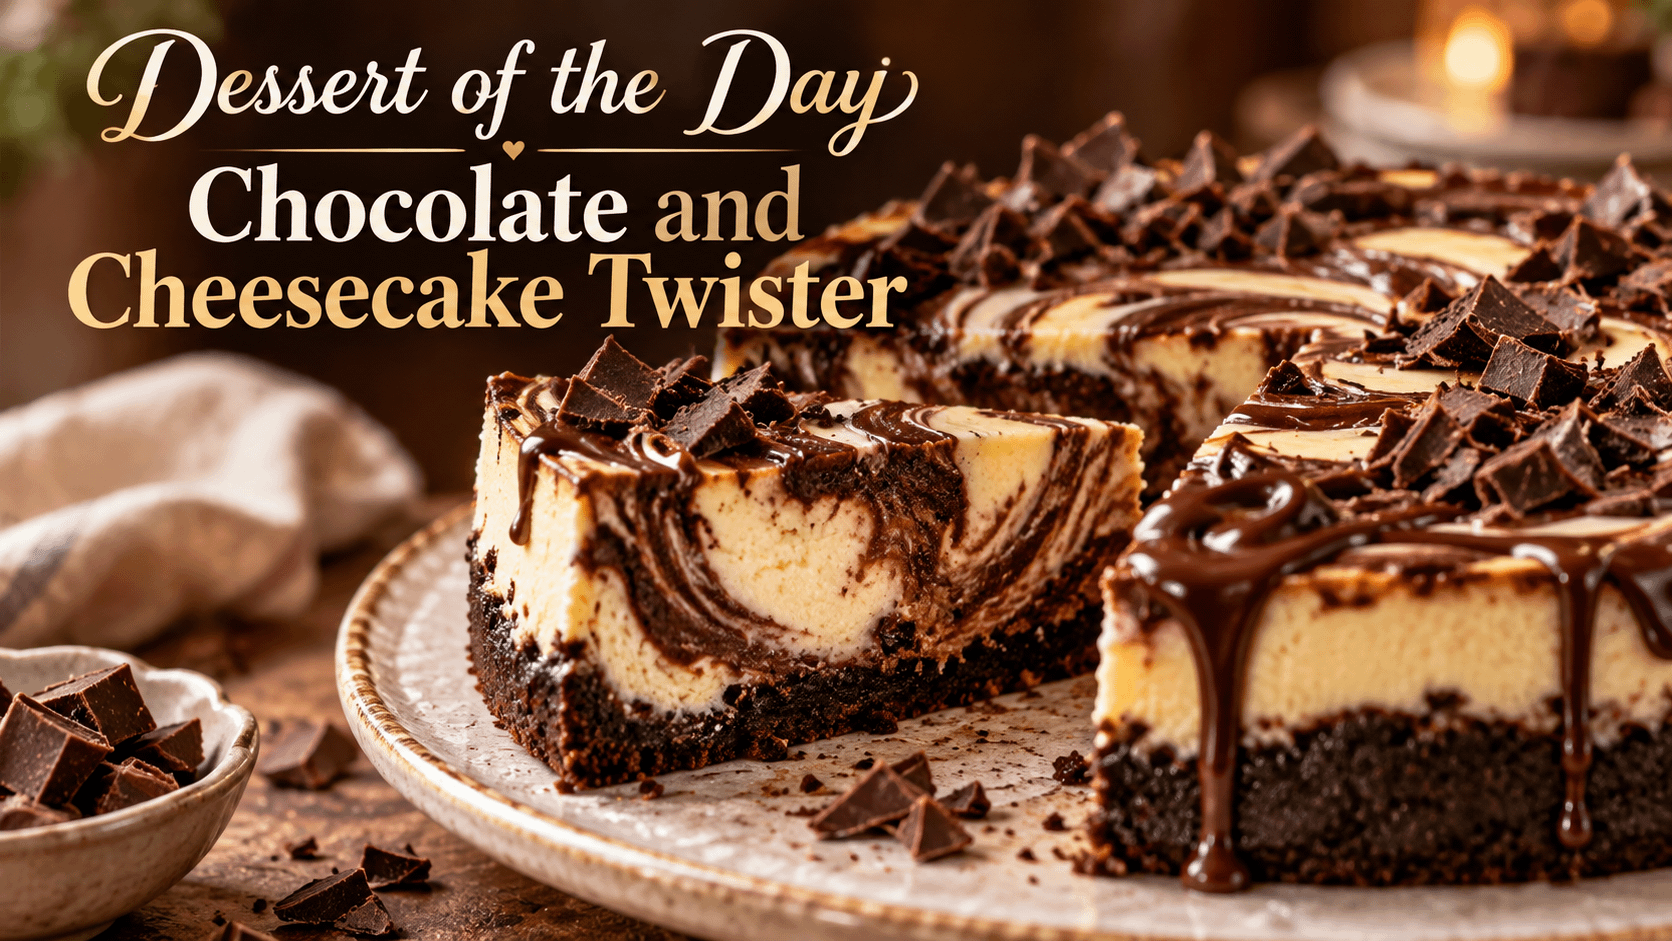
    There are desserts that satisfy a sweet craving, and then there are desserts that make you stop after the first bite and wonder why chocolate and cheesecake are not combined more often.

    Today’s Dessert of the Day — Chocolate and Cheesecake Twister brings together two dessert favorites in one rich, creamy, chocolate-filled creation. Imagine layers of smooth cheesecake filling twisted together with deep chocolate flavor, a chocolate cookie crust underneath, and a beautiful swirl running through every slice.

    It is decadent without being overly complicated, impressive enough for a celebration, and comforting enough to make simply because you deserve something sweet.

    The name “Twister” comes from the dramatic swirls of chocolate and cheesecake throughout the dessert. No two slices look exactly alike, making each serving a little different while delivering the same combination of creamy cheesecake and rich chocolate.

    Whether you are serving this at a birthday party, family gathering, holiday dinner, potluck, or simply enjoying a quiet dessert at home, Chocolate and Cheesecake Twister is the kind of recipe chocolate lovers will remember.

    Why Chocolate and Cheesecake Work So Well Together

    Chocolate and cheesecake are individually wonderful, but combining them creates something even better.

    Cheesecake provides a creamy, slightly tangy base that balances the sweetness of chocolate. Chocolate contributes richness, depth, and that unmistakable flavor people crave when they want a truly indulgent dessert.

    Instead of one flavor overpowering the other, they complement each other.

    The cheesecake layer is smooth and velvety.

    The chocolate is bold and luxurious.

    The cookie crust adds texture.

    And the swirling effect creates little pockets where one flavor may be stronger before blending back into the other.

    Every forkful becomes slightly different.

    Chocolate and Cheesecake Twister Recipe

    Ingredients

    For the Chocolate Cookie Crust

    • 2 cups chocolate sandwich cookie crumbs
    • 5 tablespoons unsalted butter, melted
    • 1 tablespoon granulated sugar

    For the Cheesecake Filling

    • 24 ounces cream cheese, softened
    • 1 cup granulated sugar
    • 3 large eggs
    • 1 cup sour cream
    • 2 teaspoons vanilla extract
    • 2 tablespoons all-purpose flour
    • 1/4 teaspoon salt

    For the Chocolate Swirl

    • 1 cup semisweet chocolate chips
    • 1/2 cup heavy whipping cream
    • 1 tablespoon unsalted butter

    Optional Toppings

    • Chocolate sauce
    • Whipped cream
    • Chocolate curls
    • Mini chocolate chips
    • Crushed chocolate cookies
    • Fresh strawberries
    • Chocolate-covered strawberries
    • Caramel drizzle

    Step 1: Prepare the Pan

    Preheat your oven to 325°F.

    Lightly grease a 9-inch springform pan.

    For additional protection against leaks, wrap the outside bottom of the pan with a couple layers of aluminum foil, especially if you plan to bake the cheesecake using a water bath.

    Set the prepared pan aside.

    Step 2: Make the Chocolate Cookie Crust

    Place the chocolate cookie crumbs in a medium mixing bowl.

    Add the melted butter and sugar.

    Mix until the crumbs resemble wet sand and hold together when pressed.

    Pour the mixture into the bottom of the springform pan.

    Use the bottom of a drinking glass or measuring cup to firmly press the crust into an even layer.

    Bake for approximately 8 to 10 minutes.

    Remove the crust from the oven and allow it to cool slightly while you prepare the filling.

    Step 3: Prepare the Cheesecake Filling

    Place the softened cream cheese into a large mixing bowl.

    Using an electric mixer, beat the cream cheese until smooth and creamy.

    Add the sugar and continue mixing until everything is incorporated.

    Add the eggs one at a time, mixing gently after each addition.

    Avoid overmixing once the eggs have been added. Too much air can cause the cheesecake to rise dramatically during baking and then crack as it cools.

    Add the sour cream, vanilla extract, flour, and salt.

    Mix on low speed until the batter becomes smooth and creamy.

    Set aside.

    Step 4: Make the Chocolate Ganache Swirl

    Place the chocolate chips in a heat-safe bowl.

    Heat the heavy cream in a small saucepan until it is hot but not boiling.

    Pour the hot cream over the chocolate chips.

    Allow the mixture to sit for approximately two minutes.

    Add the butter.

    Stir slowly until the chocolate becomes completely melted, smooth, and glossy.

    Let the ganache cool for several minutes.

    Step 5: Create the Twister Effect

    Pour approximately half of the cheesecake batter over the prepared chocolate crust.

    Spoon several portions of chocolate ganache over the cheesecake mixture.

    Pour the remaining cheesecake batter over the top.

    Add additional spoonfuls of ganache across the surface.

    Now comes the fun part.

    Take a butter knife, skewer, or toothpick and gently drag it through the chocolate and cheesecake mixture.

    Create sweeping curves, circles, or figure-eight patterns.

    The goal is to create beautiful chocolate ribbons throughout the cheesecake without completely mixing the two batters together.

    Do not over-swirl.

    You want visible streaks of chocolate and cheesecake.

    This twisting pattern is what gives the Chocolate and Cheesecake Twister its signature appearance.

    Step 6: Bake the Cheesecake

    Place the cheesecake in the oven and bake for approximately 55 to 70 minutes.

    The edges should look set while the center should still have a slight wobble.

    Turn the oven off.

    Crack the oven door open slightly and allow the cheesecake to remain inside for approximately 30 minutes.

    This gradual cooling process helps prevent cracking.

    Remove the cheesecake from the oven.

    Allow it to cool completely at room temperature.

    Then refrigerate for at least 6 hours, although overnight refrigeration produces the best texture.

    Cheesecake needs time to fully set.

    Trying to slice it too early can result in a softer filling that does not hold its shape properly.

    Decorating Your Chocolate and Cheesecake Twister

    Once the cheesecake has completely chilled, remove it from the springform pan.

    You could serve it exactly as it is because the chocolate swirl already creates an impressive appearance.

    However, toppings can take this dessert to another level.

    Drizzle warm chocolate sauce across the top.

    Add small swirls of whipped cream around the edge.

    Sprinkle chocolate curls over the center.

    You could also crush several chocolate sandwich cookies and scatter the crumbs around the top.

    For something especially impressive, place chocolate-covered strawberries around the outside of the cheesecake.

    The combination of strawberries, chocolate, and cheesecake is difficult to resist.

    Creating the Perfect Cheesecake Texture

    One of the biggest secrets to great cheesecake is starting with room-temperature ingredients.

    Cold cream cheese does not blend as smoothly and can leave small lumps throughout the batter.

    Take the cream cheese, eggs, and sour cream out of the refrigerator ahead of time.

    Room-temperature ingredients blend together much more easily.

    You should also avoid aggressively beating the batter after adding your eggs.

    Cheesecake does not need lots of air whipped into it.

    Slow, gentle mixing helps create the dense and creamy texture associated with bakery-quality cheesecake.

    The Water Bath Option

    Professional bakers often bake cheesecake in a water bath.

    A water bath provides gentle heat and moisture inside the oven.

    To use one, wrap the bottom of your springform pan securely with aluminum foil.

    Place the cheesecake inside a larger roasting pan.

    Pour hot water into the roasting pan until it reaches approximately halfway up the sides of the springform pan.

    Carefully place everything inside the oven.

    The steam created by the water keeps the cheesecake moist and helps regulate the baking temperature.

    A water bath is optional, but it can produce an exceptionally smooth cheesecake.

    Chocolate Choices

    Semisweet chocolate works especially well because it provides strong chocolate flavor without making the cheesecake overwhelmingly sweet.

    However, there are several alternatives.

    Milk chocolate creates a sweeter and softer chocolate flavor.

    Dark chocolate adds deeper cocoa flavor and makes the dessert taste slightly more sophisticated.

    White chocolate can also be incorporated into part of the batter for a triple-chocolate variation.

    You could even combine multiple chocolates.

    Imagine dark chocolate swirls on one side and milk chocolate swirls on the other.

    Suddenly your Chocolate and Cheesecake Twister becomes a completely different dessert.

    Add a Brownie Layer

    If you want to make this dessert even richer, add a thin brownie layer above the cookie crust.

    Prepare approximately half a batch of brownie batter.

    Spread it over the crust and partially bake it before adding the cheesecake mixture.

    The final dessert will contain chocolate cookie crust, brownie, cheesecake, and chocolate ganache.

    It becomes almost impossible to classify.

    Is it cheesecake?

    Brownie?

    Chocolate cake?

    The correct answer may simply be delicious.

    Chocolate Peanut Butter Twister

    Chocolate and peanut butter lovers can easily transform this recipe.

    Warm approximately half a cup of creamy peanut butter until slightly softened.

    Alternate spoonfuls of peanut butter and chocolate ganache throughout the cheesecake batter.

    Swirl everything together.

    The result becomes a Chocolate Peanut Butter Cheesecake Twister filled with ribbons of chocolate, peanut butter, and creamy cheesecake.

    Salted Caramel Chocolate Twister

    Another delicious variation uses caramel.

    Drizzle caramel sauce between the cheesecake layers along with the chocolate.

    After baking and chilling, finish the cheesecake with additional chocolate sauce, caramel sauce, and a light sprinkle of flaky sea salt.

    Salt intensifies both chocolate and caramel flavors.

    That small finishing touch creates a dessert that tastes incredibly luxurious.

    Cookies and Cream Version

    Chocolate sandwich cookies already appear in the crust, so why not bring them into the cheesecake?

    Roughly chop several cookies and fold them into part of the cheesecake batter.

    Then add the chocolate swirl normally.

    Top the finished cheesecake with whipped cream and additional cookie pieces.

    You now have a Cookies and Cream Chocolate Cheesecake Twister.

    Strawberry Chocolate Cheesecake Twister

    Fresh strawberries are another excellent addition.

    Create a quick strawberry sauce using strawberries, sugar, and a little lemon juice.

    Allow the mixture to cool.

    Add alternating spoonfuls of strawberry sauce and chocolate ganache across the cheesecake batter.

    Swirl everything together.

    The finished cheesecake will contain ribbons of white cheesecake, chocolate, and bright red strawberry.

    It looks beautiful when sliced.

    How to Slice Cheesecake Cleanly

    For bakery-style slices, use a long sharp knife.

    Dip the knife into hot water.

    Dry it with a clean towel.

    Make one slice.

    Clean the knife again before making the next slice.

    Repeating this process creates smooth, clean edges instead of dragging cheesecake filling across each piece.

    It takes slightly longer, but the presentation is worth it.

    Serving Suggestions

    Chocolate and Cheesecake Twister is rich, so smaller slices usually work best.

    Serve it slightly chilled rather than frozen cold.

    Allowing the cheesecake to sit at room temperature for approximately 10 to 15 minutes before serving can help the flavors become more noticeable.

    Pair each slice with:

    • Fresh strawberries
    • Raspberries
    • Hot coffee
    • Cold milk
    • Espresso
    • Vanilla ice cream
    • Chocolate ice cream
    • Fresh whipped cream

    A little fruit can provide a refreshing contrast to the richness of the chocolate cheesecake.

    How to Store Chocolate and Cheesecake Twister

    Keep leftover cheesecake covered in the refrigerator.

    It should stay fresh for approximately 4 to 5 days.

    For longer storage, cheesecake freezes surprisingly well.

    Slice the cheesecake first.

    Wrap individual slices tightly in plastic wrap.

    Place them inside a freezer-safe container or bag.

    Freeze for up to approximately two months.

    When you want dessert, transfer a slice to the refrigerator and allow it to thaw overnight.

    Having individual slices available can be dangerously convenient.

    Make It Ahead for Parties

    One reason cheesecake works so well for entertaining is that it actually benefits from being made ahead.

    Prepare the cheesecake the day before your gathering.

    Allow it to chill overnight.

    Then decorate it shortly before your guests arrive.

    You eliminate the stress of baking dessert at the last minute while still serving something that looks impressive.

    For holidays, birthdays, family dinners, potlucks, anniversaries, or special celebrations, this recipe can easily become the centerpiece of the dessert table.

    Why This Dessert Deserves a Spot on Your Table

    Chocolate and Cheesecake Twister checks nearly every box a great dessert should.

    It looks impressive.

    It tastes indulgent.

    It can be prepared ahead of time.

    It can be customized.

    And most importantly, it combines two beloved desserts into one.

    Chocolate lovers get the rich cocoa flavor they want.

    Cheesecake lovers get smooth, creamy filling.

    Cookie lovers get the crunchy chocolate crust.

    And anyone who enjoys beautifully presented desserts gets the dramatic swirl running throughout every piece.

    Dessert of the Day Final Thoughts

    Some desserts are designed to be simple.

    Others are designed to be unforgettable.

    Chocolate and Cheesecake Twister falls comfortably into the second category.

    The chocolate cookie crust provides the foundation. The creamy cheesecake creates the rich center. Chocolate ganache twists throughout the filling, producing ribbons of chocolate in every slice.

    Then you can customize it with whipped cream, berries, chocolate curls, caramel, peanut butter, cookies, or anything else your sweet tooth suggests.

    It works for holidays.

    It works for birthdays.

    It works for dinner parties.

    And sometimes it works perfectly on an ordinary evening when you simply want an extraordinary dessert.

    Because every once in a while, choosing between chocolate and cheesecake should not be necessary.

    Why choose one when you can twist them together?

    Would you top your Chocolate and Cheesecake Twister with extra chocolate, strawberries, caramel, or whipped cream?

  • Healthy Recipe of the Day: Chicken and Bacon Pizza

    Advertisements

    Pizza is one of those foods that can instantly make dinner feel a little more exciting. The combination of a warm crust, melted cheese, savory toppings, and fresh herbs is hard to resist. But traditional pizza can also become heavy quickly, especially when it is loaded with processed meats, extra cheese, and rich sauces.

    That doesn’t mean pizza needs to disappear when you’re trying to eat healthier.

    Today’s Healthy Recipe of the Day is Chicken and Bacon Pizza, a lighter homemade pizza that combines lean chicken, crispy bacon, vegetables, mozzarella, and a flavorful tomato sauce on a whole-wheat crust.

    The result is a pizza that still tastes comforting and satisfying while offering more protein, vegetables, and nutritional balance than many traditional versions.

    Why Chicken and Bacon Work So Well Together

    Chicken and bacon are a classic combination because they bring two very different flavors to the pizza.

    Chicken provides a mild, hearty source of protein that takes on the flavors of whatever seasonings and sauce you use. Bacon adds a salty, smoky flavor, meaning you don’t need very much of it to make an impact.

    The secret to making this combination healthier is changing the proportions.

    Instead of covering the pizza in bacon, we’re using chicken as the primary protein and bacon as a flavorful accent. A few pieces of crispy bacon scattered across the pizza provide plenty of smoky flavor without overwhelming everything else.

    Add vegetables, tomato sauce, and a moderate amount of cheese, and you have a pizza that feels indulgent without needing to be excessively heavy.

    Healthy Chicken and Bacon Pizza

    Prep Time: 15 minutes
    Cook Time: 12–16 minutes
    Total Time: About 30 minutes
    Servings: 4

    Ingredients

    For the Pizza

    • 1 whole-wheat pizza crust or whole-wheat pizza dough
    • 1 cup cooked chicken breast, chopped or shredded
    • 3 slices bacon, cooked until crisp and crumbled
    • 3/4 cup part-skim shredded mozzarella cheese
    • 1/2 cup pizza sauce or low-sodium tomato sauce
    • 1/2 cup sliced bell peppers
    • 1/3 cup sliced red onion
    • 1/2 cup sliced mushrooms
    • 1 cup fresh baby spinach
    • 1 teaspoon Italian seasoning
    • 1/2 teaspoon garlic powder
    • 1/4 teaspoon crushed red pepper flakes, optional
    • Fresh basil or parsley for garnish

    Optional Toppings

    You can customize the pizza with additional vegetables such as:

    • Cherry tomatoes
    • Broccoli
    • Zucchini
    • Jalapeños
    • Artichoke hearts
    • Arugula
    • Roasted red peppers
    • Fresh garlic

    The more vegetables you add, the easier it becomes to create a filling pizza without relying on large amounts of cheese or meat.

    How to Make Chicken and Bacon Pizza

    Step 1: Preheat the Oven

    Preheat your oven to 425°F.

    If you’re using refrigerated or homemade pizza dough, prepare it according to the package or recipe instructions.

    For an especially crispy crust, place your pizza pan, baking sheet, or pizza stone in the oven while it preheats.

    Step 2: Prepare the Chicken

    If you don’t already have cooked chicken available, season a boneless, skinless chicken breast lightly with garlic powder, black pepper, paprika, and Italian seasoning.

    Cook it thoroughly, allow it to rest for several minutes, and then slice or chop it into bite-sized pieces.

    Leftover grilled or roasted chicken works perfectly for this recipe and can significantly reduce preparation time.

    Step 3: Cook the Bacon

    Cook the bacon until crisp.

    Transfer it to a paper towel-lined plate and allow excess grease to drain before crumbling it into smaller pieces.

    You only need a few slices because bacon has such a concentrated smoky flavor.

    Step 4: Prepare the Vegetables

    Slice the bell pepper, red onion, and mushrooms thinly.

    Smaller pieces cook more evenly and distribute the vegetables throughout the pizza, so every slice gets a mixture of toppings.

    Step 5: Build Your Pizza

    Place your pizza crust on a baking sheet, pizza pan, or piece of parchment paper.

    Spread the tomato sauce evenly across the crust, leaving a small border around the outside.

    Sprinkle approximately half of the mozzarella over the sauce.

    Next, evenly distribute the chicken, bacon, peppers, onions, mushrooms, and spinach.

    Finish with the remaining mozzarella.

    Sprinkle Italian seasoning and garlic powder over the top.

    If you enjoy a little heat, add crushed red pepper flakes.

    Step 6: Bake

    Bake for approximately 12–16 minutes, depending on the thickness of your crust.

    The pizza is ready when the crust is golden and crisp around the edges and the cheese has melted and begun to brown slightly.

    Step 7: Let It Rest

    This part is easy to overlook.

    Allow the pizza to rest for approximately 3–5 minutes before slicing.

    Resting helps the cheese and toppings settle, making the pizza easier to cut and eat.

    Finish with fresh basil or parsley before serving.

    What Makes This Pizza a Healthier Choice?

    Calling something “healthy” doesn’t mean it needs to contain unusual ingredients or sacrifice flavor.

    Often, healthier cooking is simply about creating better balance.

    This pizza does that in several ways.

    Lean Chicken Provides Protein

    Chicken breast is the primary protein in this pizza.

    Protein can help make meals more satisfying, which is especially useful when you’re trying to create a meal that doesn’t leave you searching for another snack an hour later.

    Instead of making bacon the star of the pizza, we’re allowing chicken to provide most of the protein.

    Bacon Is Used for Flavor

    Bacon doesn’t have to be completely eliminated from a balanced diet.

    The important thing is portion size.

    Three slices spread across an entire pizza can provide smoky bacon flavor in nearly every bite without turning the pizza into a bacon-heavy meal.

    Think of bacon almost like a seasoning.

    A little goes a long way.

    Whole-Wheat Crust Adds Fiber

    Using a whole-wheat crust is an easy substitution that can increase the fiber content compared with many refined-flour crusts.

    If you prefer traditional pizza dough, that’s perfectly fine too. You can still make the overall meal more balanced by paying attention to the toppings and portion size.

    Vegetables Add Volume

    One of the easiest ways to make homemade pizza more nutritious is to pile on vegetables.

    Bell peppers, mushrooms, onions, and spinach add flavor, texture, color, and nutrients without requiring large amounts of additional cheese or meat.

    You can also change the vegetables based on whatever you already have in the refrigerator.

    Part-Skim Mozzarella Keeps the Classic Pizza Experience

    Cheese is part of what makes pizza pizza.

    There’s no need to remove it completely.

    Using part-skim mozzarella and keeping the quantity moderate gives you the familiar melted-cheese experience while helping keep the overall pizza lighter.

    Try a Thin-Crust Version

    If you prefer a crispier pizza, use a thin whole-wheat crust.

    Thin crust lets the chicken, bacon, vegetables, sauce, and cheese become the focus of each bite rather than having the toppings overwhelmed by a thick layer of dough.

    You can also use whole-wheat flatbread for an extremely quick version.

    Spread the sauce across the flatbread, add the toppings, sprinkle with cheese, and bake until everything is hot and the edges are crispy.

    This can turn Chicken and Bacon Pizza into a dinner that takes less than 20 minutes.

    Make Individual Pizzas

    Another fun option is making individual pizzas.

    Use small whole-wheat flatbreads or pita breads and allow everyone to choose their own toppings.

    Set out bowls containing:

    Chicken, bacon, mushrooms, peppers, onions, spinach, tomatoes, mozzarella, and other vegetables.

    Everyone can build their own pizza before putting them into the oven.

    This is especially useful when different people in the household have different preferences.

    Add Even More Vegetables

    Don’t be afraid to turn this into a vegetable-packed pizza.

    Try combining chicken and bacon with:

    Spinach and mushrooms: A simple combination with plenty of earthy flavor.

    Peppers and onions: Adds sweetness and texture.

    Broccoli and tomatoes: A colorful combination that works surprisingly well with chicken.

    Jalapeños and peppers: Great for anyone who enjoys spicy pizza.

    Arugula: Add fresh arugula after the pizza comes out of the oven for a peppery finish.

    You can easily put two or three cups of vegetables across a large pizza.

    BBQ Chicken and Bacon Variation

    Want something different from traditional tomato sauce?

    Turn this into a healthier BBQ Chicken and Bacon Pizza.

    Replace the pizza sauce with a thin layer of your favorite barbecue sauce. Look for one with less added sugar if that’s important to you.

    Top it with:

    • Chicken
    • Crumbled bacon
    • Red onion
    • Bell peppers
    • Mozzarella
    • Fresh cilantro

    The combination of smoky bacon, chicken, barbecue sauce, and red onion creates an entirely different pizza using essentially the same basic recipe.

    Spicy Chicken and Bacon Pizza

    For anyone who loves heat, add:

    • Sliced jalapeños
    • Crushed red pepper
    • Cayenne pepper
    • Hot sauce
    • Banana peppers

    You can also season the chicken with smoked paprika and cayenne before adding it to the pizza.

    The heat works especially well against the smoky bacon and melted mozzarella.

    Ranch Chicken and Bacon Pizza

    Chicken, bacon, and ranch are another classic combination.

    Instead of covering the pizza in ranch dressing, keep the tomato base and drizzle a small amount of light ranch over the finished pizza.

    This gives you the familiar ranch flavor while keeping the amount controlled.

    Fresh green onions make an excellent finishing touch.

    What to Serve With Chicken and Bacon Pizza

    Pizza can easily become a complete meal on its own, but adding a vegetable-heavy side can make dinner even more balanced.

    Try serving your pizza with a large green salad containing lettuce, spinach, cucumbers, tomatoes, carrots, and a light vinaigrette.

    You could also serve it alongside:

    Roasted broccoli, steamed green beans, grilled zucchini, roasted Brussels sprouts, cucumber salad, tomato salad, or a simple bowl of fresh fruit.

    Rather than thinking of pizza as the entire meal, think of it as one part of the plate.

    Great for Meal Prep

    Chicken and Bacon Pizza can also work well for meal preparation.

    Cook the chicken and bacon ahead of time and store them separately in the refrigerator.

    Slice your vegetables in advance.

    When you’re ready for dinner, all you need to do is assemble and bake the pizza.

    This can make homemade pizza almost as convenient as ordering takeout.

    Leftover pizza can also be refrigerated in an airtight container and reheated for lunch the next day.

    For the best texture, reheat it in an oven, toaster oven, or skillet rather than the microwave. This helps bring back some of the crispness in the crust.

    Portion Size Matters

    Even when you make a healthier pizza, portions still matter.

    Instead of automatically eating until the pizza is gone, start with a couple of slices alongside a large salad or vegetables.

    Eat slowly and give yourself time to determine whether you’re actually still hungry.

    A meal doesn’t need to be perfect to support healthier eating habits. What matters more is what you do consistently over time.

    Healthy Eating Doesn’t Mean Giving Up Your Favorite Foods

    One reason people struggle with healthier eating is the belief that they must permanently give up everything they enjoy.

    Pizza.

    Burgers.

    Tacos.

    Pasta.

    Dessert.

    That approach can make healthier eating feel like punishment.

    A more sustainable approach is learning how to modify your favorite foods.

    Instead of asking:

    “Can I eat pizza?”

    Try asking:

    “How can I make my pizza more balanced?”

    That small change in thinking opens up a lot of possibilities.

    Choose leaner proteins.

    Add more vegetables.

    Use cheese intentionally instead of excessively.

    Experiment with whole-grain crusts.

    Pay attention to portions.

    Pair pizza with vegetables or salad.

    Suddenly, pizza isn’t something that has to be reserved for a “cheat day.” It can simply be dinner.

    Final Thoughts

    Today’s Healthy Recipe of the Day: Chicken and Bacon Pizza proves that comfort food and healthier eating don’t have to be opposites.

    You still get everything people love about pizza—a crispy crust, savory sauce, melted mozzarella, juicy chicken, smoky bacon, and plenty of flavorful toppings.

    The difference comes from balance.

    Chicken provides the primary protein. Bacon provides concentrated smoky flavor. Vegetables add volume, texture, and nutrients. Whole-wheat crust adds another opportunity for fiber, while a reasonable amount of mozzarella keeps the pizza satisfying.

    Best of all, the recipe is extremely customizable.

    Make it spicy. Turn it into BBQ pizza. Add extra vegetables. Use flatbread. Make individual pizzas. Change the toppings according to whatever you already have available.

    Healthy eating doesn’t have to mean eating meals you don’t enjoy.

    Sometimes it simply means taking something you already love and finding a better way to make it.

    What vegetables would you add to your Chicken and Bacon Pizza?

  • Recipe of the Day: Cowboy Lasagna

    Advertisements

    There are nights when a light dinner simply isn’t going to cut it. You want something hearty, cheesy, meaty, comforting, and filling enough to satisfy everyone around the table. That is exactly where Cowboy Lasagna comes riding in.

    Cowboy Lasagna takes everything people love about traditional lasagna and gives it a bold, rustic twist. Instead of relying only on the familiar combination of pasta, tomato sauce, ricotta, and mozzarella, this version loads the dish with seasoned ground beef, smoky sausage, beans, tomatoes, plenty of cheese, and a touch of Southwestern flavor.

    The result is somewhere between classic lasagna, cowboy chili, and a bubbling Tex-Mex casserole.

    It is big.

    It is cheesy.

    It is packed with flavor.

    And it is exactly the kind of meal you want when you need serious comfort food.

    What Is Cowboy Lasagna?

    There isn’t one strict definition of Cowboy Lasagna. The name is commonly used for hearty lasagna-style casseroles that combine traditional pasta layers with ingredients associated with Southwestern or cowboy cooking.

    For this version, we’re using ground beef and smoked sausage as the foundation. Kidney or pinto beans make the filling even heartier, while tomatoes, onions, garlic, chili powder, cumin, and smoked paprika bring in those warm Southwestern flavors.

    Then everything is layered between lasagna noodles with ricotta, cheddar, and mozzarella.

    When it comes out of the oven, you get a bubbling casserole with crispy cheese around the edges, tender noodles underneath, and layers of rich meat sauce throughout.

    Cowboy Lasagna Recipe

    Prep Time: 25 minutes
    Cook Time: 45 minutes
    Resting Time: 10–15 minutes
    Total Time: About 1 hour 25 minutes
    Servings: 8–10

    Ingredients

    For the cowboy meat sauce:

    • 1 pound ground beef
    • 12 ounces smoked sausage, sliced into thin rounds
    • 1 medium yellow onion, diced
    • 3 cloves garlic, minced
    • 1 can (15 ounces) kidney or pinto beans, drained and rinsed
    • 1 can (14.5 ounces) diced tomatoes, undrained
    • 1 can (10 ounces) diced tomatoes with green chiles
    • 1 can (15 ounces) tomato sauce
    • 2 tablespoons tomato paste
    • 1 tablespoon chili powder
    • 1 teaspoon ground cumin
    • 1 teaspoon smoked paprika
    • 1 teaspoon dried oregano
    • ½ teaspoon garlic powder
    • ½ teaspoon onion powder
    • ½ teaspoon salt, or to taste
    • ¼ teaspoon black pepper
    • ¼ teaspoon cayenne pepper, optional

    For the cheese filling:

    • 15 ounces ricotta cheese
    • 1 large egg
    • ½ cup grated Parmesan cheese
    • 1 teaspoon dried parsley
    • ½ teaspoon garlic powder

    For assembling:

    • 9–12 lasagna noodles
    • 2 cups shredded mozzarella cheese
    • 2 cups shredded cheddar cheese
    • Chopped green onions or fresh parsley for garnish, optional

    Step 1: Prepare the Lasagna Noodles

    Bring a large pot of salted water to a boil.

    Add the lasagna noodles and cook according to the package directions until they are just tender. You don’t want to overcook them because they will continue cooking while the lasagna bakes.

    Drain the noodles and carefully lay them flat so they don’t stick together.

    If you’re using oven-ready lasagna noodles, you can skip this step. Just make sure there is plenty of sauce surrounding the noodles so they have enough moisture to soften properly in the oven.

    Step 2: Brown the Beef and Sausage

    Place a large skillet or Dutch oven over medium-high heat.

    Add the ground beef and cook until browned, breaking it into small crumbles as it cooks.

    Once the beef is nearly cooked through, add the sliced smoked sausage.

    Continue cooking for several minutes until the sausage begins to brown around the edges.

    That little bit of browning makes a big difference. It deepens the smoky flavor of the sausage and gives the finished lasagna more character.

    Drain excessive grease from the pan if necessary.

    Step 3: Add the Onion and Garlic

    Add the diced onion to the skillet.

    Cook for approximately 4–5 minutes, stirring occasionally, until the onion begins to soften.

    Add the minced garlic and cook for another 30–60 seconds.

    Don’t let the garlic burn. You’re simply looking for it to become fragrant.

    At this point, your kitchen should already smell incredible.

    Step 4: Build the Cowboy Sauce

    Add the diced tomatoes, tomatoes with green chiles, tomato sauce, tomato paste, and beans.

    Stir everything together.

    Now add the chili powder, cumin, smoked paprika, oregano, garlic powder, onion powder, salt, black pepper, and optional cayenne.

    Bring the mixture to a gentle simmer.

    Reduce the heat and allow the sauce to cook for approximately 10–15 minutes, stirring occasionally.

    The sauce should thicken slightly but remain loose enough to spread easily between the lasagna layers.

    Taste before assembling the lasagna.

    Want more heat? Add additional cayenne or chili powder.

    Want more smokiness? Add another pinch of smoked paprika.

    Prefer it mild? Leave the cayenne out completely.

    Step 5: Prepare the Ricotta Mixture

    In a medium bowl, combine:

    Ricotta cheese, egg, Parmesan cheese, dried parsley, and garlic powder.

    Mix until everything is evenly incorporated.

    The ricotta layer adds a creamy contrast to the spicy, smoky cowboy meat sauce.

    Step 6: Assemble the Cowboy Lasagna

    Preheat your oven to 375°F.

    Lightly grease a 9-by-13-inch baking dish.

    Spread a thin layer of cowboy meat sauce across the bottom of the baking dish.

    Place a layer of lasagna noodles over the sauce.

    Spread approximately one-third of the ricotta mixture over the noodles.

    Spoon a generous layer of cowboy meat sauce over the ricotta.

    Sprinkle mozzarella and cheddar over the sauce.

    Then repeat.

    Noodles → ricotta → cowboy meat sauce → cheese.

    Continue layering until your ingredients are used, finishing with meat sauce and a generous amount of mozzarella and cheddar across the top.

    Don’t be shy with that final cheese layer.

    This is Cowboy Lasagna.

    It is supposed to be hearty.

    Step 7: Bake

    Cover the baking dish loosely with aluminum foil.

    Bake for approximately 25 minutes.

    Remove the foil and continue baking for another 15–20 minutes, or until the sauce is bubbling and the cheese is completely melted.

    For a slightly browned top, place the lasagna under the broiler for 1–2 minutes at the very end.

    Watch it carefully because cheese can go from golden brown to burned surprisingly quickly.

    Don’t Skip the Resting Time

    When that bubbling pan of Cowboy Lasagna comes out of the oven, you’re going to want to cut into it immediately.

    Try to resist.

    Let the lasagna rest for 10–15 minutes before slicing.

    Resting allows the cheese and sauce to settle so your pieces hold together better.

    Cut it too early and you’ll probably end up with delicious Cowboy Lasagna sliding all over your plate.

    Still delicious—but considerably messier.

    Why Smoked Sausage Makes This Lasagna Different

    Ground beef gives the dish its hearty base, but smoked sausage is what really pushes the recipe into cowboy territory.

    The sausage adds saltiness, smokiness, and another layer of meaty flavor.

    You can use traditional smoked sausage, beef sausage, kielbasa, or even a spicy smoked sausage.

    For an extra Southwestern flavor, try using a smoked jalapeño or cheddar sausage.

    Just remember that some sausages are already fairly salty, so taste your sauce before adding additional salt.

    What Beans Should You Use?

    Beans are optional if you’re committed to a more traditional lasagna texture, but they work extremely well in Cowboy Lasagna.

    Pinto beans provide a softer, creamier texture and classic Southwestern character.

    Kidney beans hold their shape particularly well and give the casserole a chili-inspired feel.

    Black beans are another excellent option.

    You could even use a combination.

    The beans stretch the meal farther, add texture, and make an already substantial casserole even more satisfying.

    Turn Up the Heat

    The basic recipe has plenty of flavor without being overwhelmingly spicy.

    But Cowboy Lasagna is easy to customize.

    For additional heat, try adding:

    • Fresh diced jalapeños
    • Pickled jalapeños
    • Hot diced green chiles
    • Crushed red pepper
    • Cayenne pepper
    • Chipotle peppers in adobo
    • Pepper Jack cheese

    Chipotle peppers are especially good because they add both heat and smokiness.

    Start small. A little chipotle goes a long way.

    Add Some Corn

    Want another Southwestern element?

    Add approximately 1 cup of corn to the meat sauce.

    Fresh, frozen, or drained canned corn will work.

    Corn adds little bursts of sweetness that balance the richness of the beef, sausage, tomatoes, and cheese.

    Fire-roasted corn is even better if you can find it.

    Make It Extra Cheesy

    Two cheeses are already working overtime in this recipe: mozzarella provides the classic melted-cheese stretch while cheddar gives Cowboy Lasagna its sharper flavor.

    But nobody says you have to stop there.

    Try combining:

    Mozzarella + cheddar + Monterey Jack

    or

    Mozzarella + cheddar + Pepper Jack

    A Mexican-style shredded cheese blend also works perfectly.

    For an especially cheesy version, sprinkle additional cheese between every layer.

    What to Serve With Cowboy Lasagna

    Cowboy Lasagna is substantial enough to be dinner all by itself, but a few simple sides can turn it into a complete meal.

    Try serving it with:

    • Garlic bread
    • Texas toast
    • Cornbread
    • Green salad
    • Roasted vegetables
    • Grilled corn
    • Coleslaw
    • Avocado slices
    • Pico de gallo

    Cornbread is particularly good because its slight sweetness complements the smoky, savory flavors of the lasagna.

    For toppings, place bowls of sour cream, sliced jalapeños, green onions, diced avocado, salsa, and chopped cilantro on the table and let everyone customize their own serving.

    Make-Ahead Cowboy Lasagna

    This is an excellent recipe for preparing ahead of time.

    Assemble the entire lasagna but don’t bake it.

    Cover tightly and refrigerate for up to 24 hours.

    When you’re ready for dinner, remove it from the refrigerator while the oven preheats.

    Because the casserole will be cold, you may need to add approximately 10–15 minutes to the covered baking time.

    That makes Cowboy Lasagna especially useful for busy days when you know you won’t have time to prepare dinner from scratch.

    Leftovers May Be Even Better

    Like chili, spaghetti sauce, and traditional lasagna, Cowboy Lasagna can taste even better the next day.

    After spending the night in the refrigerator, the flavors have more time to mingle.

    Store leftovers in an airtight container in the refrigerator and reheat individual servings in the microwave or oven.

    For oven reheating, cover the lasagna so it doesn’t dry out.

    If it seems a little dry, spoon a tablespoon or two of tomato sauce around the serving before reheating.

    Freezing Cowboy Lasagna

    Cowboy Lasagna is also freezer-friendly.

    You can freeze the entire casserole or divide leftovers into individual portions.

    Individual portions are particularly convenient because you can pull out exactly what you need for lunch or dinner without defrosting an entire pan.

    Wrap portions tightly and place them inside freezer-safe containers.

    For the best quality, enjoy frozen Cowboy Lasagna within about 2–3 months.

    Easy Cowboy Lasagna Variations

    Once you’ve made the basic recipe, there are plenty of ways to change it.

    Bacon Cowboy Lasagna: Add cooked, crumbled bacon to the meat mixture.

    BBQ Cowboy Lasagna: Stir a small amount of barbecue sauce into the tomato sauce for a sweet, smoky variation.

    Spicy Cowboy Lasagna: Add jalapeños, Pepper Jack, cayenne, and hot green chiles.

    Three-Meat Cowboy Lasagna: Combine ground beef, smoked sausage, and bacon.

    Loaded Cowboy Lasagna: Add corn, black beans, jalapeños, bell peppers, and extra cheddar.

    Extra-Smoky Cowboy Lasagna: Use smoked cheddar and a little chipotle pepper in the sauce.

    The recipe is forgiving, so don’t be afraid to experiment with what you already have in your refrigerator or pantry.

    The Secret to Great Cowboy Lasagna

    The biggest mistake you can make is thinking more ingredients automatically mean more flavor.

    What really makes this casserole work is balance.

    The beef provides richness.

    The sausage provides smoke.

    The tomatoes provide acidity.

    The beans provide heartiness.

    The spices provide warmth.

    The ricotta provides creaminess.

    And the cheddar and mozzarella bring everything together.

    Each layer should contribute something without completely overpowering the others.

    Also, don’t make your sauce too dry. Lasagna noodles absorb moisture while baking, so a slightly saucy filling produces a much better finished casserole.

    A Hearty Dinner Made for Sharing

    There is something satisfying about carrying a giant bubbling casserole to the dinner table.

    Cowboy Lasagna isn’t fancy food.

    It isn’t delicate.

    And it definitely isn’t one of those dinners that leaves you wondering what you’re going to eat an hour later.

    This is unapologetic comfort food.

    It takes the familiar idea of homemade lasagna and gives it a smoky, hearty Southwestern personality with ground beef, sausage, beans, tomatoes, spices, and plenty of melted cheese.

    Make it for Sunday dinner.

    Bring it to a potluck.

    Serve it while watching the game.

    Prepare it for a family gathering.

    Or make a pan simply because you’ve had a long day and want something warm, cheesy, and satisfying waiting for you at dinner.

    However you serve it, don’t be surprised when someone goes back for seconds.

    And possibly thirds.

    Would you keep your Cowboy Lasagna classic with beef and sausage, or load it up with bacon, jalapeños, corn, and extra cheese?

  • Breakfast of the Day: Country Fried Steak and Eggs

    Advertisements

    Some breakfasts are light and simple. Others are meant to stick with you, warm you from the inside out, and make the morning feel like something special. Country Fried Steak and Eggs definitely belongs in that second category.

    Crispy, golden-brown country fried steak covered in creamy peppered country gravy, served alongside freshly cooked eggs and your favorite breakfast sides—it is the kind of hearty meal that has been filling breakfast plates for generations.

    Whether you are making a big weekend breakfast, feeding a hungry family, or simply craving some old-fashioned comfort food, Country Fried Steak and Eggs delivers everything you could want from a satisfying morning meal.

    Why Country Fried Steak Makes Such a Great Breakfast

    Country fried steak brings together several things that make comfort food irresistible: crispy breading, tender beef, creamy gravy, and plenty of savory flavor.

    Add eggs to the plate, and you have a classic diner-style breakfast that feels like something you would order at a roadside café or country restaurant.

    The contrast is part of what makes this meal so good. The outside of the steak becomes crunchy and seasoned while the inside stays tender. Then the gravy adds richness and moisture.

    A couple of eggs provide another layer of flavor, especially when they’re cooked sunny-side up or over easy and the yolks mix with the gravy.

    Serve everything with hash browns, breakfast potatoes, biscuits, or toast, and you have a breakfast worth slowing down for.

    Country Fried Steak and Eggs Recipe

    Servings: 4
    Prep Time: 20 minutes
    Cook Time: 30 minutes
    Total Time: About 50 minutes

    Ingredients

    For the country fried steak:

    • 4 cube steaks
    • 1 1/2 cups all-purpose flour
    • 1 teaspoon salt
    • 1 teaspoon black pepper
    • 1 teaspoon garlic powder
    • 1 teaspoon onion powder
    • 1/2 teaspoon smoked paprika
    • 2 large eggs
    • 3/4 cup milk
    • Vegetable oil for frying

    For the country gravy:

    • 1/4 cup reserved frying oil or butter
    • 1/4 cup all-purpose flour
    • 2 1/2 cups whole milk
    • 1/2 teaspoon salt, or to taste
    • 1 teaspoon freshly ground black pepper, or to taste
    • Pinch of garlic powder, optional

    For the eggs:

    • 8 large eggs
    • Butter or cooking oil
    • Salt and black pepper to taste

    Optional Sides

    Complete your breakfast with:

    • Hash browns
    • Country potatoes
    • Biscuits
    • Buttered toast
    • Fresh fruit
    • Sliced tomatoes
    • Bacon or sausage

    How to Make Country Fried Steak and Eggs

    Step 1: Prepare the Steaks

    Remove the cube steaks from the refrigerator and pat them dry with paper towels.

    If the steaks are particularly thick, gently pound them until they’re roughly 1/4-inch thick. This helps them cook quickly and remain tender.

    Season both sides lightly with salt and pepper.

    Step 2: Make the Breading

    In a shallow bowl, combine the flour, salt, black pepper, garlic powder, onion powder, and smoked paprika.

    In another shallow bowl, whisk together the eggs and milk.

    Take each steak and coat it thoroughly in the seasoned flour. Shake off the excess.

    Dip the steak into the egg mixture, allowing the excess to drip away.

    Return it to the flour mixture and coat it again.

    That second coating is important. It creates the thick, craggy breading that gives country fried steak its signature crunchy exterior.

    Place the breaded steaks on a plate and allow them to rest for approximately 5 minutes before frying. This gives the coating time to adhere to the meat.

    Step 3: Fry Until Golden Brown

    Pour enough vegetable oil into a large skillet to generously cover the bottom.

    Heat the oil over medium to medium-high heat.

    Once the oil is hot, carefully add the steaks without overcrowding the skillet. Depending on the size of your pan, you may need to cook them in batches.

    Fry each steak for approximately 3–4 minutes per side, or until the coating is deep golden brown and the beef is cooked through.

    Transfer the steaks to a wire rack or paper towel-lined plate while you prepare the gravy.

    Step 4: Make the Country Gravy

    Country gravy transforms a good fried steak into something unforgettable.

    Carefully drain most of the frying oil from your skillet, leaving approximately 1/4 cup behind along with some of the flavorful browned bits.

    You can also use butter if you prefer.

    Sprinkle 1/4 cup flour into the skillet and whisk continuously for about 1–2 minutes. The flour should combine with the fat to create a smooth roux.

    Slowly pour in the milk while whisking constantly.

    Continue cooking over medium heat until the gravy begins to thicken.

    Season generously with black pepper and add salt to taste. A small amount of garlic powder can also be added for additional flavor.

    If the gravy becomes too thick, whisk in a splash of milk.

    If it seems too thin, continue simmering for another minute or two.

    The finished gravy should be thick enough to coat the steak while still being easy to pour.

    Step 5: Cook the Eggs

    While the gravy finishes, prepare your eggs however you like them.

    Country Fried Steak and Eggs works especially well with sunny-side-up or over-easy eggs because the runny yolk creates another rich sauce for the steak.

    However, there are no rules here.

    Scrambled eggs are excellent if you want something soft and fluffy. Over-medium eggs provide a slightly firmer yolk, while over-hard eggs work well for anyone who doesn’t enjoy runny eggs.

    Heat a skillet with a little butter and cook two eggs per serving.

    Season lightly with salt and black pepper.

    Step 6: Build the Breakfast Plate

    Place one crispy country fried steak onto each plate.

    Spoon warm peppered country gravy generously over the top.

    Add two freshly cooked eggs alongside the steak.

    Finish the plate with hash browns, country potatoes, biscuits, toast, or whatever breakfast sides you enjoy most.

    Serve immediately while everything is hot.

    The Secret to Crispy Country Fried Steak

    The difference between average country fried steak and great country fried steak often comes down to the breading.

    One trick is using the double-dredge method.

    Flour.

    Egg mixture.

    Flour again.

    The second layer of flour creates more texture on the outside of the steak.

    Another important step is allowing the breaded steak to rest briefly before frying. If you move it directly from the flour mixture into the skillet, some of the breading can separate from the meat.

    Give it about five minutes to settle before frying.

    Finally, make sure your oil is properly heated before adding the steak. Oil that isn’t hot enough can make the coating greasy rather than crispy.

    Don’t Forget the Black Pepper

    Country gravy isn’t supposed to be bland.

    Freshly ground black pepper is one of the defining flavors of traditional white country gravy. You should be able to see those little flecks of pepper throughout the sauce.

    Start with about a teaspoon and adjust according to your preference.

    If you love a strongly seasoned gravy, add a little more.

    Best Eggs for Country Fried Steak

    There really isn’t a wrong answer, but over-easy eggs are hard to beat.

    Cut into the yolk and allow it to run across the crispy steak, gravy, and potatoes.

    Suddenly you’ve got creamy gravy and egg yolk mixing together into one incredibly rich sauce.

    If runny yolks aren’t your thing, scrambled eggs make an excellent alternative. Cook them gently with butter so they remain soft rather than becoming dry.

    Turn It Into a Complete Country Breakfast

    Country Fried Steak and Eggs can easily become the centerpiece of a huge weekend breakfast.

    Imagine a plate filled with:

    Golden country fried steak covered in pepper gravy, two eggs cooked over easy, crispy hash browns, and a warm biscuit with butter.

    Add a cup of hot coffee and you’ve got a breakfast that wouldn’t feel out of place at an old-fashioned country diner.

    For something slightly fresher, add sliced tomatoes, berries, melon, or another serving of fruit alongside the heavier components.

    Make Homemade Biscuits to Go With It

    If you’re making country gravy anyway, biscuits are a natural addition.

    Split a warm biscuit in half and spoon some of the extra gravy over it.

    Now you’ve essentially added biscuits and gravy to your Country Fried Steak and Eggs breakfast.

    Is it a light breakfast?

    Absolutely not.

    But sometimes breakfast isn’t supposed to be light.

    Sometimes you want the kind of meal that makes you sit back afterward and realize you’re probably not going to need lunch anytime soon.

    Country Fried Steak vs. Chicken Fried Steak

    The names are often used interchangeably, and exactly what each term means can depend on where you live.

    Generally, both involve tenderized beef that is breaded and fried similarly to fried chicken.

    Chicken fried steak is frequently associated with a crispier coating and creamy white gravy, while some versions of country fried steak use a slightly different breading or brown gravy.

    But regional traditions vary considerably.

    For today’s breakfast, we’re going with the crispy breaded steak and creamy peppered gravy combination because it pairs beautifully with eggs.

    Tips for the Best Country Fried Steak and Eggs

    A few simple techniques can make a noticeable difference.

    Season every layer. Don’t rely entirely on the gravy for flavor. Season the beef, flour mixture, eggs, and gravy appropriately.

    Don’t overcrowd the skillet. Adding too many steaks at once lowers the oil temperature and can prevent the coating from becoming crispy.

    Keep cooked steaks warm. If you’re frying several batches, place finished steaks on a wire rack over a baking sheet in a low oven.

    Make the gravy last. Country gravy thickens as it sits, so prepare it close to serving time.

    Serve immediately. Country fried steak is at its best when the coating is still crispy and the gravy is hot.

    Leftovers and Reheating

    If you have leftover country fried steak, store it separately from the gravy whenever possible.

    Keeping them separate prevents the breading from becoming completely soggy.

    Refrigerate leftovers in airtight containers and use them within a few days.

    For reheating, an oven or air fryer is generally better than a microwave if you want to restore some of the steak’s crispiness.

    Warm the gravy separately over low heat. Since refrigerated gravy will usually become very thick, add a small splash of milk while reheating and whisk until smooth.

    Cook fresh eggs when you’re ready to serve the leftovers.

    A Breakfast Made for Slow Mornings

    There is something comforting about a breakfast that takes a little time to prepare.

    Country Fried Steak and Eggs isn’t the meal you throw together while running out the door.

    It’s a breakfast for a Saturday or Sunday morning when you have time to heat the skillet, fry the steak, whisk together homemade gravy, cook some eggs, and actually sit down at the table.

    The smell alone will probably bring people into the kitchen before you ever call them.

    And once that plate arrives—with crispy steak disappearing beneath creamy pepper gravy and eggs sitting alongside it—you know you’re about to eat something substantial.

    Breakfast of the Day

    Today’s Breakfast of the Day: Country Fried Steak and Eggs celebrates old-fashioned comfort food at its best.

    You get crispy breading, tender beef, creamy peppered gravy, buttery eggs, and endless possibilities for sides.

    Make it simple with steak, gravy, and eggs, or go all out with hash browns, biscuits, fresh fruit, and coffee.

    Either way, this isn’t a breakfast you’re likely to forget five minutes after eating it.

    It’s hearty.

    It’s comforting.

    And it’s exactly the kind of breakfast that makes getting out of bed a little easier.

    How would you order your Country Fried Steak and Eggs—over easy, scrambled, sunny-side up, or another way?

  • Dear Diary Day: Putting Your Thoughts, Memories, and Heart Into Words

    Advertisements

    Every year on September 22, Dear Diary Day celebrates something beautifully simple: sitting down with our thoughts and putting them into words.

    For generations, people have turned to diaries and journals to record the moments of their lives. Some pages contain exciting memories and dreams for the future. Others hold heartbreak, grief, anger, confusion, prayers, secrets, accomplishments, and thoughts that may never be spoken aloud.

    A diary does not judge.

    It does not interrupt.

    It does not tell you that you should feel differently.

    It simply gives you a place to be completely honest.

    Dear Diary Day is an opportunity to rediscover the value of writing about our lives. Whether you keep a traditional diary, write in a journal, type notes on your phone, record prayers, or simply write a letter to your future self, today is a reminder that your thoughts and experiences are worth preserving.

    What Is Dear Diary Day?

    Dear Diary Day is observed annually on September 22 and encourages people to begin, continue, or rediscover the practice of keeping a diary or journal.

    Many of us probably remember the classic opening:

    “Dear Diary…”

    Those two words can open the door to almost anything.

    You might write about what happened during your day.

    You might describe someone you met.

    You might record something funny that happened.

    You might write about a dream you hope to accomplish someday.

    Or you might finally put words to something you have been carrying silently for years.

    There are no real rules.

    That freedom is part of what makes journaling so powerful.

    A Private Place for Your Thoughts

    Life can become noisy.

    We constantly receive information from phones, social media, television, work, family, friends, responsibilities, and everything happening around us.

    Sometimes we become so busy reacting to life that we rarely stop to understand what we are actually feeling.

    Writing can create that pause.

    When you sit quietly with a blank page, you give yourself permission to slow down.

    You may begin with something simple:

    “Today was difficult.”

    But then another sentence follows.

    And another.

    Before long, you may discover that you are writing about something much deeper than the events of your day.

    Sometimes we don’t fully understand our emotions until we try to put them into words.

    Diaries Preserve the Ordinary Moments

    When people think about recording their lives, they often believe they should only write about major events.

    Birthdays.

    Weddings.

    Graduations.

    Vacations.

    New jobs.

    Relationships.

    Losses.

    Major accomplishments.

    Those moments certainly deserve to be remembered, but some of the most meaningful memories are surprisingly ordinary.

    The conversation you had with someone you love.

    The meal your family ate together.

    The song playing during a long drive.

    Something funny your child said.

    A quiet morning drinking coffee.

    A beautiful sunset you stopped to admire.

    At the time, these moments may seem insignificant.

    Years later, they can become priceless.

    Memory changes as time passes. Details disappear. Voices become harder to remember. Dates blur together.

    Writing preserves pieces of life that might otherwise be forgotten.

    Writing Through Difficult Times

    A diary isn’t only a place for happy memories.

    Sometimes the pages become a place where we put the things that hurt.

    Heartbreak.

    Disappointment.

    Fear.

    Loneliness.

    Betrayal.

    Grief.

    Regret.

    Anger.

    Uncertainty.

    There are experiences that are difficult to explain to another person. You may not know what to say, or you may worry that someone won’t understand.

    A journal gives you somewhere to begin.

    You don’t have to make your feelings sound reasonable.

    You don’t have to organize them perfectly.

    You don’t have to pretend you’re having a good day when you’re not.

    You can simply write.

    Sometimes the page becomes the place where we finally admit:

    “I’m hurting.”

    That sentence alone can be meaningful.

    Journaling Through Grief

    Writing can hold a particularly meaningful place in grief.

    After losing someone you love, there are often countless things you still wish you could say.

    You may want to tell them about your day.

    You may want to tell them how much you miss them.

    You may remember something the two of you did together.

    You may feel angry that they are gone.

    You may wish you could have one more conversation.

    A journal can become a place for those conversations.

    You might write:

    “I thought about you today.”

    Then continue.

    Tell them what happened.

    Tell them what you remembered.

    Tell them what you wish you could say if they were sitting beside you.

    Writing cannot replace the person you lost, but it can give your love, memories, and grief somewhere to go.

    And years later, those pages can show just how much love remained even after loss changed everything.

    Write About the Good Days Too

    When people begin journaling during difficult periods, there can be a tendency to write only when something is wrong.

    But the good days deserve pages too.

    Write about the day you laughed harder than you had in months.

    Write about the unexpected kindness someone showed you.

    Write about the first time you felt hopeful again.

    Write about a beautiful place you visited.

    Write about something you accomplished.

    Write about the person who made you smile.

    Write about the moment you realized life might still have something good waiting for you.

    Those entries can become reminders during difficult times.

    They show that even when life has contained pain, it has also contained moments worth remembering.

    Write About the Person You Are Becoming

    A diary isn’t simply a record of what happened.

    It can also document who you are becoming.

    Our beliefs change.

    Our priorities change.

    Our relationships change.

    Our dreams change.

    And sometimes we change in ways we don’t notice until we look backward.

    Imagine reading something you wrote five years ago.

    You might barely recognize the person who wrote it.

    Things that once terrified you may no longer control you.

    Problems that seemed impossible may have been solved.

    People you thought would always be part of your life may have disappeared.

    Dreams you once thought were impossible may have become reality.

    Other dreams may have changed completely.

    A diary allows you to see that transformation.

    Write Letters You Never Send

    One powerful form of journaling is writing letters that are never meant to be sent.

    Write to someone you miss.

    Write to someone who hurt you.

    Write to someone you need to forgive.

    Write to someone you wish you could speak with again.

    Write to your younger self.

    Write to your future self.

    Write to someone who changed your life.

    Say everything.

    You don’t have to send the letter.

    Sometimes the purpose isn’t communication.

    Sometimes the purpose is simply allowing yourself to say what has been sitting inside you.

    Keep a Prayer Journal

    For people of faith, a diary can also become a prayer journal.

    Instead of simply thinking about what you’re worried about, write your prayers.

    Write about what you’re asking God to help you understand.

    Write about what you’re thankful for.

    Write about the people you’re praying for.

    Write about your fears.

    Write about the places where you need strength.

    Then occasionally return to older entries.

    You may discover prayers that were answered differently than you expected.

    You may notice how your faith changed during difficult seasons.

    You may recognize moments when you received strength you didn’t realize you had at the time.

    A prayer journal can become a personal record of your spiritual journey.

    What Should You Write About?

    One of the biggest obstacles to journaling is staring at the blank page and thinking:

    “I don’t know what to write.”

    Start small.

    You could write about:

    • What happened today and how it made you feel.
    • Three things you’re grateful for right now.
    • Someone you’ve been thinking about lately.
    • A memory you never want to forget.
    • Something you’re struggling to understand.
    • A goal you want to accomplish.
    • Something you wish you could tell someone.
    • A lesson life has taught you.
    • A prayer that’s been on your heart.
    • Where you hope your life will be one year from today.

    You don’t have to write pages.

    Some days you might write three paragraphs.

    Other days you might write three sentences.

    Sometimes one sentence is enough.

    You Don’t Have to Be a Writer

    A diary isn’t a writing competition.

    Grammar doesn’t matter.

    Spelling doesn’t matter.

    Sentence structure doesn’t matter.

    Nobody is grading you.

    You don’t have to sound intelligent, inspirational, poetic, or profound.

    You only have to be truthful.

    Write exactly how you feel.

    If you’re angry, write angry words.

    If you’re confused, write confusing thoughts.

    If you’re happy, capture the happiness.

    If you’re grieving, write about the person you miss.

    If you’re hopeful, describe what you’re hoping for.

    The most meaningful journal entries aren’t necessarily beautifully written.

    They’re honest.

    Your Future Self May Thank You

    Imagine opening your diary ten years from now.

    You begin reading about the life you’re living today.

    Suddenly you remember things you had completely forgotten.

    You remember where you lived.

    What you worried about.

    Who you spent time with.

    What you dreamed about.

    What made you laugh.

    What broke your heart.

    What you prayed for.

    And what you thought your future would look like.

    That is one of the beautiful things about keeping a diary.

    You’re writing to yourself today, but you’re also leaving something behind for the person you will become.

    How to Celebrate Dear Diary Day

    Celebrating doesn’t require anything complicated.

    Find a notebook or journal and write your first entry.

    If you already have a diary, return to it today.

    Read an old entry.

    Write a letter to your future self.

    Record a favorite memory.

    Start a gratitude journal.

    Begin a prayer journal.

    Write about someone you love.

    Document something happening in your life right now that you don’t want to forget.

    You could even begin with the traditional words:

    Dear Diary…

    Then see where your thoughts take you.

    One Page at a Time

    We spend so much of our lives moving forward that we rarely stop to record where we’ve been.

    But someday, today’s ordinary moments will become yesterday’s memories.

    The people around you will change.

    Your circumstances will change.

    You will change.

    And those pages can become reminders of who you were, what you survived, what you loved, what you lost, what you learned, and what you dreamed about along the way.

    Your diary doesn’t need to contain a perfect life.

    It only needs to contain an honest one.

    So on Dear Diary Day, find a quiet place, open a blank page, and begin writing.

    You never know which ordinary thought you record today might become a treasured memory years from now.

    If you could write one completely honest sentence in your diary tonight, what would it say?

  • National Ice Cream Cone Day — Celebrating the Crispy Treat That Made Ice Cream Even Better

    Advertisements

    There are few treats that capture the feeling of happiness quite like an ice cream cone.

    The first bite begins with cold, creamy ice cream. Maybe it is classic vanilla, rich chocolate, strawberry, cookies and cream, butter pecan, rocky road, mint chocolate chip, or something completely adventurous. Then comes the crunch of the cone underneath.

    It is a simple combination, but somehow it works perfectly.

    National Ice Cream Cone Day, celebrated each year on September 22, gives us an excuse to appreciate the edible container that transformed the way generations of people have enjoyed ice cream.

    Whether you prefer a traditional wafer cone, crunchy sugar cone, oversized waffle cone, chocolate-dipped cone, or a cone covered with sprinkles and toppings, today is a great day to order your favorite scoop and enjoy every bite.

    The Simple Genius of the Ice Cream Cone

    Before the ice cream cone became popular, ice cream was commonly served in dishes, bowls, cups, and sometimes reusable glass containers.

    Then someone had a brilliant idea:

    Why not put the ice cream inside something you could eat?

    That simple concept changed the dessert forever.

    The cone made ice cream portable. You didn’t necessarily need a spoon or bowl. You could grab your dessert and walk around while eating it.

    Better yet, when the ice cream disappeared, there wasn’t an empty dish left behind.

    You simply ate the container.

    More than a century later, that basic idea remains one of the most recognizable ways to enjoy ice cream.

    The History of the Ice Cream Cone

    The history of the ice cream cone is more complicated than one single inventor suddenly creating it.

    Edible wafers and cone-shaped pastries existed before the modern ice cream cone became popular, and several people have been associated with early versions of serving ice cream in edible containers.

    However, one of the most famous moments in ice cream cone history occurred at the 1904 Louisiana Purchase Exposition, better known as the St. Louis World’s Fair.

    According to popular accounts, ice cream vendors and waffle or pastry sellers at the fair helped popularize serving ice cream inside rolled edible wafers.

    Different stories credit different vendors, which is why historians continue to debate exactly who deserves the title of inventor.

    What is much clearer is what happened afterward.

    The idea caught on.

    Ice cream cones became increasingly popular, manufacturers developed machines capable of producing cones efficiently, and the cone eventually became a standard part of American ice cream culture.

    Why Ice Cream and Cones Belong Together

    Ice cream is delicious by itself.

    A cone adds something completely different: texture.

    Ice cream is cold, smooth, creamy, and soft.

    The cone is dry, crisp, crunchy, and slightly sweet.

    Every bite combines those contrasting textures.

    Then there is the final bite.

    Anyone who loves ice cream cones knows exactly what that means.

    After most of the ice cream has been eaten, some melted ice cream usually works its way toward the bottom of the cone.

    The last few bites become a mixture of crunchy cone and melted ice cream.

    For some people, that is the best part.

    The Different Types of Ice Cream Cones

    Not every ice cream cone is the same.

    Cake or Wafer Cone

    This is the classic lightweight cone commonly found at ice cream shops.

    It has a mild flavor and crispy texture that doesn’t overpower the ice cream.

    Because the flavor is relatively neutral, wafer cones work with practically every variety of ice cream.

    Sugar Cone

    Sugar cones are generally sweeter and crunchier.

    They also tend to be sturdier, making them a good option when you want multiple scoops or heavier ice cream.

    The slightly caramelized flavor adds another layer of sweetness to the dessert.

    Waffle Cone

    For many ice cream lovers, the waffle cone is the ultimate choice.

    Waffle cones are larger, thicker, and usually sweeter than traditional cones.

    Freshly made waffle cones can also fill an ice cream shop with an incredible aroma.

    Their wider opening leaves plenty of room for large scoops and toppings.

    Chocolate-Dipped Cone

    Why stop with an ordinary cone?

    Dip part of a waffle or sugar cone in melted chocolate and suddenly the cone becomes a dessert of its own.

    The chocolate can also be covered with sprinkles, chopped nuts, cookie crumbs, candy pieces, or other toppings.

    The Great Ice Cream Debate: Cone or Cup?

    Ice cream lovers have been debating this question for generations.

    Are you Team Cone or Team Cup?

    A cup certainly has advantages.

    It is easier to manage melting ice cream, especially on a hot afternoon. Cups also make it easier to pile on toppings and sauces.

    But the cone offers something a cup never can.

    You can eat it.

    That makes the cone part of the entire experience instead of simply being the container.

    There is also something nostalgic about holding an ice cream cone on a warm day and trying to finish it before the melting ice cream reaches your hand.

    Sometimes the mess is part of the fun.

    Build the Ultimate Ice Cream Cone

    National Ice Cream Cone Day is the perfect opportunity to create a cone that goes beyond one scoop of vanilla.

    Start by choosing your cone.

    Try a waffle cone, sugar cone, chocolate-dipped cone, or traditional wafer cone.

    Then choose your ice cream.

    Some classic possibilities include:

    • Vanilla
    • Chocolate
    • Strawberry
    • Cookies and cream
    • Mint chocolate chip
    • Butter pecan
    • Rocky road
    • Cookie dough
    • Coffee
    • Chocolate peanut butter
    • Salted caramel
    • Birthday cake

    Next comes the fun part: toppings.

    Try sprinkles, crushed cookies, chopped nuts, chocolate chips, caramel sauce, hot fudge, shredded coconut, mini marshmallows, candy pieces, brownie crumbs, fruit, or whipped cream.

    You could even combine several flavors and toppings to create your own signature cone.

    Try an Ice Cream Cone Bar

    If you are celebrating with family or friends, create an ice cream cone bar.

    Set out several flavors of ice cream along with different cones and toppings.

    Everyone can build their own dessert.

    It works especially well for birthday parties, family gatherings, summer cookouts, neighborhood events, or casual get-togethers.

    Children can keep things simple with chocolate ice cream and sprinkles while adults experiment with combinations like coffee ice cream, caramel sauce, chocolate pieces, and chopped nuts.

    There are practically unlimited possibilities.

    Make Homemade Waffle Cones

    For an even bigger National Ice Cream Cone Day challenge, try making waffle cones at home.

    Homemade cones typically use a simple batter containing ingredients such as flour, sugar, eggs, butter, vanilla, and milk.

    The batter is cooked thin and then shaped while it is still warm.

    Once it cools, it becomes crisp.

    Timing matters because the cooked waffle becomes increasingly difficult to shape as it cools.

    The reward is worth the effort.

    A warm, freshly made waffle cone filled with your favorite ice cream is difficult to beat.

    Turn the Cone Into the Dessert

    Ice cream cones don’t have to be ordinary.

    Try coating the inside with melted chocolate before adding the ice cream.

    Once the chocolate hardens, it creates a delicious shell and can also help prevent melted ice cream from soaking through the cone as quickly.

    You can also dip the rim in chocolate and immediately roll it through toppings.

    Try:

    Chocolate and peanuts.

    White chocolate and colorful sprinkles.

    Chocolate and crushed sandwich cookies.

    Caramel and chopped pecans.

    White chocolate and toasted coconut.

    Suddenly the cone itself becomes almost as exciting as the ice cream.

    Ice Cream Cones Bring Back Memories

    Part of the appeal of ice cream cones has nothing to do with ingredients.

    It is about memories.

    Maybe you remember hearing the music of an ice cream truck coming down the street when you were a child.

    Maybe your family stopped for ice cream during summer vacations.

    Maybe you remember standing at an ice cream counter staring at dozens of flavors while trying to make the extremely serious childhood decision of which one to choose.

    Ice cream has a way of becoming connected to moments.

    Family vacations.

    First dates.

    Birthday parties.

    Baseball games.

    Boardwalks.

    Carnivals.

    Road trips.

    Warm evenings.

    Celebrations.

    Sometimes the simplest foods carry the strongest memories.

    Support Your Local Ice Cream Shop

    National Ice Cream Cone Day is also a great opportunity to visit a local ice cream shop.

    Independent ice cream parlors often create unique flavors that you won’t find in grocery stores.

    Some make their ice cream in-house. Others make fresh waffle cones throughout the day.

    You might discover a flavor you would never normally try.

    Instead of automatically ordering your usual favorite, ask what their most popular or unusual flavor is.

    Then order it in a cone.

    You might find a new favorite.

    Have an Ice Cream Cone Taste Test

    Can’t decide which cone is best?

    Turn the celebration into a taste test.

    Try the same flavor of ice cream in several different cones.

    Compare a wafer cone, sugar cone, and waffle cone.

    Which has the best crunch?

    Which has the best flavor?

    Which works best with the ice cream?

    Then reverse the experiment.

    Choose one cone and test several different ice cream flavors.

    It is not exactly serious scientific research, but it might be the tastiest experiment you conduct all year.

    Fun Ways to Celebrate National Ice Cream Cone Day

    There are plenty of ways to make September 22 a little sweeter.

    Visit your favorite ice cream shop and order a cone instead of a cup.

    Try an ice cream flavor you’ve never tasted before.

    Make homemade waffle cones.

    Create an ice cream cone bar for your family.

    Dip waffle cones in chocolate and decorate them.

    Take your children or grandchildren out for ice cream.

    Buy someone else an ice cream cone.

    Try recreating your favorite childhood ice cream combination.

    Or keep everything simple.

    Get one scoop of your favorite flavor, find somewhere comfortable to sit, and enjoy it.

    Not every celebration needs to be complicated.

    A Little Happiness in a Cone

    There are bigger and more important things happening in life than deciding between chocolate and vanilla.

    Maybe that is exactly why small celebrations like National Ice Cream Cone Day can be enjoyable.

    Life can become busy.

    Responsibilities pile up. Stress takes over. We rush from one obligation to another and sometimes forget that small moments of enjoyment matter too.

    An ice cream cone won’t solve life’s problems.

    But for a few minutes, it can remind you to slow down and enjoy something simple.

    Sometimes happiness doesn’t need to be complicated.

    Sometimes it is two scoops of your favorite ice cream sitting inside a crunchy waffle cone.

    Celebrate National Ice Cream Cone Day on September 22

    National Ice Cream Cone Day celebrates an invention so simple that it is easy to overlook how clever it really is.

    Take something delicious.

    Put it inside something else that is delicious.

    Eat everything.

    No bowl required.

    More than a century after ice cream cones became widely popular, people are still enjoying them at ice cream shops, fairs, boardwalks, restaurants, parties, and homes around the world.

    So on September 22, grab your favorite cone, add a scoop—or two—of your favorite ice cream, pile on the toppings if you want, and celebrate.

    Just remember one important rule:

    Eat it before it melts.

    What is your perfect ice cream cone: which cone, ice cream flavor, and toppings would you choose?

  • National White Chocolate Day — Celebrate the Sweet, Creamy Side of Chocolate

    Advertisements

    Every year on September 22, dessert lovers have an especially sweet reason to celebrate: National White Chocolate Day.

    Smooth, creamy, rich, and unmistakably indulgent, white chocolate has earned a special place in everything from cookies and cheesecakes to candies, drinks, brownies, and elegant desserts. While traditional milk and dark chocolate usually receive most of the attention, National White Chocolate Day gives this ivory-colored treat a day of its own.

    Whether you love white chocolate by itself, melted over strawberries, mixed into cookies, swirled through cheesecake, or stirred into a warm drink, September 22 is the perfect excuse to enjoy a little something sweet.

    What Is White Chocolate?

    White chocolate is quite different from the dark brown chocolate most people immediately picture when they hear the word “chocolate.”

    Traditional chocolate products are made using ingredients derived from cacao beans. Dark and milk chocolates contain cocoa solids, which provide their familiar brown color and much of their characteristic chocolate flavor.

    White chocolate, however, does not contain those cocoa solids.

    Instead, genuine white chocolate is made primarily with cocoa butter, along with ingredients such as sugar and milk solids. Cocoa butter is the naturally occurring fat extracted from cacao beans, and it gives white chocolate its wonderfully smooth texture.

    Vanilla or other flavorings may also be added.

    The result is a confection with a creamy sweetness and subtle cocoa-butter flavor that is completely different from dark or milk chocolate.

    Is White Chocolate Really Chocolate?

    Few questions create a chocolate debate quite like this one.

    Some people argue that white chocolate isn’t “real chocolate” because it doesn’t contain cocoa solids. Others point out that cocoa butter comes directly from cacao beans and is an essential component of chocolate.

    From a food-standard perspective in the United States, white chocolate can officially be labeled as such when it meets specific requirements, including containing at least 20 percent cocoa butter.

    So while white chocolate is certainly different from milk and dark chocolate, it isn’t simply vanilla candy pretending to be chocolate.

    Its connection to cacao comes through cocoa butter.

    And for white chocolate fans, that’s more than enough reason to celebrate.

    The History of White Chocolate

    Chocolate itself has a history stretching back thousands of years, but white chocolate is a relatively modern creation.

    Cacao was consumed by ancient civilizations in Mesoamerica long before chocolate became the sweet confection we recognize today. Over centuries, cacao traveled around the world and chocolate-making techniques evolved dramatically.

    By the 19th and early 20th centuries, manufacturers had developed increasingly sophisticated ways of separating and processing the components of cacao beans.

    White chocolate emerged commercially during the 1930s, when confectioners began producing sweets based largely on cocoa butter, milk, and sugar.

    Its pale appearance and delicate flavor offered consumers something noticeably different from traditional chocolate.

    Over time, white chocolate expanded far beyond candy bars.

    Today, pastry chefs, bakers, chocolatiers, coffee shops, restaurants, and home cooks use it in an enormous variety of creations.

    Why White Chocolate Tastes So Different

    If you’ve ever compared a piece of dark chocolate with white chocolate, the difference is immediate.

    Dark chocolate can be bitter, earthy, fruity, roasted, intense, and complex depending on its cacao content and origin.

    White chocolate tends to emphasize creaminess and sweetness.

    Because cocoa butter melts close to body temperature, good-quality white chocolate develops a silky texture that seems to melt quickly on your tongue.

    Milk solids contribute additional richness, while sugar provides the familiar sweetness.

    That combination makes white chocolate especially useful for desserts where a softer chocolate flavor is desired.

    White Chocolate and Dessert Are a Perfect Match

    One reason white chocolate has remained popular is its versatility.

    Its mild flavor pairs beautifully with ingredients that might otherwise be overwhelmed by darker chocolate.

    Berries are a perfect example.

    Strawberries, raspberries, blueberries, and blackberries provide tartness and freshness that balance white chocolate’s sweetness.

    Citrus flavors work wonderfully too. Lemon and white chocolate can create a particularly delicious combination because bright acidity cuts through the richness of the cocoa butter.

    White chocolate also pairs beautifully with:

    • Macadamia nuts
    • Coconut
    • Caramel
    • Vanilla
    • Coffee
    • Pistachios
    • Almonds
    • Cranberries
    • Cherries
    • Pretzels
    • Peanut butter
    • Cream cheese
    • Cinnamon
    • Peppermint

    These combinations give you almost endless possibilities for celebrating National White Chocolate Day.

    White Chocolate Macadamia Nut Cookies

    Few white chocolate desserts are more recognizable than white chocolate macadamia nut cookies.

    The combination works because the ingredients complement one another perfectly.

    White chocolate chips provide creamy sweetness, while macadamia nuts bring buttery richness and a satisfying crunch. Put them inside a warm, chewy cookie and it’s easy to understand why this combination became such a bakery favorite.

    If you’re looking for something simple to make on September 22, a fresh batch of white chocolate macadamia cookies is hard to beat.

    Enjoy one while it’s still slightly warm and the white chocolate is soft and melted.

    White Chocolate Cheesecake

    For something richer, try white chocolate cheesecake.

    Melted white chocolate can be incorporated into cheesecake filling, adding sweetness while enhancing its creamy texture.

    Top the cheesecake with fresh raspberries or strawberries to balance the richness.

    You can also add a berry sauce, white chocolate curls, whipped cream, or crushed cookies.

    It makes an impressive National White Chocolate Day dessert without requiring an overly complicated presentation.

    Chocolate-Covered Strawberries With a Twist

    Chocolate-covered strawberries don’t have to involve milk or dark chocolate.

    White chocolate-covered strawberries are beautiful, easy to prepare, and perfect for sharing.

    Simply melt white chocolate carefully, dip clean and completely dry strawberries into it, and allow the coating to set.

    You can decorate them with crushed nuts, cookie crumbs, sprinkles, coconut, or a contrasting chocolate drizzle.

    They’re equally appropriate for a party or a quiet dessert at home.

    Make White Chocolate Bark

    White chocolate bark may be one of the easiest ways to celebrate.

    Melt white chocolate, spread it onto parchment paper, add your favorite toppings, let everything firm up, and break it into pieces.

    Try combinations such as:

    Cranberry Pistachio: Dried cranberries and chopped pistachios.

    Cookies and Cream: Crushed chocolate sandwich cookies.

    Strawberry: Freeze-dried strawberries and cookie crumbs.

    Sweet and Salty: Pretzel pieces and chopped nuts.

    Birthday Cake: Colorful sprinkles and crushed vanilla cookies.

    White chocolate bark is also easy to package and give to friends, family members, coworkers, or neighbors.

    Enjoy a White Hot Chocolate

    National White Chocolate Day isn’t limited to desserts you can eat.

    You can drink your celebration too.

    White hot chocolate combines milk with melted white chocolate to create an exceptionally creamy beverage.

    Top it with whipped cream, marshmallows, white chocolate shavings, or a little cinnamon.

    Since September 22 arrives just as summer is giving way to fall in the Northern Hemisphere, a warm white chocolate drink can be a delicious way to welcome cooler evenings.

    Add White Chocolate to Your Morning Coffee

    If hot chocolate isn’t your thing, try adding white chocolate to coffee.

    A white chocolate mocha combines espresso or strong coffee with milk and white chocolate.

    Serve it hot for a cozy morning drink or pour it over ice if September still feels like summer where you live.

    A little whipped cream on top turns an ordinary cup of coffee into something worthy of a national food holiday.

    Try White Chocolate Popcorn

    Movie night can become part of the celebration too.

    Make your favorite popcorn and drizzle melted white chocolate over it.

    Add a small amount of salt for contrast.

    For an even more indulgent version, mix in pretzel pieces, nuts, mini marshmallows, or candies after the chocolate has cooled slightly.

    You get sweet, salty, crunchy, and creamy flavors in practically every handful.

    Bake White Chocolate Brownies or Blondies

    Brownies are traditionally associated with cocoa or dark chocolate, but white chocolate offers plenty of alternatives.

    White chocolate blondies can be dense, chewy, buttery, and incredibly rich.

    You can add white chocolate chunks directly to the batter or drizzle melted white chocolate across the finished blondies.

    Raspberries, macadamia nuts, pecans, or cranberries can add another layer of flavor.

    Serve them slightly warm with vanilla ice cream for an especially decadent dessert.

    Make White Chocolate-Dipped Pretzels

    Sometimes the simplest treats are the best.

    White chocolate-dipped pretzels require only a few ingredients and give you one of the classic dessert combinations: sweet and salty.

    Dip pretzel rods or twists into melted white chocolate and allow them to set.

    Decorate them with chopped nuts, sprinkles, cookie crumbs, or another chocolate drizzle.

    They’re also easy to make with children and convenient for parties.

    Create a White Chocolate Dessert Board

    If you’re celebrating National White Chocolate Day with friends or family, create an entire dessert board.

    Start with pieces of white chocolate and surround them with complementary treats.

    Include strawberries, raspberries, grapes, cookies, pretzels, marshmallows, nuts, dried fruit, pound cake cubes, and other small desserts.

    Add a bowl of melted white chocolate in the middle for dipping.

    Instead of serving one dessert, everyone gets to create their own combinations.

    Baking With White Chocolate

    White chocolate can be slightly trickier to work with than people expect.

    Because it contains cocoa butter and milk solids, excessive heat can cause it to scorch, separate, or become grainy.

    When melting white chocolate, use gentle heat.

    A microwave works well when you heat it in short intervals and stir frequently. A double boiler can also provide more control.

    And be careful with water.

    Even a small amount of moisture can interfere with the texture of melted chocolate.

    When you’re dipping fruit, make sure the fruit has been thoroughly dried before it touches the chocolate.

    Choosing Good White Chocolate

    Not every white-colored baking product is genuine white chocolate.

    When shopping, check the ingredient list.

    Look for cocoa butter.

    Some inexpensive products substitute other vegetable fats for cocoa butter. Those products can still work for certain baking and decorating purposes, but they won’t necessarily have the same flavor, texture, or melting characteristics as true white chocolate.

    For eating on its own or making a dessert where chocolate is the star, good-quality white chocolate can make a noticeable difference.

    Fun Ways to Celebrate National White Chocolate Day

    You don’t need an elaborate event to participate.

    Pick up your favorite white chocolate candy bar. Bake white chocolate cookies. Order a white chocolate mocha. Make strawberries dipped in white chocolate. Try a dessert you’ve never had before.

    You could even organize a small white chocolate taste test.

    Purchase several brands and compare their sweetness, creaminess, aroma, texture, and overall flavor.

    You might discover that white chocolates can taste surprisingly different from one another.

    Share Something Sweet

    Food holidays can be about more than simply eating.

    They’re also opportunities to connect.

    Bake white chocolate cookies and bring some to work.

    Make white chocolate bark for a neighbor.

    Prepare chocolate-covered strawberries for someone you love.

    Surprise your family with dessert after dinner.

    Sometimes a small treat is simply another way of saying, “I was thinking about you.”

    And that can make an ordinary day feel a little more special.

    A Day for White Chocolate Lovers

    White chocolate may never end the debate over whether it deserves to stand beside milk and dark chocolate, but perhaps that’s part of its charm.

    It doesn’t need to taste like traditional chocolate.

    White chocolate has its own identity.

    It’s creamy rather than deeply cocoa-forward, delicate rather than bitter, and versatile enough to complement everything from tart raspberries and bright lemon to salty pretzels and buttery macadamia nuts.

    National White Chocolate Day gives this distinctive treat a well-deserved moment in the spotlight.

    So on September 22, grab your favorite white chocolate treat, bake something delicious, experiment with a new dessert, or share something sweet with somebody else.

    Because sometimes you don’t need a complicated reason to celebrate.

    Sometimes all you need is a little chocolate.

    What’s your favorite way to enjoy white chocolate—cookies, cheesecake, candy, strawberries, coffee, or something else?

Exit mobile version