Category: Recipes

  • Breakfast of the Day: Garlic Pizza Omelette

    Breakfast of the Day: Garlic Pizza Omelette

    Advertisements

    Start Your Morning with Pizza-Inspired Flavor

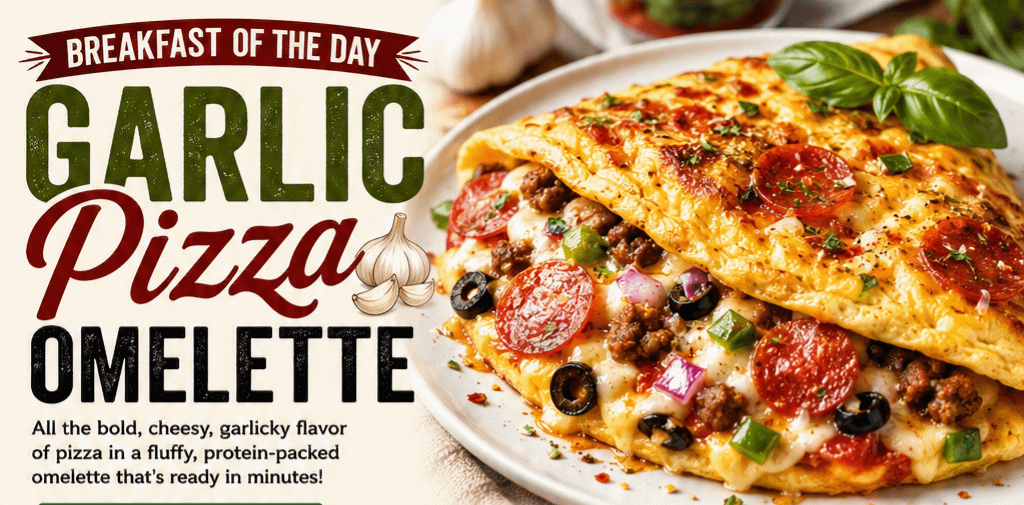
    Who says pizza is only for lunch or dinner? If you’ve ever enjoyed leftover pizza for breakfast, you’ll love this homemade Garlic Pizza Omelette. It captures everything people love about pizza—gooey mozzarella, pepperoni, Italian herbs, rich tomato sauce, and plenty of garlic—while delivering the protein-packed goodness of a classic omelet.

    Whether you’re cooking for yourself, your family, or weekend brunch guests, this recipe is easy to customize and comes together in under 20 minutes.


    Why You’ll Love This Recipe

    The Garlic Pizza Omelette is:

    • High in protein
    • Loaded with cheesy goodness
    • Full of bold garlic flavor
    • Ready in about 15 minutes
    • Easy to customize with your favorite pizza toppings
    • Perfect for keto or low-carb lifestyles

    Every bite delivers the comforting taste of pizza without the crust.


    Ingredients

    For the Omelette

    • 3 large eggs
    • 2 tablespoons milk or heavy cream
    • Salt and black pepper to taste
    • 1 tablespoon butter
    • 2 cloves fresh garlic, minced
    • ½ teaspoon Italian seasoning
    • ¼ teaspoon garlic powder
    • ½ cup shredded mozzarella cheese
    • ¼ cup shredded Parmesan cheese

    Pizza Filling

    • ¼ cup pepperoni slices
    • ¼ cup cooked Italian sausage
    • 2 tablespoons diced red onions
    • ¼ cup sliced mushrooms
    • ¼ cup diced green bell peppers
    • 2 tablespoons sliced black olives
    • 2 tablespoons pizza sauce
    • Fresh basil (optional)

    Directions

    Step 1: Prepare the Eggs

    Whisk together the eggs, milk, garlic powder, Italian seasoning, salt, and pepper until smooth and fluffy.


    Step 2: Cook the Vegetables

    Heat butter in a non-stick skillet over medium heat.

    Add:

    • Minced garlic
    • Mushrooms
    • Bell peppers
    • Red onions

    Cook for about 3-4 minutes until softened and fragrant.


    Step 3: Cook the Omelette

    Pour the egg mixture over the vegetables.

    Allow the eggs to cook undisturbed for about one minute before gently lifting the edges so uncooked egg flows underneath.


    Step 4: Add the Pizza Toppings

    When the eggs are nearly set, spread one side of the omelette with:

    • Pizza sauce
    • Mozzarella
    • Parmesan
    • Pepperoni
    • Italian sausage
    • Black olives

    Fold the omelette in half.

    Cover the skillet for another minute until the cheese is completely melted.


    Step 5: Garnish and Serve

    Top with:

    • Fresh basil
    • Extra Parmesan
    • Crushed red pepper flakes
    • A sprinkle of Italian seasoning

    Serve immediately while hot and cheesy.


    Optional Toppings

    One of the best things about this breakfast is how customizable it is.

    Try adding:

    • Crispy bacon
    • Ham
    • Spinach
    • Jalapeños
    • Banana peppers
    • Fresh tomatoes
    • Roasted garlic
    • Ricotta cheese
    • Feta cheese
    • Crumbled bacon
    • Fresh oregano

    Every variation creates a completely different pizza-inspired experience.


    What to Serve With It

    Complete your breakfast with:

    • Garlic roasted breakfast potatoes
    • Fresh fruit
    • Hash browns
    • Toast with garlic butter
    • Avocado slices
    • Fresh orange juice
    • Coffee or espresso

    Tips for the Perfect Garlic Pizza Omelette

    • Use freshly minced garlic for the richest flavor.
    • Don’t overcook the eggs—they should remain soft and fluffy.
    • Cover the skillet briefly after folding to melt the cheese perfectly.
    • Warm the pizza sauce before adding it to prevent cooling the eggs.
    • Fresh mozzarella creates an extra creamy texture.

    Make It Your Own

    This omelette works with almost any pizza combination.

    Popular combinations include:

    Meat Lovers

    Pepperoni, sausage, bacon, ham, and mozzarella.

    Veggie Supreme

    Mushrooms, peppers, onions, spinach, olives, tomatoes, and garlic.

    Hawaiian

    Ham, pineapple, mozzarella, and garlic.

    Buffalo Chicken

    Grilled chicken, buffalo sauce, mozzarella, blue cheese crumbles, and green onions.

    BBQ Chicken

    Chicken, barbecue sauce, red onions, cheddar, and mozzarella.


    Nutritional Benefits

    Eggs provide complete protein along with vitamins B12, D, and choline. Garlic has long been appreciated for its natural antioxidant compounds and bold flavor, while vegetables contribute fiber, vitamins, and minerals. Using plenty of fresh ingredients makes this breakfast both satisfying and nutritious.


    A Breakfast Worth Waking Up For

    The Garlic Pizza Omelette proves you don’t have to choose between breakfast and pizza—you can enjoy both in one delicious meal. Rich, cheesy, loaded with savory toppings, and bursting with garlic flavor, it’s the perfect breakfast for weekends, brunch gatherings, or any morning when you want something a little more exciting than ordinary eggs.

    Once you try this recipe, it may become your new favorite way to enjoy pizza flavors first thing in the morning. Whether you’re feeding one person or an entire family, this hearty omelette is guaranteed to satisfy every pizza lover at the breakfast table.

    Read More Recipes

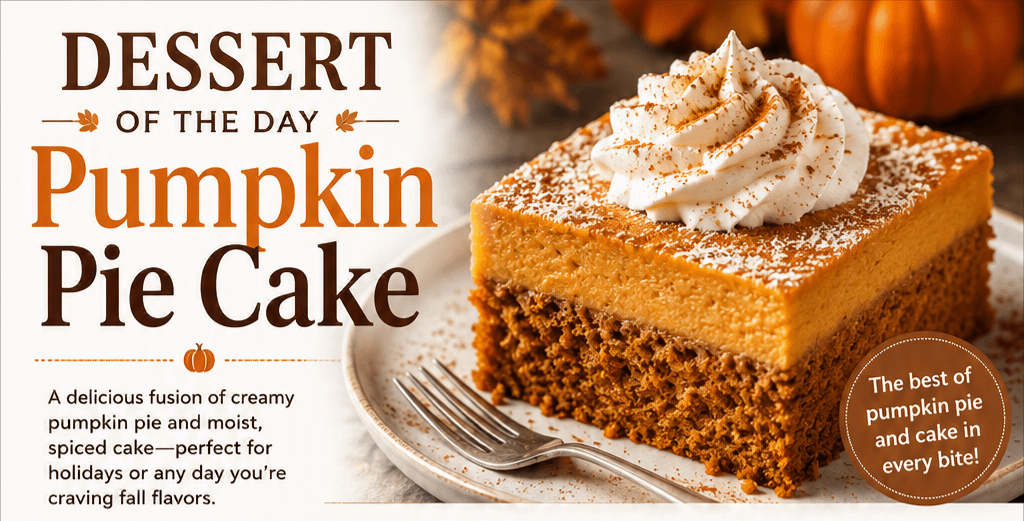
  • Dessert of the Day: Pumpkin Pie Cake

    Advertisements

    Pumpkin Pie Cake is the perfect dessert for anyone who can’t decide between a slice of classic pumpkin pie and a moist slice of spiced cake. This delicious treat combines the creamy, silky texture of pumpkin pie with the light, tender crumb of a homemade cake, creating a dessert that’s rich in fall flavor yet simple enough to enjoy all year long.

    Whether you’re serving it during Thanksgiving, bringing it to a family gathering, or simply satisfying a pumpkin craving, Pumpkin Pie Cake is guaranteed to become a favorite.


    Why You’ll Love Pumpkin Pie Cake

    Pumpkin Pie Cake offers the best of two beloved desserts in every bite. It has the warm spices of traditional pumpkin pie, the comforting texture of cake, and a beautiful presentation that’s perfect for any occasion.

    It’s also incredibly versatile. Serve it warm with vanilla ice cream, chilled with whipped cream, or alongside a hot cup of coffee or spiced cider.


    Ingredients

    For the Cake

    • 2 cups all-purpose flour
    • 2 teaspoons baking powder
    • 1 teaspoon baking soda
    • ½ teaspoon salt
    • 2 teaspoons pumpkin pie spice
    • 1 teaspoon cinnamon
    • ½ cup unsalted butter, softened
    • 1 cup granulated sugar
    • ½ cup brown sugar
    • 2 large eggs
    • 1 teaspoon vanilla extract
    • 1 cup pumpkin puree
    • ½ cup milk

    For the Pumpkin Layer

    • 15-ounce can pumpkin puree
    • 12-ounce can evaporated milk
    • 2 large eggs
    • ½ cup brown sugar
    • ¼ cup granulated sugar
    • 1½ teaspoons pumpkin pie spice
    • ½ teaspoon cinnamon
    • 1 teaspoon vanilla extract

    Optional Toppings

    • Fresh whipped cream
    • Vanilla ice cream
    • Caramel sauce
    • Chopped pecans
    • Cinnamon sugar
    • Dusting of powdered sugar

    How to Make Pumpkin Pie Cake

    Step 1: Prepare the Oven

    Preheat your oven to 350°F (175°C). Grease a 9×13-inch baking dish.

    Step 2: Make the Cake Batter

    In one bowl, whisk together the flour, baking powder, baking soda, salt, pumpkin pie spice, and cinnamon.

    In another bowl, cream the butter with both sugars until light and fluffy. Beat in the eggs one at a time, followed by the vanilla and pumpkin puree.

    Gradually mix the dry ingredients into the wet ingredients, alternating with the milk until the batter is smooth.

    Spread the batter evenly into the prepared baking dish.


    Step 3: Prepare the Pumpkin Pie Filling

    Whisk together:

    • Pumpkin puree
    • Evaporated milk
    • Eggs
    • Brown sugar
    • Granulated sugar
    • Pumpkin pie spice
    • Cinnamon
    • Vanilla

    Slowly pour the pumpkin mixture over the cake batter.

    Don’t worry if it looks unusual—the layers bake beautifully together.


    Step 4: Bake

    Bake for 55 to 65 minutes, or until the center is set and a toothpick inserted into the cake portion comes out mostly clean.

    Allow the cake to cool for at least 30 minutes before serving.


    Serving Suggestions

    Pumpkin Pie Cake is wonderful served:

    • Warm with vanilla ice cream
    • Chilled with whipped cream
    • Drizzled with salted caramel
    • Sprinkled with toasted pecans
    • Alongside hot coffee
    • With chai tea or apple cider
    • At holiday dinners
    • During cozy autumn evenings

    Tips for Success

    • Use 100% pure pumpkin puree, not pumpkin pie filling.
    • Avoid overmixing the batter to keep the cake tender.
    • Let the cake cool before slicing for cleaner servings.
    • Refrigerate leftovers since the pumpkin layer is custard-based.
    • The flavor becomes even better the next day.

    Delicious Variations

    Try putting your own twist on this classic dessert:

    • Add chopped pecans or walnuts to the batter.
    • Mix white chocolate chips into the cake.
    • Swirl cream cheese into the pumpkin layer.
    • Add maple extract for extra autumn flavor.
    • Top with cinnamon streusel before baking.
    • Sprinkle crushed graham crackers over the whipped cream.

    Storage

    Store covered in the refrigerator for up to 5 days.

    For longer storage, freeze individual slices for up to 3 months. Thaw overnight in the refrigerator and warm slightly before serving if desired.


    A Dessert Worth Sharing

    Pumpkin Pie Cake captures everything people love about fall desserts in one easy-to-make recipe. The combination of moist cake, creamy pumpkin filling, and warm spices creates a comforting dessert that’s elegant enough for holiday celebrations yet simple enough for a weeknight treat.

    Whether you’re making it for Thanksgiving, a family dinner, or simply because you’re craving pumpkin spice, this dessert delivers homemade comfort in every slice. It’s a recipe that friends and family will request again and again, becoming a cherished seasonal tradition for years to come.

    Dessert of the Day: Pumpkin Pie Cake—a delightful fusion of classic pumpkin pie and soft, spiced cake that’s sure to warm hearts and satisfy every sweet tooth.

    Read More Recipes

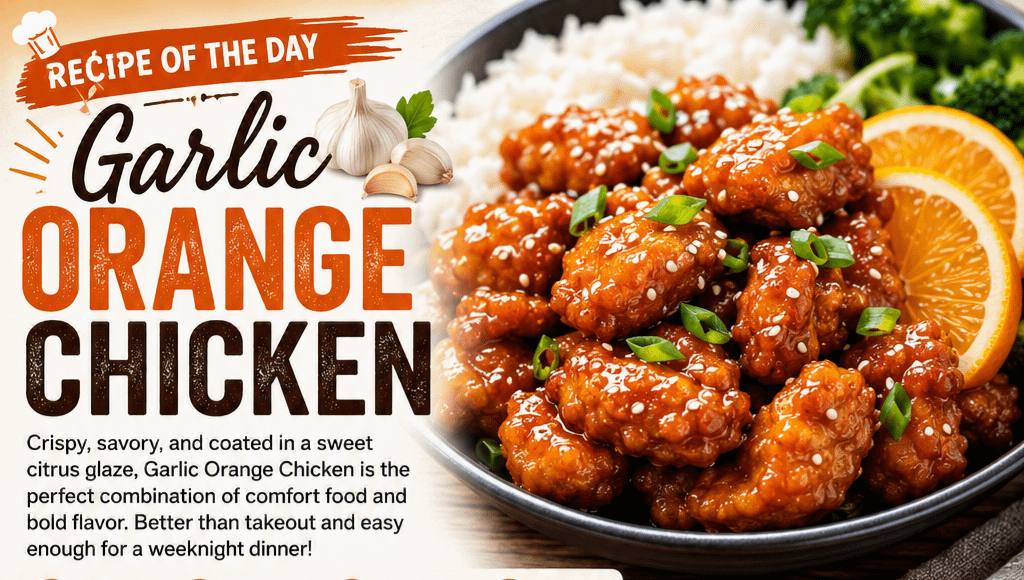
  • Recipe of the Day: Garlic Orange Chicken

    Advertisements

    Crispy, savory, and coated in a sweet citrus glaze, Garlic Orange Chicken is the perfect combination of comfort food and bold flavor. Whether you’re preparing a quick weeknight dinner or looking to impress family and friends, this homemade version delivers restaurant-quality taste with fresh ingredients and a rich garlic-orange sauce that is both tangy and satisfying.


    A Fresh Twist on a Takeout Favorite

    Orange chicken has become one of the most popular dishes in Chinese-American cuisine, loved for its crispy chicken pieces tossed in a sweet citrus glaze. This Garlic Orange Chicken takes that classic recipe a step further by adding plenty of fresh garlic, creating a deeper, richer flavor that balances the sweetness of the orange.

    Instead of relying on heavy sauces or overly processed ingredients, this recipe uses fresh orange juice, garlic, ginger, and a simple homemade sauce that comes together in minutes.

    The result is crispy chicken coated in a glossy glaze that’s bursting with fresh citrus flavor and just the right amount of savory goodness.


    Why You’ll Love This Recipe

    • Crispy chicken with tender, juicy meat
    • Fresh orange flavor from real oranges
    • Plenty of aromatic garlic
    • Better than takeout
    • Ready in about 40 minutes
    • Great for meal prep
    • Family-friendly
    • Easily adjustable for spice lovers

    Ingredients

    For the Chicken

    • 2 pounds boneless, skinless chicken thighs, cut into bite-sized pieces
    • 1 cup cornstarch
    • 2 eggs, beaten
    • Salt and black pepper to taste
    • Vegetable oil for frying

    For the Garlic Orange Sauce

    • ¾ cup fresh orange juice
    • Zest of one orange
    • ¼ cup low-sodium soy sauce
    • ⅓ cup brown sugar
    • 2 tablespoons honey
    • 6 cloves garlic, minced
    • 1 tablespoon fresh ginger, grated
    • 1 tablespoon rice vinegar
    • 1 teaspoon sesame oil
    • 1 tablespoon cornstarch
    • 2 tablespoons water

    Garnish

    • Sliced green onions
    • Sesame seeds
    • Orange slices
    • Steamed rice
    • Steamed broccoli (optional)

    Instructions

    Step 1: Prepare the Chicken

    Season the chicken pieces lightly with salt and pepper.

    Dip each piece into the beaten eggs, then coat thoroughly in cornstarch.

    Allow the coated chicken to rest for about 10 minutes. This helps create an extra crispy coating.


    Step 2: Fry the Chicken

    Heat vegetable oil to 350°F (175°C).

    Fry the chicken in batches for 4–5 minutes until golden brown and fully cooked.

    Transfer to a paper towel-lined plate.

    For extra crispiness, fry the chicken a second time for about 1 minute before serving.


    Step 3: Make the Sauce

    In a saucepan combine:

    • Orange juice
    • Orange zest
    • Soy sauce
    • Brown sugar
    • Honey
    • Garlic
    • Ginger
    • Rice vinegar
    • Sesame oil

    Bring to a gentle simmer over medium heat.

    Mix the cornstarch with water until smooth.

    Slowly stir it into the sauce.

    Continue stirring for 2–3 minutes until the sauce becomes thick and glossy.


    Step 4: Combine

    Add the crispy chicken to the sauce.

    Gently toss until every piece is completely coated.

    Serve immediately over steamed rice.

    Top with green onions, sesame seeds, and fresh orange slices.


    Serving Suggestions

    Garlic Orange Chicken pairs wonderfully with:

    • Steamed jasmine rice
    • Fried rice
    • Lo mein noodles
    • Stir-fried vegetables
    • Roasted broccoli
    • Snap peas
    • Garlic green beans
    • Egg rolls
    • Crab rangoons

    It also makes an excellent meal-prep lunch that reheats beautifully.


    Tips for Success

    • Fresh orange juice provides the brightest flavor.
    • Chicken thighs stay juicier than chicken breast.
    • Double frying creates restaurant-style crispiness.
    • Don’t overcrowd the fryer.
    • Toss the chicken with the sauce immediately before serving to maintain its crisp texture.
    • Add crushed red pepper flakes or sriracha if you enjoy a spicy kick.

    Variations

    Spicy Garlic Orange Chicken

    Add:

    • 1 teaspoon crushed red pepper flakes
    • 1 tablespoon chili garlic sauce

    Air Fryer Version

    Cook the coated chicken in an air fryer at 400°F for 12–15 minutes, flipping halfway through.

    Lighter Version

    Instead of frying, bake the chicken at 425°F for about 25 minutes until crispy.


    Storage

    Store leftovers in an airtight container in the refrigerator for up to 4 days.

    Freeze for up to 2 months.

    Reheat in the oven or air fryer to restore the crispy texture.


    Perfect Pairings

    Complete your meal with:

    • Vegetable fried rice
    • Asian cucumber salad
    • Roasted asparagus
    • Honey-glazed carrots
    • Spring rolls
    • Fresh fruit salad
    • Iced green tea or sparkling citrus water

    Final Thoughts

    Garlic Orange Chicken is a delicious combination of crispy fried chicken, vibrant citrus, and bold garlic flavor that transforms an everyday meal into something memorable. The homemade sauce is fresher, richer, and more flavorful than most takeout versions, while the crispy chicken provides the perfect texture in every bite.

    Whether you’re cooking for your family, entertaining guests, or simply craving a comforting dinner, this recipe is sure to become a regular favorite. Sweet, savory, garlicky, and packed with fresh orange flavor, Garlic Orange Chicken is proof that some of the best meals are made right in your own kitchen.

    Read More Recipes

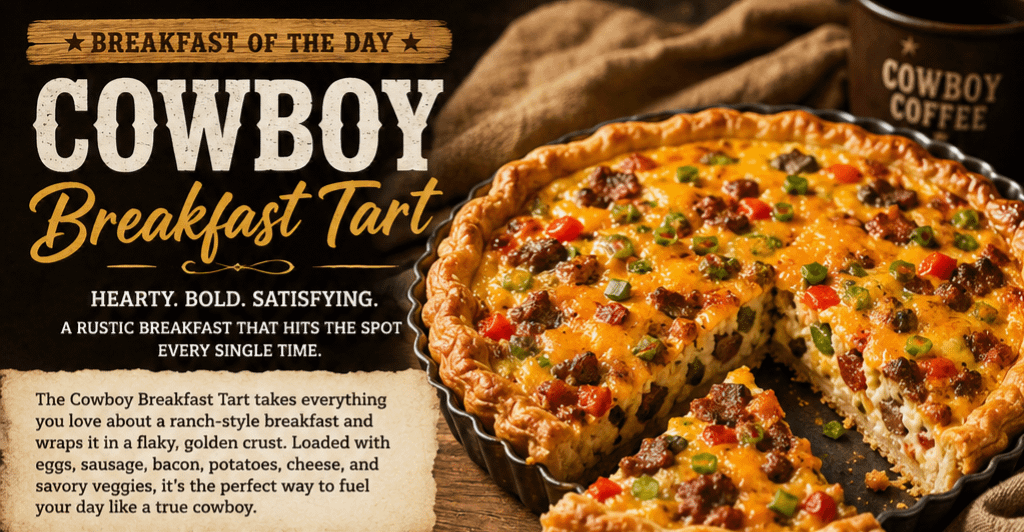
  • Breakfast of the Day: Cowboy Breakfast Tart

    Advertisements

    There’s something special about starting the morning with a meal that’s both hearty and satisfying. The Cowboy Breakfast Tart takes everything people love about a traditional ranch-style breakfast and transforms it into an easy-to-slice, flaky pastry loaded with eggs, sausage, cheese, potatoes, and savory vegetables. It’s rustic enough for a weekend at the campsite yet elegant enough to serve at brunch with family and friends.

    Whether you’re feeding hungry cowboys after a long morning on the ranch or simply looking for a breakfast that will keep everyone full until lunch, this recipe delivers bold flavors in every bite.


    What Is a Cowboy Breakfast Tart?

    A Cowboy Breakfast Tart is a savory breakfast pastry built on buttery puff pastry or pie crust. Instead of sweet fillings, it’s packed with classic breakfast ingredients like fluffy eggs, seasoned breakfast sausage, crispy potatoes, cheddar cheese, onions, peppers, and bacon. Once baked, the crust becomes golden and flaky while the filling stays rich, creamy, and full of flavor.

    The result is somewhere between a breakfast pizza, quiche, and country-style casserole—but with a crisp pastry that makes every bite unforgettable.


    Why You’ll Love This Recipe

    • Easy enough for beginner cooks
    • Perfect for weekend brunches
    • Great make-ahead breakfast
    • Feeds the whole family
    • Freezer-friendly leftovers
    • Packed with protein and flavor
    • Easily customized with your favorite ingredients

    Cowboy Breakfast Tart Recipe

    Ingredients

    For the Tart

    • 1 sheet frozen puff pastry, thawed
    • 6 large eggs
    • ½ cup heavy cream
    • 1 pound breakfast sausage
    • 4 slices bacon, cooked and crumbled
    • 1 cup frozen hash browns, thawed
    • 1 small onion, diced
    • ½ red bell pepper, diced
    • ½ green bell pepper, diced
    • 2 cloves garlic, minced
    • 1½ cups shredded sharp cheddar cheese
    • ½ cup Monterey Jack cheese
    • 2 tablespoons chopped green onions
    • 1 teaspoon smoked paprika
    • ½ teaspoon black pepper
    • ½ teaspoon garlic powder
    • ½ teaspoon onion powder
    • Salt to taste

    Optional Toppings

    • Fresh parsley
    • Chopped chives
    • Hot sauce
    • Salsa
    • Sour cream
    • Sliced avocado

    Directions

    Step 1: Prepare the Oven

    Preheat your oven to 400°F (204°C).

    Lightly grease a tart pan or baking sheet.


    Step 2: Cook the Meat

    Brown the breakfast sausage in a skillet until fully cooked.

    Drain excess grease.

    Cook the bacon until crispy and crumble into pieces.


    Step 3: Cook the Vegetables

    Using the same skillet, sauté:

    • onions
    • bell peppers
    • garlic
    • hash browns

    Cook until lightly browned and tender.


    Step 4: Prepare the Egg Mixture

    Whisk together:

    • eggs
    • heavy cream
    • smoked paprika
    • garlic powder
    • onion powder
    • black pepper

    Mix until smooth.


    Step 5: Assemble the Tart

    Roll the puff pastry slightly larger than the tart pan.

    Press it into the pan and fold excess edges inward.

    Layer:

    • hash browns
    • sausage
    • bacon
    • sautéed vegetables
    • cheddar cheese
    • Monterey Jack

    Pour the egg mixture evenly over everything.


    Step 6: Bake

    Bake for 30–35 minutes, or until:

    • eggs are fully set
    • crust is golden brown
    • cheese is bubbling

    Allow the tart to cool for about 10 minutes before slicing.


    Serving Suggestions

    Serve alongside:

    • Fresh fruit
    • Country gravy
    • Hash browns
    • Biscuits
    • Cowboy coffee
    • Fresh orange juice
    • Homemade salsa

    Delicious Variations

    Southwest Cowboy Tart

    Add:

    • jalapeños
    • pepper jack cheese
    • black beans
    • corn
    • taco seasoning

    Steakhouse Version

    Replace sausage with:

    • diced sirloin
    • caramelized onions
    • mushrooms
    • smoked gouda

    Ranch Breakfast Tart

    Mix ranch seasoning into the eggs and top with crispy fried onions after baking.


    Spicy Cowboy

    Add:

    • diced green chilies
    • chipotle peppers
    • cayenne pepper
    • hot breakfast sausage

    Veggie Cowboy

    Skip the meat and add:

    • spinach
    • mushrooms
    • zucchini
    • tomatoes
    • broccoli

    Tips for Success

    • Don’t overfill the tart or the eggs may overflow.
    • Blind bake the pastry for 5–7 minutes if you prefer an extra-crispy crust.
    • Let the tart cool slightly before cutting for cleaner slices.
    • Freshly shredded cheese melts more smoothly than pre-shredded varieties.
    • Puff pastry creates the flakiest texture, while pie crust gives a more traditional, rustic feel.

    Storage

    Store leftovers in an airtight container in the refrigerator for up to 4 days.

    Freeze individual slices for up to 2 months.

    Reheat in a 350°F oven for 10–15 minutes or in an air fryer for a crisp crust.


    Perfect for Every Occasion

    The Cowboy Breakfast Tart is ideal for:

    • Weekend breakfasts
    • Holiday brunches
    • Father’s Day
    • Camping trips
    • Potluck breakfasts
    • Family gatherings
    • Meal prep
    • Ranch breakfasts
    • Game-day brunches

    Its hearty ingredients and rustic presentation make it a crowd-pleaser no matter the occasion.


    Final Thoughts

    If you’re looking for a breakfast that’s comforting, filling, and packed with bold country flavor, the Cowboy Breakfast Tart is an excellent choice. Combining flaky pastry with savory sausage, crispy bacon, seasoned potatoes, colorful vegetables, fluffy eggs, and melted cheese, it’s everything you love about a classic cowboy breakfast in one beautiful dish.

    Whether enjoyed fresh from the oven on a quiet morning or served as the centerpiece of a family brunch, this tart is sure to become a favorite. Pair it with a hot cup of coffee and gather around the table—because some of the best mornings begin with a hearty meal shared with the people you love.

    Read More Recipes

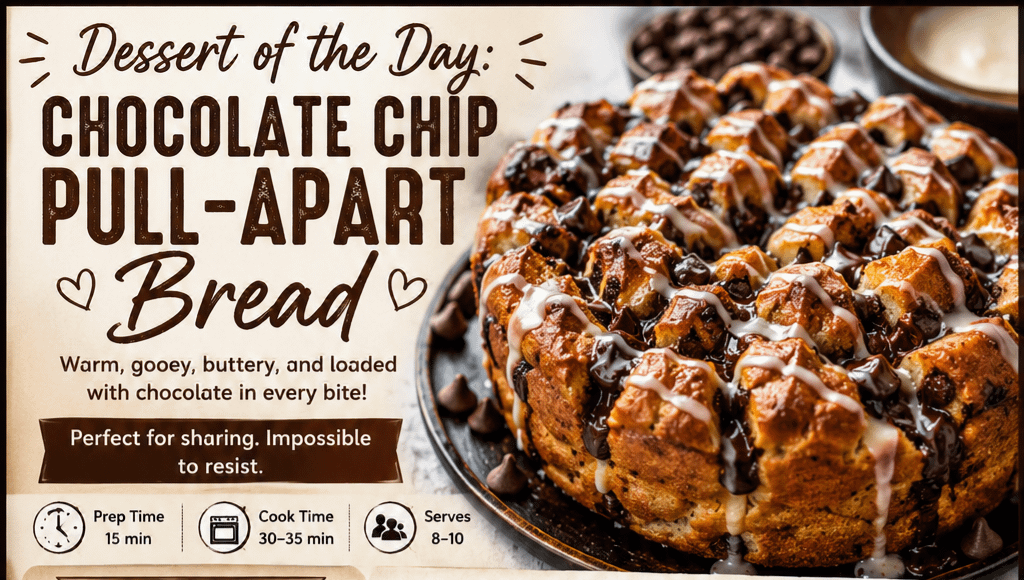
  • Dessert of the Day: Chocolate Chip Pull-Apart Bread

    Advertisements

    There are few desserts more comforting than warm, buttery bread loaded with melted chocolate. Chocolate Chip Pull-Apart Bread is the perfect combination of soft homemade-style bread, rich butter, cinnamon sugar, and gooey chocolate chips. Every bite is sweet, fluffy, and filled with pockets of melted chocolate, making it an irresistible dessert for family dinners, parties, holidays, or cozy evenings at home.

    The best part? You don’t need to slice it. Simply place it in the center of the table and let everyone pull off warm, chocolate-filled pieces. It’s interactive, fun, and guaranteed to disappear quickly.

    Whether you’re serving it with coffee, hot cocoa, or a scoop of vanilla ice cream, this dessert is pure comfort food.


    Why You’ll Love Chocolate Chip Pull-Apart Bread

    This dessert has everything people crave:

    • Warm, buttery layers
    • Gooey melted chocolate chips
    • Crispy golden edges
    • Soft, fluffy center
    • Easy to share
    • Great for breakfast, dessert, or brunch

    It’s like combining monkey bread, chocolate chip cookies, and fresh bakery bread into one incredible dessert.


    Ingredients

    For the Bread

    • 1 loaf soft Italian bread or brioche
    • ½ cup unsalted butter, melted
    • ½ cup brown sugar
    • 2 teaspoons cinnamon
    • 1 teaspoon vanilla extract
    • 1½ cups semi-sweet chocolate chips
    • ½ cup mini chocolate chips
    • Pinch of salt

    Optional Add-Ins

    • Chopped pecans
    • Walnuts
    • White chocolate chips
    • Peanut butter chips
    • Caramel bits
    • Mini marshmallows
    • Toffee pieces

    For the Vanilla Glaze

    • 1 cup powdered sugar
    • 2 tablespoons milk
    • ½ teaspoon vanilla extract

    Directions

    Step 1

    Preheat your oven to 350°F (175°C).


    Step 2

    Using a sharp bread knife, slice the loaf in a crisscross pattern without cutting all the way through the bottom. Leave about one inch intact so the loaf stays together.


    Step 3

    Mix together:

    • Melted butter
    • Brown sugar
    • Cinnamon
    • Vanilla
    • Pinch of salt

    Step 4

    Carefully spoon the butter mixture into every cut of the bread.

    Use your fingers or a pastry brush to help distribute it evenly.


    Step 5

    Stuff chocolate chips into every opening.

    The more chocolate, the better.


    Step 6

    Wrap the loaf loosely in foil.

    Bake for 15 minutes.

    Uncover and continue baking another 10–15 minutes until the bread is crispy and the chocolate is completely melted.


    Step 7

    Whisk together the glaze ingredients.

    Drizzle over the warm bread immediately before serving.


    Serving Suggestions

    Chocolate Chip Pull-Apart Bread is delicious on its own, but it becomes unforgettable when paired with:

    • Vanilla bean ice cream
    • Whipped cream
    • Fresh strawberries
    • Raspberries
    • Chocolate sauce
    • Salted caramel sauce
    • Espresso
    • Cold milk
    • Hot chocolate

    Make It Even More Decadent

    Turn this dessert into a bakery masterpiece by adding:

    • Nutella between the slices
    • Cream cheese filling
    • Cookie butter
    • Peanut butter
    • Dulce de leche
    • Crushed Oreos
    • Toasted coconut
    • Chopped candy bars

    Storage

    Store leftovers in an airtight container for up to 3 days.

    Reheat individual portions in the microwave for 15–20 seconds to restore the warm, gooey texture.


    Tips for Perfect Pull-Apart Bread

    • Brioche creates the richest flavor.
    • Use freshly shredded chocolate for extra meltiness.
    • Don’t overbake or the bread can dry out.
    • Wrap in foil during the first bake to keep the bread soft.
    • Serve immediately while the chocolate is still molten.

    Delicious Variations

    Cookies & Cream

    Add crushed chocolate sandwich cookies and white chocolate chips.

    Peanut Butter Cup

    Mix peanut butter chips with mini peanut butter cups.

    Triple Chocolate

    Use milk, dark, and white chocolate chips together.

    S’mores

    Add mini marshmallows and crushed graham crackers during the final few minutes of baking.

    Salted Caramel

    Drizzle caramel sauce over the finished loaf and sprinkle with flaky sea salt.


    Perfect for Every Occasion

    Chocolate Chip Pull-Apart Bread is a crowd-pleaser that’s easy to make and even easier to enjoy. It’s ideal for:

    • Birthday parties
    • Family gatherings
    • Holiday dinners
    • Movie nights
    • Potlucks
    • Weekend brunches
    • Game day desserts
    • Christmas morning breakfast
    • Valentine’s Day treats

    Its warm aroma, buttery sweetness, and melted chocolate make it the kind of dessert that brings everyone together around the table.

    Final Thoughts

    Chocolate Chip Pull-Apart Bread proves that simple ingredients can create something truly unforgettable. With its crispy golden crust, soft buttery center, rivers of melted chocolate, and sweet vanilla glaze, every pull-apart piece feels like a special treat. Whether you’re making it for guests or indulging in a cozy night at home, this dessert is guaranteed to become a favorite you’ll want to bake again and again.

    Dessert of the Day: Chocolate Chip Pull-Apart Bread—warm, gooey, shareable, and packed with chocolate in every delicious bite.

    Read More Recipes

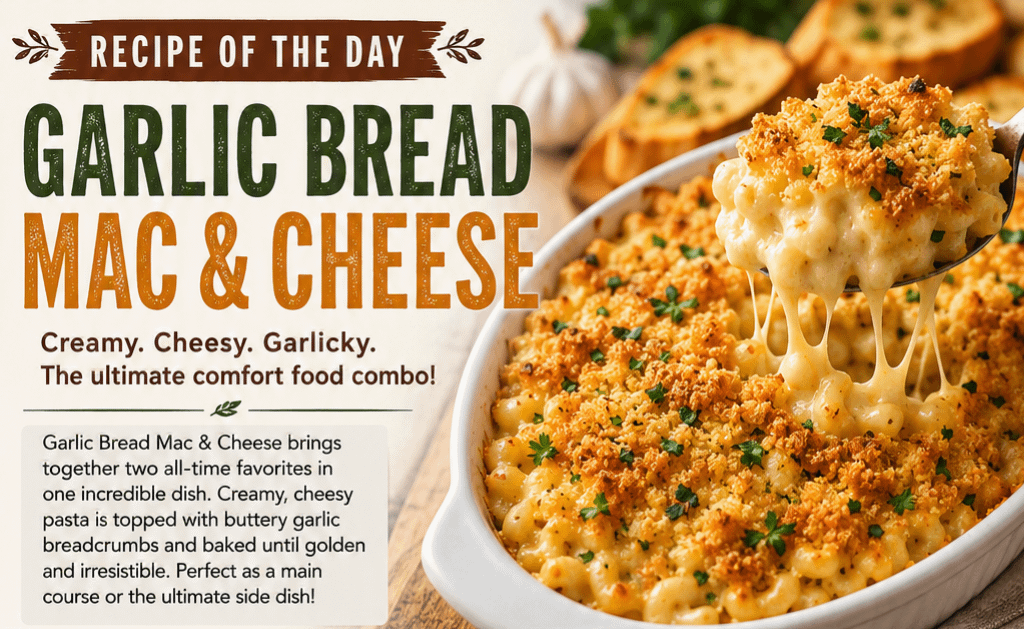
  • Recipe of the Day: Garlic Bread Mac & Cheese

    Advertisements

    Golden, buttery garlic bread meets rich, creamy macaroni and cheese in one unforgettable comfort food masterpiece.

    There are few dishes more comforting than a bowl of homemade macaroni and cheese. Likewise, few side dishes are as universally loved as warm, buttery garlic bread. Combine the two, and you have a meal that is indulgent, satisfying, and guaranteed to become a family favorite.

    Garlic Bread Mac & Cheese transforms two classic comfort foods into one incredible recipe. Creamy cheddar cheese sauce coats perfectly cooked pasta while a crispy garlic butter topping creates the flavor and texture of fresh garlic bread. Every bite is cheesy, buttery, crunchy, and packed with rich garlic flavor.

    Whether you’re preparing a weeknight dinner, bringing a dish to a potluck, or looking for the ultimate comfort meal, this recipe delivers every time.


    Why You’ll Love This Recipe

    • Rich, creamy homemade cheese sauce
    • Crispy garlic butter breadcrumb topping
    • Loaded with fresh garlic flavor
    • Family-friendly comfort food
    • Great as a main course or side dish
    • Easy enough for beginners
    • Perfect for leftovers

    Ingredients

    For the Mac & Cheese

    • 1 pound elbow macaroni
    • 4 tablespoons butter
    • 4 cloves garlic, minced
    • ¼ cup all-purpose flour
    • 3 cups whole milk
    • 1 cup heavy cream
    • 2 teaspoons Dijon mustard
    • ½ teaspoon paprika
    • Salt and pepper to taste
    • 3 cups sharp cheddar cheese, shredded
    • 1 cup mozzarella cheese, shredded
    • ½ cup Parmesan cheese, grated

    Garlic Bread Topping

    • 4 tablespoons melted butter
    • 3 cloves garlic, minced
    • 1½ cups panko breadcrumbs
    • ½ cup Parmesan cheese
    • 2 tablespoons chopped fresh parsley
    • ½ teaspoon Italian seasoning

    Optional Add-Ins

    Customize your Garlic Bread Mac & Cheese with:

    • Crispy bacon
    • Grilled chicken
    • Italian sausage
    • Pepperoni slices
    • Caramelized onions
    • Roasted broccoli
    • Spinach
    • Jalapeños
    • Sun-dried tomatoes
    • Red pepper flakes for heat

    Directions

    Step 1: Cook the Pasta

    Cook macaroni in salted boiling water until just al dente according to package directions.

    Drain and set aside.


    Step 2: Prepare the Cheese Sauce

    In a large saucepan, melt the butter over medium heat.

    Add the minced garlic and cook for about one minute until fragrant.

    Whisk in the flour and cook for another minute, creating a smooth roux.

    Slowly whisk in the milk and heavy cream until smooth.

    Cook for 4–5 minutes until slightly thickened.

    Add:

    • Dijon mustard
    • Paprika
    • Salt
    • Black pepper

    Reduce heat to low.

    Gradually stir in:

    • Cheddar
    • Mozzarella
    • Parmesan

    Mix until silky smooth.

    Fold in the cooked macaroni.


    Step 3: Make the Garlic Bread Topping

    Combine:

    • Melted butter
    • Garlic
    • Panko breadcrumbs
    • Parmesan
    • Parsley
    • Italian seasoning

    Mix until all breadcrumbs are coated.


    Step 4: Assemble

    Preheat oven to 375°F (190°C).

    Pour the mac and cheese into a greased 9×13-inch baking dish.

    Evenly sprinkle the garlic breadcrumb mixture over the top.


    Step 5: Bake

    Bake for 20–25 minutes, or until the topping is golden brown and crispy.

    For an extra crunchy finish, broil for 1–2 minutes, watching closely to prevent burning.

    Allow to rest for five minutes before serving.


    Serving Suggestions

    Garlic Bread Mac & Cheese pairs wonderfully with:

    • Grilled steak
    • BBQ ribs
    • Meatloaf
    • Fried chicken
    • Smoked brisket
    • Caesar salad
    • Roasted vegetables
    • Tomato soup

    It also makes an excellent side dish for holiday dinners and backyard cookouts.


    Tips for Success

    • Freshly shred your cheese for the smoothest sauce.
    • Don’t overcook the pasta—it will continue cooking in the oven.
    • Fresh garlic provides the best flavor.
    • Panko breadcrumbs create the crispiest topping.
    • Let the casserole rest before serving so the sauce thickens.

    Variations

    Bacon Garlic Bread Mac

    Add cooked bacon pieces before baking for smoky flavor.

    Buffalo Chicken Version

    Mix in shredded buffalo chicken and drizzle with ranch dressing.

    Pizza Mac

    Add pepperoni, mozzarella, and Italian seasoning for a pizza-inspired twist.

    Four Cheese Edition

    Combine cheddar, mozzarella, Gruyère, and Monterey Jack for extra richness.

    Spicy Southwest

    Add jalapeños, pepper jack cheese, smoked paprika, and diced green chiles.


    Storage

    Store leftovers in an airtight container in the refrigerator for up to 4 days.

    Freeze for up to 2 months in a freezer-safe container.


    Reheating

    Reheat in the microwave with a splash of milk to restore creaminess, or warm in a 350°F oven until heated through. Cover with foil for most of the baking time, then uncover for the last few minutes to crisp the topping.


    Final Thoughts

    Garlic Bread Mac & Cheese takes two beloved comfort food classics and combines them into one irresistible casserole. The creamy blend of cheeses, savory garlic, and buttery golden breadcrumb topping creates layers of flavor and texture that make every bite memorable. Whether you’re serving it as a hearty family dinner, a crowd-pleasing side dish, or the centerpiece of your next gathering, this recipe is sure to earn a permanent place in your meal rotation.

    Once you try this cheesy, crispy, garlic-packed creation, you’ll wonder why macaroni and cheese and garlic bread weren’t always served together.

    Read More Recipes

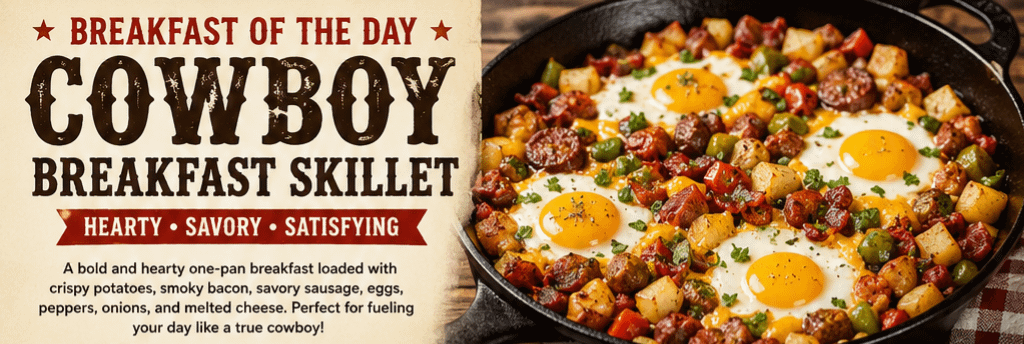
  • Breakfast of the Day: Cowboy Breakfast Skillet

    Advertisements

    Cowboy Breakfast Skillet: The Ultimate Hearty Breakfast

    When you need a breakfast that sticks with you for hours, few meals can compete with a Cowboy Breakfast Skillet. Packed with crispy potatoes, smoky bacon, savory sausage, colorful vegetables, perfectly cooked eggs, and melted cheese, this one-pan breakfast has earned its place as a favorite among ranchers, campers, outdoor enthusiasts, and anyone who loves a filling morning meal.

    Simple to prepare and incredibly satisfying, the Cowboy Breakfast Skillet is the definition of comfort food. Whether you’re feeding a hungry family, hosting weekend brunch, or enjoying breakfast around a campfire, this classic skillet recipe delivers bold flavors with every bite.


    Why It’s Called a Cowboy Breakfast

    Cowboys spent long days riding horses, repairing fences, herding cattle, and working outdoors. Their mornings often began with hearty meals that provided enough calories and protein to fuel hours of physical labor.

    While today’s Cowboy Breakfast is a modern interpretation, it reflects that same tradition by combining:

    • Potatoes
    • Bacon
    • Sausage
    • Eggs
    • Fresh vegetables
    • Cheese

    Everything cooks together in one cast-iron skillet, creating layers of flavor that make every forkful delicious.


    Ingredients

    For the Skillet

    • 1 pound russet potatoes, diced
    • 6 slices bacon, chopped
    • ½ pound breakfast sausage
    • 1 medium onion, diced
    • 1 red bell pepper, diced
    • 1 green bell pepper, diced
    • 2 cloves garlic, minced
    • 1 teaspoon smoked paprika
    • ½ teaspoon garlic powder
    • ½ teaspoon onion powder
    • ½ teaspoon black pepper
    • ½ teaspoon salt
    • ¼ teaspoon cayenne pepper (optional)
    • 1 cup shredded sharp cheddar cheese
    • 6 large eggs
    • 2 tablespoons chopped parsley
    • Green onions for garnish

    Optional Add-Ins

    Customize your skillet with:

    • Jalapeños
    • Mushrooms
    • Diced tomatoes
    • Black beans
    • Corn
    • Chorizo
    • Ham
    • Pulled pork
    • Steak bites
    • Avocado
    • Hot sauce

    Directions

    Step 1: Cook the Bacon

    Heat a large cast-iron skillet over medium heat.

    Cook bacon until crispy.

    Transfer to a paper towel-lined plate while leaving about two tablespoons of bacon grease in the skillet.


    Step 2: Brown the Sausage

    Add the breakfast sausage.

    Cook until browned and fully cooked.

    Remove and set aside with the bacon.


    Step 3: Cook the Potatoes

    Add diced potatoes to the skillet.

    Cook for 12–15 minutes, stirring occasionally until golden brown and crispy.

    If needed, add a tablespoon of butter or oil.


    Step 4: Add Vegetables

    Stir in:

    • Onion
    • Red pepper
    • Green pepper
    • Garlic

    Cook another 5 minutes until softened.


    Step 5: Season Everything

    Sprinkle over:

    • Smoked paprika
    • Garlic powder
    • Onion powder
    • Salt
    • Pepper
    • Cayenne

    Mix thoroughly.


    Step 6: Combine

    Return the cooked bacon and sausage to the skillet.

    Mix well until evenly distributed.


    Step 7: Add the Eggs

    Create six small wells in the mixture.

    Crack one egg into each well.

    Cover with a lid.

    Cook 5–8 minutes until the egg whites are set while the yolks remain runny, or longer if you prefer firm yolks.


    Step 8: Add Cheese

    Sprinkle cheddar cheese over the skillet.

    Cover for 1–2 minutes until melted.


    Step 9: Garnish

    Top with:

    • Fresh parsley
    • Green onions
    • Extra black pepper

    Serve immediately.


    Tips for the Best Cowboy Breakfast Skillet

    Use Cast Iron

    A cast-iron skillet creates perfectly crispy potatoes while adding incredible flavor.

    Don’t Rush the Potatoes

    Golden potatoes are the foundation of this breakfast.

    Cook Ingredients Separately

    Cooking bacon, sausage, and vegetables individually keeps each ingredient flavorful and properly textured.

    Freshly Shredded Cheese

    Fresh cheese melts much smoother than pre-shredded varieties.


    Delicious Variations

    Southwest Cowboy

    Add:

    • Pepper Jack cheese
    • Jalapeños
    • Black beans
    • Salsa
    • Avocado

    Steakhouse Skillet

    Replace sausage with:

    • Ribeye steak
    • Sirloin steak
    • Mushrooms
    • Swiss cheese

    BBQ Cowboy

    Mix in:

    • Pulled pork
    • BBQ sauce
    • Smoked gouda
    • Crispy onions

    Campfire Cowboy

    Cook everything over an open fire in a cast-iron skillet for authentic outdoor flavor.


    Perfect Side Dishes

    Serve with:

    • Buttermilk biscuits
    • Toast
    • Pancakes
    • Fresh fruit
    • Homemade salsa
    • Biscuits and gravy
    • Cinnamon rolls

    Beverage Pairings

    This hearty breakfast pairs wonderfully with:

    • Fresh coffee
    • Orange juice
    • Apple cider
    • Sweet tea
    • Cold milk
    • Bloody Mary (for brunch)

    Storage

    Store leftovers in an airtight container for up to 3 days.

    Reheat in a skillet over medium heat to restore the potatoes’ crispness.


    Can You Freeze It?

    Yes.

    Freeze the potato, meat, and vegetable mixture for up to 2 months.

    For the best texture, cook fresh eggs when reheating instead of freezing them with the skillet.


    Nutrition (Approximate Per Serving)

    • Calories: 640
    • Protein: 33g
    • Carbohydrates: 28g
    • Fat: 42g
    • Fiber: 4g
    • Sugar: 4g

    Values will vary depending on ingredients used.


    Why You’ll Love This Recipe

    The Cowboy Breakfast Skillet brings together everything people love about a hearty breakfast in one easy pan. Crispy potatoes, smoky bacon, savory sausage, colorful peppers, creamy eggs, and melted cheddar create a satisfying meal that’s perfect for busy mornings, relaxing weekends, or outdoor adventures. It’s simple to prepare, easy to customize, and guaranteed to keep everyone coming back for seconds.

    Whether you’re cooking in your kitchen or over a campfire beneath the open sky, this classic breakfast skillet captures the spirit of hearty home cooking—bold, comforting, and made to share.

    Read More Recipes

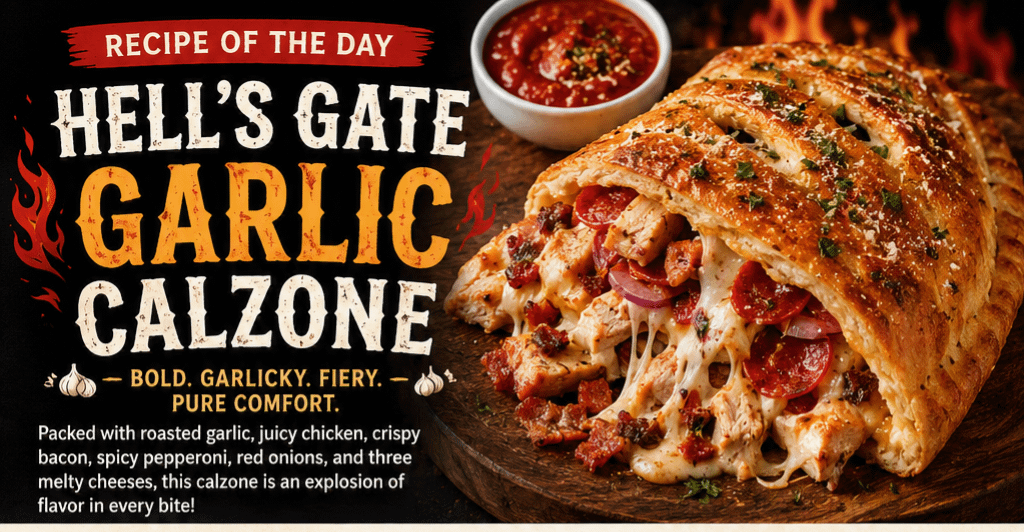
  • Recipe of the Day: Hell’s Gate Garlic Calzone

    Advertisements

    There are calzones… and then there’s the Hell’s Gate Garlic Calzone. This isn’t your average folded pizza—it’s an explosion of bold flavors wrapped inside a perfectly baked, golden crust. Loaded with roasted garlic, juicy chicken, crispy bacon, spicy pepperoni, sweet red onions, three rich cheeses, and a touch of heat, every bite delivers the kind of comfort food that satisfies even the biggest appetite.

    Whether you’re feeding the family on pizza night, entertaining friends during the big game, or simply craving something hearty after a long day, this calzone is guaranteed to become a favorite. The combination of smoky meats, creamy cheeses, and roasted garlic creates an unforgettable flavor that lives up to its fiery name.


    Why You’ll Love This Calzone

    Hell’s Gate Garlic Calzone takes everything people love about pizza and elevates it into something even better.

    Every bite offers layers of flavor:

    • Rich roasted garlic that becomes sweet and buttery during roasting
    • Tender chicken for a hearty, protein-packed filling
    • Crispy bacon that adds smoky crunch
    • Pepperoni that delivers classic pizza flavor with a hint of spice
    • Red onions that soften while baking and provide just the right amount of sweetness
    • Three melted cheeses that create a creamy, stretchy center
    • A crispy golden crust brushed with homemade garlic butter
    • A spicy finish that can easily be adjusted to your preferred heat level

    The result is a restaurant-quality calzone that’s surprisingly simple to make at home.


    Ingredients

    Dough

    • 1 pound fresh pizza dough
    • 1 tablespoon olive oil

    Filling

    • 2 cups cooked chicken, shredded or diced
    • 20–24 slices pepperoni
    • 6 slices bacon, cooked until crispy and crumbled
    • ½ cup red onion, thinly sliced
    • 2 cups shredded mozzarella cheese
    • ½ cup whole milk ricotta cheese
    • ¼ cup grated Parmesan cheese
    • 8–10 cloves roasted garlic
    • 2 tablespoons garlic butter
    • 1 teaspoon Italian seasoning
    • 1 teaspoon crushed red pepper flakes
    • ½ teaspoon smoked paprika
    • ½ teaspoon black pepper
    • 1 tablespoon chopped fresh parsley

    Garlic Butter Topping

    • 3 tablespoons melted butter
    • 2 cloves garlic, finely minced
    • 1 tablespoon grated Parmesan cheese
    • 1 teaspoon chopped parsley

    Optional Dipping Sauces

    • Marinara sauce
    • Garlic Alfredo sauce
    • Spicy ranch dressing
    • Creamy garlic aioli

    Step-by-Step Instructions

    Step 1: Roast the Garlic

    Roasting garlic transforms its sharp bite into something smooth, sweet, and buttery.

    Preheat your oven to 400°F (205°C).

    Wrap the garlic cloves in aluminum foil with a drizzle of olive oil and roast for approximately 35–40 minutes until soft. Allow them to cool slightly before squeezing the cloves into a bowl and mashing them into a paste.

    This roasted garlic becomes the heart of the filling.


    Step 2: Prepare the Filling

    In a large mixing bowl combine:

    • Chicken
    • Pepperoni
    • Bacon
    • Red onions
    • Mozzarella
    • Ricotta
    • Parmesan
    • Roasted garlic
    • Garlic butter
    • Italian seasoning
    • Smoked paprika
    • Black pepper
    • Crushed red pepper flakes
    • Fresh parsley

    Mix thoroughly until every ingredient is evenly coated.

    The filling should be rich, creamy, and packed with colorful ingredients.


    Step 3: Prepare the Dough

    Lightly flour your countertop.

    Roll the pizza dough into a circle about 12 inches across.

    Avoid rolling it too thin, as the filling is generous and you’ll want a sturdy crust capable of holding everything together.


    Step 4: Fill the Calzone

    Spread the filling over one half of the dough while leaving approximately one inch around the edge.

    Fold the dough over the filling.

    Press firmly around the edges before sealing with a fork.

    Cut two or three small slits into the top to allow steam to escape during baking.


    Step 5: Bake

    Brush the top with olive oil.

    Bake at 425°F (220°C) for 18–22 minutes, or until the crust becomes beautifully golden brown.

    The edges should be crisp while the inside stays perfectly cheesy.


    Step 6: Garlic Butter Finish

    While the calzone bakes, combine:

    • Melted butter
    • Minced garlic
    • Parmesan
    • Fresh parsley

    Immediately after removing the calzone from the oven, brush this mixture generously over the crust.

    This final step adds incredible aroma, flavor, and a glossy finish that makes the calzone absolutely irresistible.


    Serving Suggestions

    Hell’s Gate Garlic Calzone pairs wonderfully with:

    • Caesar salad
    • Garlic Parmesan fries
    • Mozzarella sticks
    • Roasted vegetables
    • Onion rings
    • Loaded potato wedges
    • Tomato basil soup

    For dipping, serve warm marinara, creamy Alfredo, spicy ranch, or garlic aioli.


    Tips for the Perfect Calzone

    Roast Your Garlic

    Roasted garlic provides deep, mellow flavor that raw garlic simply can’t match.

    Cook the Bacon First

    Crispy bacon keeps the filling from becoming greasy while adding excellent texture.

    Don’t Overfill

    As tempting as it is, overstuffing makes sealing difficult and increases the chance of leaks during baking.

    Seal It Well

    Use water or a beaten egg around the edge before crimping for an extra secure seal.

    Rest Before Cutting

    Allow the calzone to rest for five minutes before slicing. This helps the melted cheeses stay inside rather than spilling out immediately.


    Delicious Variations

    The Inferno

    Add sliced jalapeños, diced habaneros, hot Italian sausage, and your favorite hot sauce.

    BBQ Hell’s Gate

    Mix shredded chicken with smoky barbecue sauce before combining with the cheeses.

    Steakhouse Edition

    Replace the chicken with thin slices of grilled steak and sautéed mushrooms.

    Vegetarian

    Swap the meats for spinach, mushrooms, roasted peppers, olives, and extra mozzarella.


    Storage and Reheating

    Store leftovers in an airtight container in the refrigerator for up to 4 days.

    Freeze individual slices for up to 2 months.

    Reheat in a 375°F oven for 10–12 minutes or in an air fryer for 5–6 minutes to restore the crispy crust.

    Avoid microwaving whenever possible, as it softens the crust.


    Nutritional Information (Approximate Per Serving)

    • Calories: 720
    • Protein: 39g
    • Carbohydrates: 42g
    • Fat: 45g
    • Saturated Fat: 18g
    • Fiber: 3g
    • Sodium: 1,520mg

    Nutritional values will vary depending on the dough and ingredients used.


    Final Thoughts

    The Hell’s Gate Garlic Calzone is everything comfort food should be—crispy, cheesy, smoky, garlicky, and packed with bold flavors in every bite. Roasted garlic provides incredible depth, while bacon, pepperoni, and juicy chicken create a satisfying combination of textures and savory goodness. Sweet red onions balance the richness, and the garlic butter finish takes the crust to another level.

    Whether you’re making it for pizza night, a weekend gathering, or simply because you’re craving something unforgettable, this calzone is guaranteed to disappear quickly. Serve it fresh from the oven with your favorite dipping sauce and watch everyone come back for seconds. One bite is all it takes to understand why this recipe earns its fiery name.

    Read More Recipes

  • Breakfast of the Day: Ham & Cheese Egg Cups

    Advertisements

    There are few breakfasts as satisfying as one that is simple to prepare, packed with protein, and delicious enough to keep you full throughout the morning. Ham & Cheese Egg Cups check every box. These savory breakfast bites combine eggs, ham, cheese, and your favorite vegetables into convenient individual servings that are perfect for busy mornings, meal prepping, or weekend brunches.

    Whether you’re following a low-carb lifestyle, looking for a grab-and-go breakfast, or simply trying to use up ingredients in your refrigerator, Ham & Cheese Egg Cups are a versatile recipe you’ll find yourself making again and again.


    Why You’ll Love Ham & Cheese Egg Cups

    Breakfast often sets the tone for the rest of the day. A balanced meal filled with protein and healthy fats can help improve focus, reduce hunger, and provide lasting energy.

    Ham & Cheese Egg Cups offer numerous benefits:

    • Ready in about 30 minutes
    • Great for meal prep
    • High in protein
    • Naturally low in carbohydrates
    • Easy to customize
    • Kid-friendly
    • Freezer-friendly
    • Minimal cleanup

    They’re portable enough to enjoy on your commute, at work, or after a morning workout.


    Ingredients

    For 12 Egg Cups

    • 10 large eggs
    • ¼ cup milk or heavy cream
    • 1½ cups diced cooked ham
    • 1 cup shredded cheddar cheese
    • ¼ cup mozzarella cheese
    • ¼ cup diced green onions
    • ¼ cup diced red bell pepper
    • 2 tablespoons chopped parsley
    • Salt to taste
    • Black pepper to taste
    • Non-stick cooking spray

    Optional Add-Ins

    One of the best things about egg cups is how customizable they are.

    Try adding:

    • Cooked bacon
    • Breakfast sausage
    • Spinach
    • Mushrooms
    • Jalapeños
    • Broccoli
    • Tomatoes
    • Swiss cheese
    • Pepper Jack cheese
    • Feta cheese
    • Fresh herbs

    Mix and match ingredients to create your own favorite combination.


    Instructions

    Step 1: Prepare the Oven

    Preheat your oven to 375°F (190°C).

    Grease a 12-cup muffin pan thoroughly with non-stick spray.


    Step 2: Whisk the Eggs

    In a large bowl combine:

    • Eggs
    • Milk
    • Salt
    • Pepper

    Whisk until completely blended and slightly frothy.


    Step 3: Fill the Muffin Cups

    Evenly divide between the muffin cups:

    • Ham
    • Cheddar cheese
    • Mozzarella
    • Bell pepper
    • Green onions

    Pour the egg mixture over the fillings until each cup is approximately ¾ full.

    Top with parsley.


    Step 4: Bake

    Bake for 18–22 minutes, or until the centers are fully set and lightly golden.

    The egg cups will puff up while baking but settle slightly as they cool.


    Step 5: Cool and Serve

    Allow them to cool for about five minutes before carefully removing them from the muffin pan.

    Serve warm.


    Serving Suggestions

    Ham & Cheese Egg Cups pair wonderfully with:

    • Fresh fruit
    • Hash browns
    • Breakfast potatoes
    • Toast
    • English muffins
    • Avocado slices
    • Greek yogurt
    • Fresh salsa
    • Hot sauce

    For brunch, serve them alongside pancakes or waffles for a complete breakfast spread.


    Meal Prep Favorite

    These egg cups are one of the easiest breakfast meal prep recipes.

    Store them in an airtight container in the refrigerator for up to 5 days.

    To reheat:

    • Microwave for 30–45 seconds
    • Oven at 300°F for about 8 minutes
    • Air fryer for 3–4 minutes

    They’re just as tasty reheated as they are fresh from the oven.


    Can You Freeze Them?

    Absolutely.

    Once cooled completely:

    1. Wrap each egg cup individually.
    2. Place them in a freezer-safe bag.
    3. Freeze for up to 3 months.

    Reheat directly from frozen in the microwave for approximately one minute.


    Tips for Perfect Egg Cups

    Grease the Pan Well

    Eggs naturally stick to muffin tins. Be generous with non-stick spray or use silicone muffin liners.

    Don’t Overfill

    Leave a little room at the top because eggs expand while baking.

    Use Cooked Ingredients

    Vegetables with high moisture should be lightly cooked first to prevent watery egg cups.

    Let Them Rest

    Allowing them to cool for a few minutes makes removal much easier.


    Nutrition Benefits

    Eggs are among the most nutrient-dense foods available.

    Each serving provides:

    • High-quality protein
    • Vitamin D
    • Vitamin B12
    • Choline
    • Selenium
    • Healthy fats

    Ham contributes additional protein while cheese provides calcium and flavor.

    Adding vegetables increases fiber, antioxidants, vitamins, and minerals.


    Flavor Variations

    Western Style

    Add onions, green peppers, ham, and cheddar.

    Denver Omelet Cups

    Mix in mushrooms and diced peppers.

    Spicy Southwest

    Use Pepper Jack cheese, jalapeños, and salsa.

    Mediterranean

    Use spinach, feta, tomatoes, and oregano.

    Bacon Lovers

    Replace the ham with crispy bacon.

    Veggie Delight

    Skip the meat and add broccoli, spinach, mushrooms, and peppers.


    Perfect for Every Occasion

    Ham & Cheese Egg Cups aren’t just for weekday breakfasts.

    They’re ideal for:

    • Holiday breakfasts
    • Family brunches
    • Baby showers
    • Potlucks
    • Camping trips
    • Road trips
    • School lunches
    • Quick dinners

    Their individual servings make entertaining easy while eliminating the need for slicing or serving large casseroles.


    Frequently Asked Questions

    Can I make these dairy-free?

    Yes. Omit the cheese and substitute a dairy-free milk alternative.

    Can I use egg whites?

    Absolutely. Substitute approximately 2 cups of liquid egg whites for the whole eggs.

    Can I use turkey ham?

    Yes. Turkey ham works wonderfully and slightly lowers the fat content.

    Why did my egg cups sink?

    This is completely normal. Eggs puff while baking and naturally settle as they cool.


    Final Thoughts

    Ham & Cheese Egg Cups are proof that breakfast doesn’t have to be complicated to be delicious. They’re flavorful, nutritious, and endlessly customizable, making them one of the best make-ahead breakfasts for busy families and anyone looking to start the day with a satisfying meal.

    Whether you’re preparing breakfast for one, feeding a crowd, or stocking your refrigerator with easy weekday meals, these savory egg cups deliver homemade comfort in every bite. Once you try them, they’re likely to become a regular part of your breakfast rotation.

    Read More Recipes

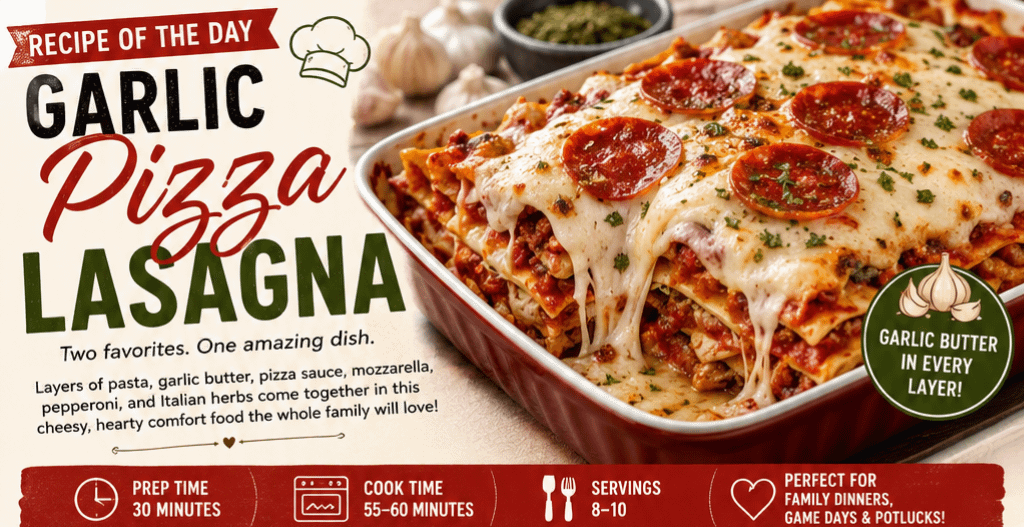
  • Recipe of the Day: Garlic Pizza Lasagna

    Advertisements

    If you’re torn between ordering pizza or making lasagna, why not enjoy both? Garlic Pizza Lasagna combines everything people love about cheesy pizza with the rich, layered goodness of traditional lasagna. Every bite delivers garlic-infused flavor, stretchy melted mozzarella, savory pepperoni, seasoned Italian sausage, and hearty pasta baked to perfection.

    This recipe is perfect for family dinners, game days, potlucks, or whenever you’re craving something indulgent. It’s easy enough for a weeknight meal yet impressive enough to serve guests.


    Why You’ll Love Garlic Pizza Lasagna

    Garlic Pizza Lasagna isn’t just another pasta dish—it delivers the best of both worlds.

    You’ll enjoy:

    • Rich garlic butter throughout every layer
    • Gooey mozzarella cheese
    • Classic pizza toppings
    • Hearty meat sauce
    • Crispy golden cheese topping
    • Leftovers that taste even better the next day

    It’s everything you love about pizza and lasagna combined into one unforgettable meal.


    Ingredients

    Pasta

    • 12 lasagna noodles
    • Water for boiling
    • 1 tablespoon salt

    Garlic Butter

    • 6 tablespoons butter
    • 6 cloves garlic, minced
    • 2 teaspoons Italian seasoning
    • 1 teaspoon parsley
    • Pinch of salt

    Meat Filling

    • 1 pound Italian sausage
    • 1/2 pound ground beef
    • 1 cup diced pepperoni
    • 1 small onion, diced
    • 3 cloves garlic, minced

    Sauce

    • 3 cups pizza sauce
    • 1 cup marinara sauce
    • 2 teaspoons Italian seasoning
    • 1 teaspoon oregano
    • 1 teaspoon basil
    • 1/2 teaspoon crushed red pepper (optional)

    Cheese Layer

    • 15 ounces ricotta cheese
    • 2 eggs
    • 1/2 cup Parmesan cheese
    • 2 tablespoons parsley
    • 1 teaspoon garlic powder
    • Salt and pepper to taste

    Toppings

    • 4 cups shredded mozzarella
    • 1 cup shredded provolone
    • 1 cup grated Parmesan
    • Pepperoni slices
    • Black olives (optional)
    • Mushrooms (optional)
    • Green peppers (optional)
    • Fresh basil for garnish

    Directions

    Step 1: Cook the Pasta

    Bring a large pot of salted water to a boil.

    Cook lasagna noodles until al dente.

    Drain and lay them flat on parchment paper.


    Step 2: Prepare the Garlic Butter

    In a small saucepan melt butter over medium heat.

    Add:

    • minced garlic
    • Italian seasoning
    • parsley
    • salt

    Cook for about two minutes until fragrant.

    Set aside.


    Step 3: Brown the Meat

    In a large skillet cook:

    • Italian sausage
    • ground beef
    • onion

    Cook until browned.

    Drain excess grease.

    Add:

    • garlic
    • diced pepperoni

    Cook another minute.


    Step 4: Make the Pizza Sauce

    Pour pizza sauce and marinara into the skillet.

    Season with:

    • oregano
    • basil
    • Italian seasoning
    • crushed red pepper

    Simmer for 10 minutes.


    Step 5: Mix the Cheese

    In a bowl combine:

    • ricotta
    • eggs
    • Parmesan
    • garlic powder
    • parsley
    • salt
    • pepper

    Mix until smooth.


    Assemble the Garlic Pizza Lasagna

    Grease a 9×13 baking dish.

    Spread a thin layer of sauce.

    Layer:

    • Lasagna noodles
    • Garlic butter brushed over noodles
    • Ricotta mixture
    • Meat sauce
    • Mozzarella
    • Provolone

    Repeat until ingredients are used.

    Finish with:

    • Remaining mozzarella
    • Parmesan
    • Pepperoni slices
    • Extra Italian seasoning

    Bake

    Cover with foil.

    Bake at 375°F (190°C) for 40 minutes.

    Remove foil.

    Bake another 15–20 minutes until golden brown and bubbly.

    Let rest for 15 minutes before slicing.


    Optional Pizza Toppings

    Customize your Garlic Pizza Lasagna with your favorite pizza ingredients:

    • Bacon
    • Canadian bacon
    • Italian sausage
    • Jalapeños
    • Pineapple
    • Bell peppers
    • Mushrooms
    • Spinach
    • Banana peppers
    • Extra pepperoni
    • Black olives
    • Red onions
    • Fresh tomatoes

    Mix and match to make it your own.


    Serving Suggestions

    Garlic Pizza Lasagna pairs perfectly with:

    • Garlic bread
    • Caesar salad
    • Italian chopped salad
    • Roasted vegetables
    • Breadsticks
    • Garlic knots

    A sparkling lemonade or Italian soda also complements the rich flavors beautifully.


    Storage

    Store leftovers in an airtight container in the refrigerator for up to 4 days.

    Freeze individual portions for up to 3 months.

    Reheat in the oven at 350°F for about 20 minutes, or microwave individual slices until heated through.


    Tips for Success

    • Brush every noodle layer with garlic butter for maximum flavor.
    • Use freshly shredded mozzarella for the best melt.
    • Let the lasagna rest before cutting so the layers stay intact.
    • Add extra pepperoni on top for a crispy pizza-style finish.
    • Make it a day ahead—the flavors become even richer overnight.

    Variations

    Meat Lover’s Version

    Add bacon, ham, and spicy Italian sausage.

    Supreme Pizza Lasagna

    Include mushrooms, peppers, onions, olives, and sausage.

    Four Cheese Pizza Lasagna

    Use mozzarella, provolone, ricotta, Parmesan, and fontina.

    Chicken Garlic Pizza Lasagna

    Replace the beef with grilled chicken and add spinach.

    Vegetarian Pizza Lasagna

    Skip the meat and load it with mushrooms, zucchini, peppers, onions, olives, and spinach.


    Final Thoughts

    Garlic Pizza Lasagna is the ultimate comfort food for pizza lovers and pasta fans alike. The buttery garlic, rich meat sauce, gooey layers of cheese, and classic pizza flavors come together in a baked dish that’s hearty, satisfying, and guaranteed to disappear quickly from the dinner table. Whether you’re feeding a hungry family, entertaining friends, or preparing meals for the week, this recipe delivers restaurant-quality flavor with homemade warmth. One bite is all it takes to understand why this fusion dish is destined to become a new family favorite.

Exit mobile version