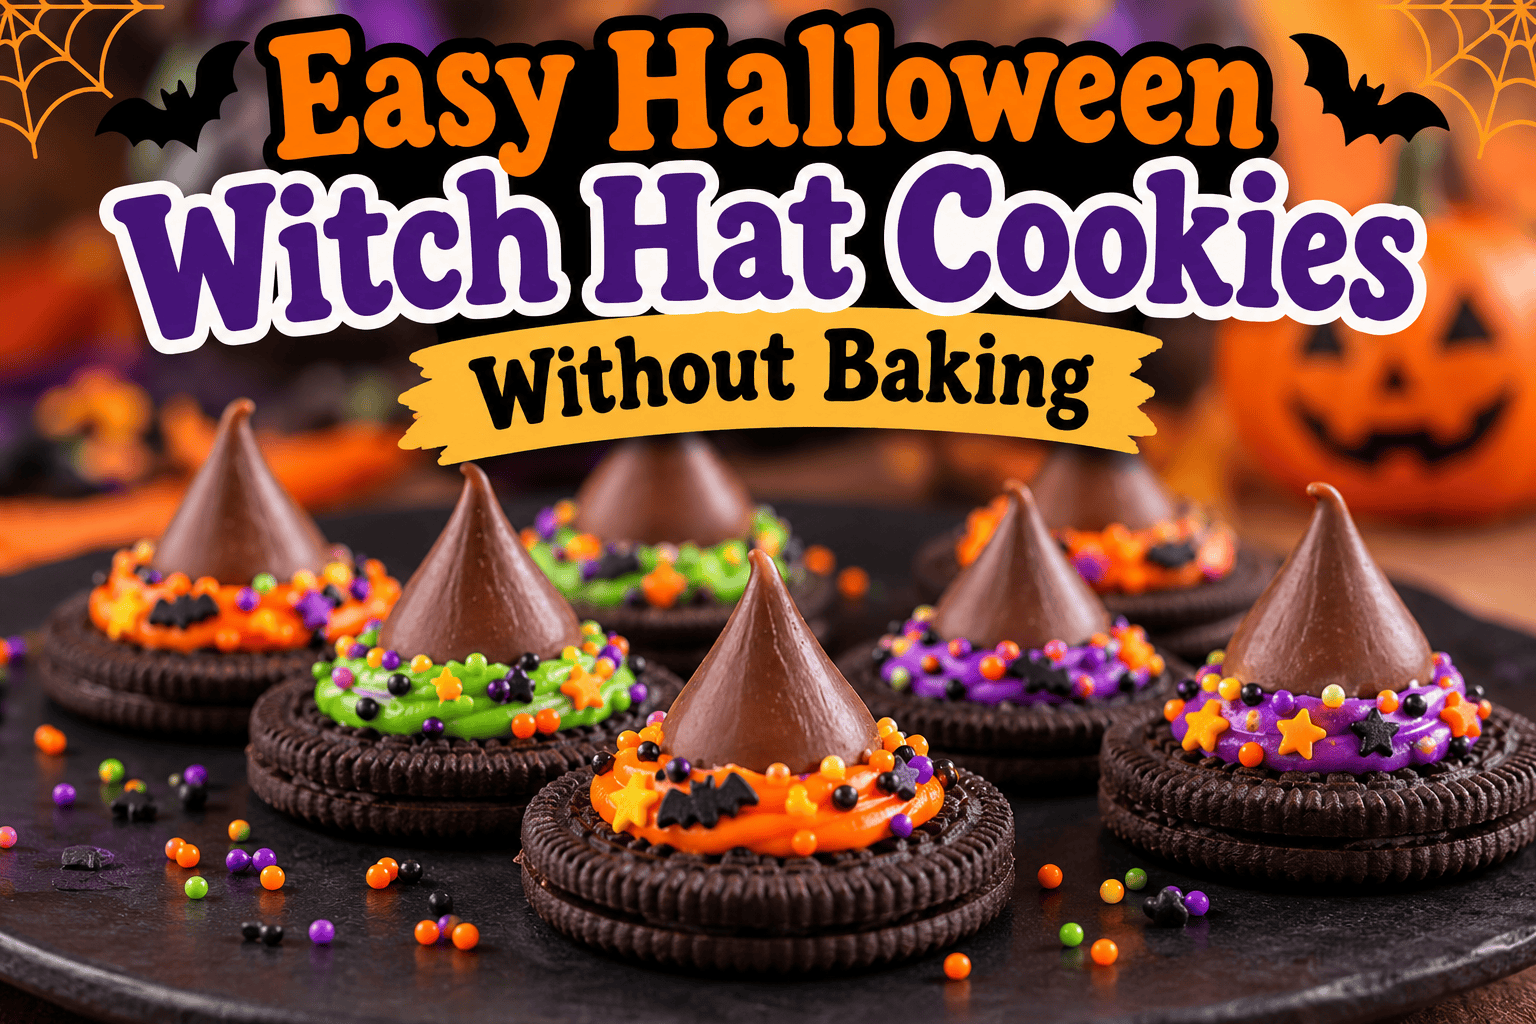
Halloween is the perfect time to get creative in the kitchen, especially when making festive treats that are easy, delicious, and fun for the entire family. If you are looking for a simple Halloween dessert that requires no oven, these Easy Halloween Witch Hat Cookies Without Baking are an excellent choice.
Made with chocolate cookies, chocolate kisses, colorful frosting, and festive sprinkles, these adorable witch hat cookies come together in minutes. They are perfect for Halloween parties, classroom celebrations, trick-or-treat gatherings, or a spooky movie night at home.
The best part? You do not need baking experience or complicated ingredients. With just a few supplies and a little creativity, you can make Halloween cookies that look impressive without spending hours in the kitchen.
Whether you are preparing treats with children or putting together a Halloween dessert platter, these no-bake witch hat cookies are sure to bring a little magic to your celebration.
Why You’ll Love These No-Bake Halloween Witch Hat Cookies
There are plenty of Halloween desserts to choose from, but witch hat cookies stand out because they combine simplicity with festive presentation.
Here are a few reasons this recipe deserves a place on your Halloween menu.
No Baking Required: You can prepare these cookies without turning on the oven, making them convenient for busy schedules.
Only a Few Ingredients: Most of the ingredients are easy to find at your local grocery store.
Kid-Friendly Activity: Children can help assemble and decorate their own witch hats.
Perfect for Halloween Parties: These cookies look wonderful on dessert tables and Halloween snack platters.
Easy to Customize: Change the frosting colors, cookie flavors, and decorations to create different witch hat designs.
Quick Preparation: The cookies take approximately 20 minutes to assemble, plus a short setting time.
These treats are especially helpful when you need a last-minute Halloween dessert that looks festive without requiring complicated preparation.
Easy Halloween Witch Hat Cookies Recipe
RECIPE DETAILS
Prep time
20 minutes
Setting time
15 minutes
Total time
35 minutes
Yield
24 cookies
Difficulty: Easy
Cooking Method: No-bake
Occasion: Halloween parties, fall celebrations, classroom treats, and family activities.
Ingredients for Halloween Witch Hat Cookies
You only need a handful of ingredients to make these adorable Halloween treats.
-
24 chocolate sandwich cookies, such as Oreos
-
24 milk chocolate kisses, unwrapped
-
½ cup orange decorating frosting
-
¼ cup purple decorating frosting
-
¼ cup green decorating frosting
-
¼ cup Halloween-themed sprinkles
-
2 tablespoons mini candy decorations or edible sugar stars (optional)
Choosing the Best Ingredients
Chocolate Sandwich Cookies: These create the wide, round brim of each witch hat. Chocolate cookies provide the traditional dark appearance, but other flavors can work.
Chocolate Kisses: The pointed shape makes them ideal for the top of the witch hat.
Colored Frosting: Orange, purple, and green are classic Halloween colors. Ready-to-use decorating frosting makes the process especially convenient.
Halloween Sprinkles: Small bats, pumpkins, stars, and colorful sugar crystals add extra personality.
For the easiest preparation, choose frosting that comes in a piping tube or transfer frosting into a small piping bag.
How to Make Easy Halloween Witch Hat Cookies Without Baking
These witch hat cookies are incredibly simple to assemble. Follow these steps for the best results.
Step 1: Prepare Your Work Area
Line a baking sheet or large tray with parchment paper.
Arrange the chocolate sandwich cookies in a single layer, leaving enough space between them for decorating.
Unwrap all the chocolate kisses before beginning. Having everything ready makes assembly much easier.
Step 2: Add the Frosting
Pipe a small circle of orange, purple, or green frosting in the center of each chocolate cookie.
The frosting serves two purposes: it holds the chocolate kiss in place and creates the colorful band around the witch hat.
Use enough frosting so that a little remains visible around the base of the chocolate kiss.
Step 3: Attach the Chocolate Kisses
Place one chocolate kiss directly onto the frosting in the center of each cookie.
Press down gently until the kiss is secure.
Avoid pressing too hard because the chocolate sandwich cookie may crack.
The pointed chocolate kiss creates the recognizable witch hat shape.
Step 4: Decorate the Witch Hats
Add Halloween sprinkles, mini candy stars, or edible sugar decorations around the frosting band.
Try alternating colors to create a variety of witch hats.
For example, make some hats with orange frosting and purple sprinkles, while others feature green frosting with black sugar crystals.
Step 5: Allow the Cookies to Set
Place the assembled cookies in the refrigerator for approximately 15 minutes to help the frosting firm up.
If using a frosting that remains soft, follow its package directions for setting and storage.
Once the decorations are secure, the cookies are ready to serve.
Step 6: Serve and Enjoy
Arrange the finished witch hat cookies on a Halloween platter or decorative serving tray.
For an extra festive presentation, surround them with candy pumpkins, wrapped Halloween chocolates, or additional sprinkles.
Your no-bake Halloween witch hat cookies are now ready to enjoy.
Tips for Making Perfect Witch Hat Cookies
Although this recipe is simple, a few helpful techniques can make your cookies look even better.
Use Fresh Chocolate Cookies
Choose cookies that are not cracked or broken. The cookie serves as the base of the witch hat, so a sturdy foundation is important.
Keep Chocolate Kisses Cool
If your kitchen is warm, refrigerate the chocolate kisses briefly before assembling the cookies.
Cool chocolate is easier to handle and less likely to soften while decorating.
Use Thick Decorating Frosting
A thicker frosting helps hold the chocolate kiss in place and creates a more defined hatband.
Thin icing may spread too much or fail to secure the candy properly.
Create Different Hat Colors
Instead of making every cookie identical, experiment with several Halloween color combinations.
Orange, purple, green, and black all work beautifully.
Let Children Help Decorate
Younger children can add sprinkles and choose frosting colors while adults handle any more detailed piping.
This turns a simple recipe into a fun Halloween family activity.
Creative Halloween Witch Hat Cookie Variations
One of the best things about this recipe is how easily you can customize it.
1. Classic Chocolate Witch Hats
Use chocolate sandwich cookies, milk chocolate kisses, and orange frosting for a traditional Halloween appearance.
2. Purple Witch Hat Cookies
Decorate the cookies with purple frosting and black or silver sprinkles.
These cookies are perfect for a magical Halloween party theme.
3. Green Witch Hat Cookies
Use bright green frosting with purple sprinkles for a colorful witch-inspired design.
4. Peanut Butter Witch Hats
Use chocolate-covered peanut butter candies with a pointed shape, if available, instead of traditional chocolate kisses.
Check ingredient labels carefully when serving guests with peanut allergies.
5. White Chocolate Witch Hats
Replace milk chocolate kisses with white chocolate kisses for a different flavor and appearance.
Pair them with orange or purple frosting for contrast.
6. Extra Spooky Witch Hats
Decorate the cookies with black frosting, edible glitter, and tiny candy spiders.
These work especially well for haunted-house-themed parties.
How to Make Witch Hat Cookies for a Halloween Party
Halloween witch hat cookies are an excellent choice for parties because they are easy to prepare in large quantities.
If you are expecting several guests, simply double or triple the recipe.
For 48 cookies, use 48 chocolate sandwich cookies, 48 chocolate kisses, and approximately twice the frosting and decorations.
Prepare the cookies the day before your celebration to save time.
When arranging your Halloween dessert table, consider placing the cookies on a black or orange serving platter.
You can also display them alongside ghost cookies, Halloween brownies, pumpkin cupcakes, and other spooky desserts.
The colorful frosting bands help the witch hats stand out among other Halloween treats.
Fun Halloween Cookie Decorating Ideas for Kids
Making Halloween cookies can be just as enjoyable as eating them.
Set up a small decorating station with separate bowls of colorful sprinkles, edible decorations, and frosting.
Give each child a few chocolate cookies and chocolate kisses.
Allow them to choose their favorite colors and create their own witch hat designs.
You can even turn decorating into a friendly Halloween activity with categories such as the most colorful witch hat, the funniest witch hat, or the spookiest design.
For younger children, provide age-appropriate decorations and supervise closely, since small candies may present a choking hazard.
The goal is to have fun, encourage creativity, and make Halloween memories together.
How to Store No-Bake Halloween Witch Hat Cookies
Proper storage helps keep your cookies fresh and attractive.
Room Temperature: Store the cookies in an airtight container in a cool, dry location for up to 2 days, provided the frosting is shelf-stable and its label permits room-temperature storage.
Refrigerator: If using perishable frosting, refrigerate the cookies in an airtight container according to the frosting’s storage instructions.
Freezer: Freezing is not recommended for the best appearance because condensation can affect the chocolate, frosting, and sprinkles after thawing.
For the best texture, avoid stacking the cookies directly on top of one another.
If stacking is necessary, use parchment paper between layers and make sure the decorations have fully set.
Common Mistakes to Avoid
Even easy Halloween recipes can occasionally present small challenges.
Using Too Much Frosting: Excess frosting may cause the chocolate kiss to slide or tilt.
Pressing Too Hard: Applying too much pressure can break the cookie base.
Decorating Before the Kiss Is Secure: Allow the chocolate kiss to settle into the frosting before adding extra decorations.
Using Runny Icing: Thin icing may not provide enough support for the chocolate kiss.
Storing Cookies in a Warm Area: Heat can soften the chocolate and affect the decorations.
Avoiding these mistakes will help your witch hat cookies maintain their shape and festive appearance.
Frequently Asked Questions About Halloween Witch Hat Cookies
Can I make Halloween witch hat cookies ahead of time?
Yes. You can prepare these cookies one day before your Halloween celebration. Store them according to the frosting’s instructions until serving.
Do witch hat cookies require baking?
No. This recipe uses ready-made chocolate cookies and chocolate kisses, so there is no baking involved.
Can I use different cookies?
Absolutely. Chocolate wafers, round chocolate biscuits, or other sturdy round cookies can work as the base.
What can I use instead of frosting?
Melted chocolate or candy melts can be used to attach the chocolate kisses. However, frosting creates a more colorful and decorative hatband.
Can children make these cookies?
Yes. This recipe is a fun Halloween activity for children with appropriate adult supervision.
How many witch hat cookies does this recipe make?
This recipe makes approximately 24 cookies. You can easily adjust the ingredients to prepare more or fewer servings.
Are these cookies good for Halloween classroom parties?
Yes, provided the school permits homemade or assembled treats. Always check classroom food-allergy policies and ingredient restrictions before bringing them.
Why No-Bake Halloween Desserts Are Perfect for Busy Families
Halloween can be a busy season filled with costumes, decorations, school activities, parties, and trick-or-treating.
Preparing complicated desserts is not always practical when there are so many other things to organize.
That is why no-bake Halloween recipes are especially convenient.
They save preparation time, require fewer kitchen tools, and offer plenty of opportunities for creativity.
Witch hat cookies are particularly appealing because they use familiar ingredients and require very little cleanup.
They also make it easy for family members of different ages to participate in preparing Halloween treats.
Instead of spending the entire afternoon baking, you can enjoy decorating cookies together and creating something festive.
Final Thoughts: Easy Halloween Witch Hat Cookies Without Baking
These Easy Halloween Witch Hat Cookies Without Baking prove that creating a festive Halloween dessert does not have to be complicated.
With chocolate sandwich cookies, chocolate kisses, colorful frosting, and a few decorative sprinkles, you can make adorable witch hat treats that are perfect for nearly any Halloween occasion.
They are quick to assemble, easy to customize, and ideal for making with children.
Whether you are hosting a Halloween party, preparing treats for a family gathering, or simply looking for a fun seasonal dessert, these no-bake cookies are a wonderful addition to your Halloween recipe collection.
Sometimes the simplest Halloween treats are the ones everyone remembers.
What colors would you choose for your Halloween witch hat cookies—classic orange and black, spooky purple and green, or a combination of all four?


Leave a Reply