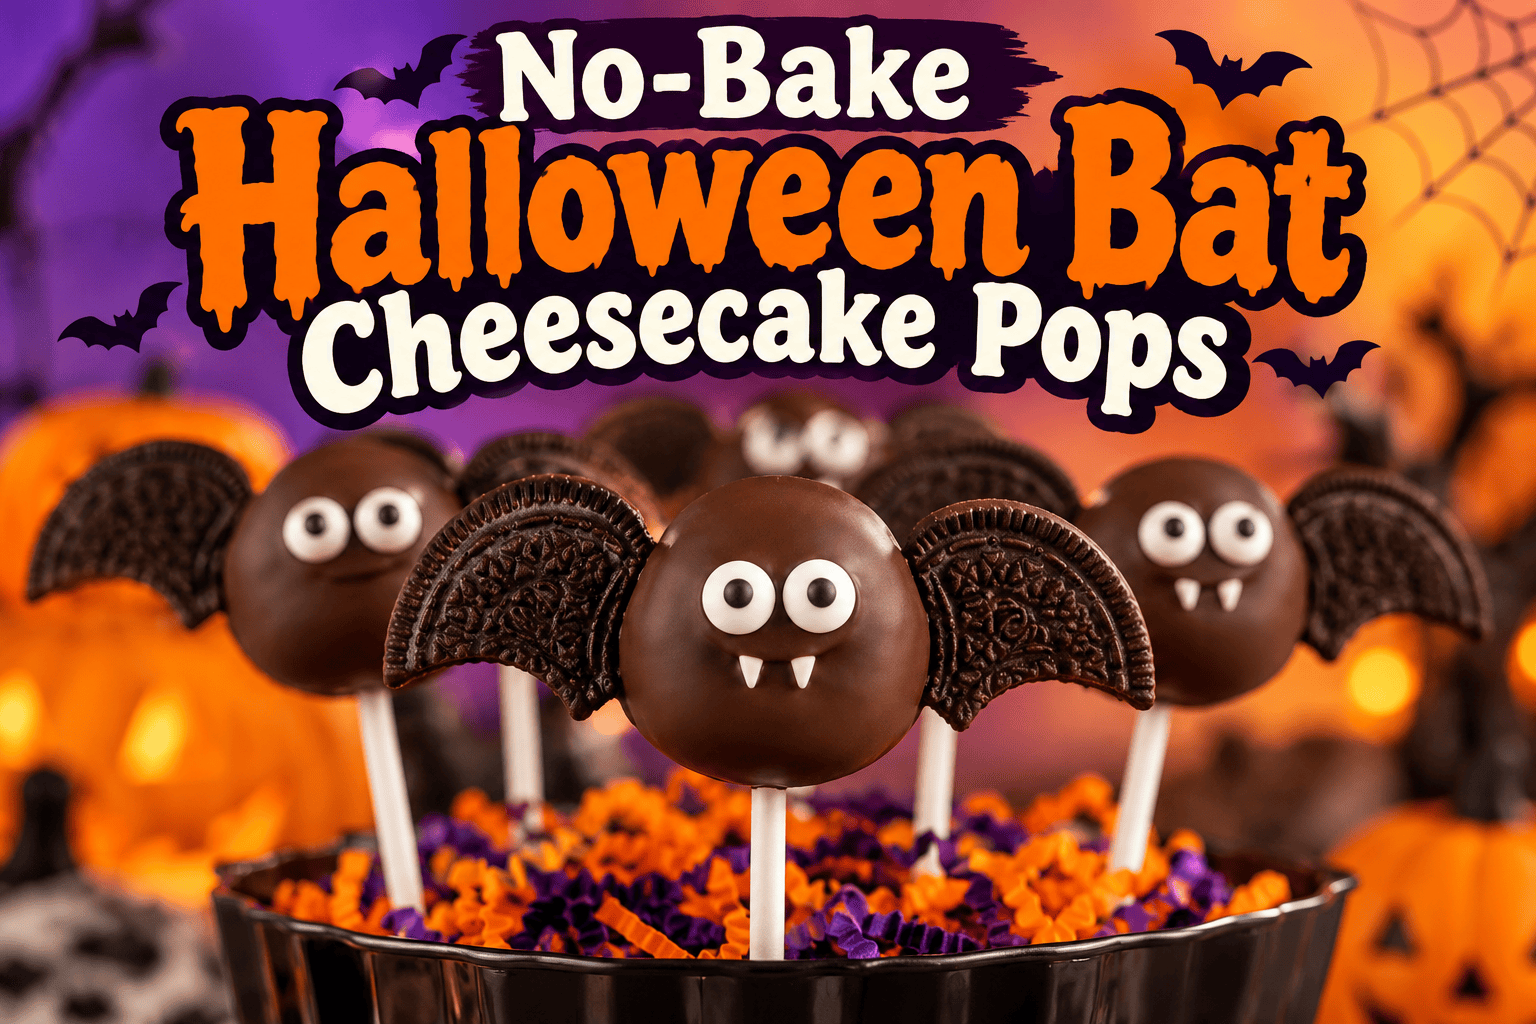
Halloween is the perfect time to get creative in the kitchen, especially when you can make something delicious without turning on the oven. These No-Bake Halloween Bat Cheesecake Pops combine a rich, creamy cheesecake filling with a crunchy chocolate coating and adorable bat decorations. They’re spooky, sweet, and surprisingly simple to prepare.
Whether you’re hosting a Halloween party, preparing treats for a school celebration, or looking for a fun dessert to make with your children, these Halloween cheesecake pops are guaranteed to stand out.
With their chocolate cookie wings, candy eyes, and smooth cheesecake centers, these little bats look impressive without requiring complicated baking techniques.
Best of all, you can prepare them ahead of time, making Halloween entertaining easier and more enjoyable.
Why You’ll Love These No-Bake Halloween Bat Cheesecake Pops
Halloween desserts should be fun, delicious, and easy to prepare. These cheesecake pops deliver all three.
No baking required: You can create these Halloween treats without using an oven.
Rich cheesecake flavor: Cream cheese, powdered sugar, and vanilla create a smooth, sweet filling.
Adorable Halloween appearance: Chocolate cookie wings and candy eyes transform ordinary cheesecake balls into spooky bats.
Perfect for parties: Individual pops make serving simple and convenient.
Make-ahead friendly: Prepare the cheesecake centers in advance and decorate them closer to your celebration.
Kid-friendly decorating: Children can help attach candy eyes and create their own bat designs.
These Halloween cheesecake pops are also easy to customize with different coatings, decorations, and flavors.
Recipe Overview
Ingredients for No-Bake Halloween Bat Cheesecake Pops
You only need a handful of ingredients to create these delicious Halloween desserts.
For the Cheesecake Filling
-
8 ounces cream cheese, softened
-
1 cup powdered sugar
-
1 teaspoon vanilla extract
-
1½ cups finely crushed graham crackers
-
½ cup finely crushed chocolate sandwich cookies
-
¼ teaspoon salt
For the Chocolate Coating
-
12 ounces dark or semi-sweet chocolate melting wafers
-
1 teaspoon coconut oil, optional, for thinning the coating
For the Bat Decorations
-
18 chocolate sandwich cookies, separated into halves
-
36 small candy eyes
-
Mini chocolate chips or black decorating icing for additional details
-
18 food-safe lollipop sticks
Optional decorations:
-
Purple Halloween sprinkles
-
Black sanding sugar
-
Orange candy melts
-
Mini candy fangs
-
Edible glitter
For the best results, choose chocolate melting wafers designed for dipping. They create a smooth coating that sets firmly around the cheesecake filling.
How to Make No-Bake Halloween Bat Cheesecake Pops
Follow these simple steps to create your spooky Halloween bats.
Step 1: Prepare the Cheesecake Filling
In a large mixing bowl, beat the softened cream cheese until smooth and creamy.
Add the powdered sugar, vanilla extract, and salt. Continue mixing until completely combined.
Gradually fold in the crushed graham crackers and chocolate sandwich cookie crumbs.
Mix until the filling becomes thick enough to hold its shape.
If the mixture feels too soft, refrigerate it for approximately 20–30 minutes before shaping.
Step 2: Shape the Cheesecake Balls
Line a baking sheet with parchment paper.
Using a small cookie scoop or tablespoon, portion the cheesecake mixture into approximately 18 equal pieces.
Roll each portion between your palms to create a smooth ball.
Place the cheesecake balls onto the prepared baking sheet.
Try to keep them uniform in size so they chill evenly and look consistent when decorated.
Step 3: Insert the Lollipop Sticks
Melt a small amount of chocolate coating.
Dip the tip of each lollipop stick into the melted chocolate, then gently insert it about halfway into a cheesecake ball.
The chocolate helps secure the stick once it hardens.
Avoid pushing the stick completely through the cheesecake ball.
Step 4: Chill the Cheesecake Pops
Place the cheesecake pops in the freezer for approximately 45–60 minutes, or until firm.
The cheesecake centers should be cold and sturdy before dipping.
This step is especially important because soft cheesecake balls can slide off their sticks when dipped into warm chocolate.
Step 5: Melt the Chocolate Coating
Place the chocolate melting wafers in a microwave-safe bowl.
Microwave in 20-second intervals, stirring between each interval until the chocolate is completely melted and smooth.
If necessary, add a small amount of coconut oil to create a thinner dipping consistency.
Allow the melted chocolate to cool slightly before dipping.
The chocolate should remain fluid but should not be excessively hot.
Step 6: Dip the Cheesecake Pops
Remove a few chilled cheesecake pops from the freezer at a time.
Hold each pop by its stick and carefully dip it into the melted chocolate.
Rotate gently until the entire cheesecake ball is covered.
Lift the pop out and allow excess chocolate to drip back into the bowl.
Place the coated pop onto parchment paper or into a cake-pop stand.
Work quickly because the chocolate will begin setting against the cold cheesecake filling.
Step 7: Create the Bat Wings
Carefully separate the chocolate sandwich cookies and remove the cream filling.
Cut or break the cookie halves into wing-shaped pieces.
Each bat will need two wings.
While the chocolate coating is still slightly soft, gently press one cookie wing onto each side of the cheesecake pop.
If the coating has already hardened, use a small amount of melted chocolate as edible glue.
Hold the wings briefly until secure.
Step 8: Add the Candy Eyes
Attach two candy eyes to the front of each cheesecake pop using small dots of melted chocolate.
Position them near the upper portion of the bat’s face.
For extra personality, use mini chocolate chips or black decorating icing to create a tiny nose or mouth.
You can also add small candy fangs for a vampire-inspired Halloween bat.
Step 9: Chill Until Set
Transfer the decorated cheesecake pops to the refrigerator for approximately 15–20 minutes.
This final chilling period allows the chocolate decorations to become firm.
Once set, your No-Bake Halloween Bat Cheesecake Pops are ready to serve.
Tips for Making Perfect Halloween Cheesecake Pops
Although this recipe is beginner-friendly, a few simple techniques can help you achieve better results.
Use Room-Temperature Cream Cheese
Softened cream cheese blends more easily with powdered sugar and vanilla.
Cold cream cheese can leave small lumps in the cheesecake mixture.
Crush the Cookies Finely
Large cookie pieces can make cheesecake balls difficult to shape.
Use a food processor or place the cookies inside a sealed plastic bag and crush them with a rolling pin.
Keep the Cheesecake Centers Cold
Cold cheesecake balls are easier to dip and less likely to fall apart.
If the centers begin softening while you’re decorating, return them to the refrigerator or freezer briefly.
Avoid Overheating the Chocolate
Chocolate that becomes too hot may cause the cheesecake filling to soften.
Melt the coating slowly and stir frequently.
Attach Decorations Before the Chocolate Hardens
Chocolate coating can set quickly when it touches frozen cheesecake.
Have your cookie wings and candy eyes prepared before dipping.
Use a Cake-Pop Stand
A cake-pop stand helps maintain the rounded appearance of each bat.
If you don’t have one, a sturdy foam block covered with food-safe material can hold the sticks upright.
Creative Halloween Bat Cheesecake Pop Variations
One of the best things about this Halloween dessert is how easily you can customize it.
Oreo Bat Cheesecake Pops
Replace the graham crackers with additional finely crushed chocolate sandwich cookies.
This creates a richer chocolate-cookie cheesecake filling.
Peanut Butter Bat Cheesecake Pops
Add two tablespoons of creamy peanut butter to the cheesecake mixture.
You may need additional cookie crumbs to maintain a firm consistency.
The peanut butter adds a delicious flavor that pairs beautifully with chocolate.
Pumpkin Spice Bat Cheesecake Pops
Add ½ teaspoon pumpkin pie spice to the filling.
The warm cinnamon and nutmeg flavors make these treats especially appropriate for fall celebrations.
White Chocolate Ghost Bats
Dip the cheesecake pops in white chocolate instead of dark chocolate.
Use dark cookie wings and black candy eyes to create a fun contrasting design.
Purple Halloween Bat Pops
Use purple candy melts for the outer coating.
Add black cookie wings and bright candy eyes for a colorful Halloween appearance.
How to Serve Halloween Bat Cheesecake Pops
Presentation can make these Halloween treats even more exciting.
Arrange the finished cheesecake pops upright in a decorative Halloween container or cake-pop stand.
For a spooky dessert table, surround them with artificial spiderweb decorations, miniature pumpkins, and Halloween-themed serving accessories. Keep non-food decorations separate from the treats.
You can also display the pops alongside Halloween cupcakes, chocolate-covered strawberries, monster cookies, and other festive desserts.
For individual party favors, wrap each fully chilled cheesecake pop in a food-safe treat bag and tie it with an orange or purple ribbon.
Keep them refrigerated until serving.
How to Store No-Bake Halloween Bat Cheesecake Pops
Proper storage helps maintain their creamy texture and decorative appearance.
Refrigerator: Store cheesecake pops in an airtight container for up to 4 days. Keep them refrigerated at 40°F or below.
Freezer: Freeze undecorated cheesecake centers for up to 1 month in a freezer-safe container. Thaw them in the refrigerator before coating and decorating.
Before serving: Remove the finished pops from the refrigerator approximately 5–10 minutes before serving for a slightly softer cheesecake texture.
Avoid leaving cream cheese desserts at room temperature for more than 2 hours.
For the best appearance, attach delicate cookie wings after freezing and thawing because moisture can soften the cookies.
Common Mistakes to Avoid
Even simple no-bake desserts can present a few challenges.
Cheesecake mixture is too soft: Add a little more finely crushed graham cracker crumbs and refrigerate before shaping.
Cheesecake balls fall off the sticks: Make sure the sticks are secured with melted chocolate and the centers are thoroughly chilled.
Chocolate coating is too thick: Add a small amount of coconut oil or use melting wafers formulated for dipping.
Cookie wings keep falling off: Attach them using melted chocolate and allow the chocolate to harden before moving the pops.
Chocolate coating cracks: Avoid dipping extremely frozen cheesecake centers into very hot chocolate. Let the chocolate cool slightly and allow the centers to warm for a minute or two if necessary.
With a little patience, these problems are easy to prevent.
Frequently Asked Questions
Can I Make Halloween Bat Cheesecake Pops Ahead of Time?
Yes. You can prepare the cheesecake centers one or two days ahead and store them in the refrigerator.
For the freshest appearance, dip and decorate the pops the day before your Halloween celebration.
Do These Cheesecake Pops Need to Be Refrigerated?
Yes. Because the filling contains cream cheese, the finished cheesecake pops must remain refrigerated until serving.
Can I Use Regular Chocolate Chips Instead of Melting Wafers?
Yes, although chocolate chips may produce a thicker coating.
Adding a small amount of coconut oil can improve the dipping consistency.
Can Kids Help Make These Halloween Treats?
Absolutely.
Children can help crush cookies, roll cheesecake balls, and attach candy eyes.
Adults should supervise melting chocolate and handling sharp utensils.
Can I Make These Cheesecake Pops Without Sticks?
Yes.
Simply prepare the cheesecake balls, coat them in chocolate, and decorate them as bats.
Serve them as Halloween bat cheesecake truffles instead.
What Is the Best Chocolate for Cheesecake Pops?
Chocolate melting wafers are usually the easiest option because they melt smoothly and harden without requiring traditional chocolate tempering.
Dark chocolate provides a rich flavor, while milk chocolate creates a sweeter dessert.
Why These No-Bake Halloween Bat Cheesecake Pops Are Perfect for Halloween Parties
Halloween celebrations often involve preparing several dishes, decorating the house, and organizing activities.
Having a dessert that can be made ahead of time is a major advantage.
These cheesecake pops require no baking, use familiar ingredients, and can be decorated in different ways to match your Halloween theme.
Their individual serving size makes them convenient for guests, while their creamy filling and crunchy chocolate coating create a satisfying combination of textures.
They’re also a great alternative to traditional Halloween cupcakes and cookies.
Whether you’re preparing a large dessert table or a small family celebration, these bat cheesecake pops add something memorable to the occasion.
Final Thoughts
No-Bake Halloween Bat Cheesecake Pops are a delicious combination of creamy cheesecake, rich chocolate, and playful Halloween decorations.
They’re simple enough for beginners, fun enough for children to help decorate, and impressive enough to serve at a Halloween party.
With their crunchy cookie wings, adorable candy eyes, and smooth chocolate coating, these spooky little bats are sure to become a seasonal favorite.
The best Halloween recipes don’t always require complicated techniques or hours in the kitchen. Sometimes, a few everyday ingredients and a little creativity are all you need to make something special.
Would you make these Halloween Bat Cheesecake Pops with dark chocolate, milk chocolate, or a colorful purple candy coating?

Leave a Reply