Category: Recipes

  • Recipe of the Day: Creamy Tuscan Chicken with Gnocchi

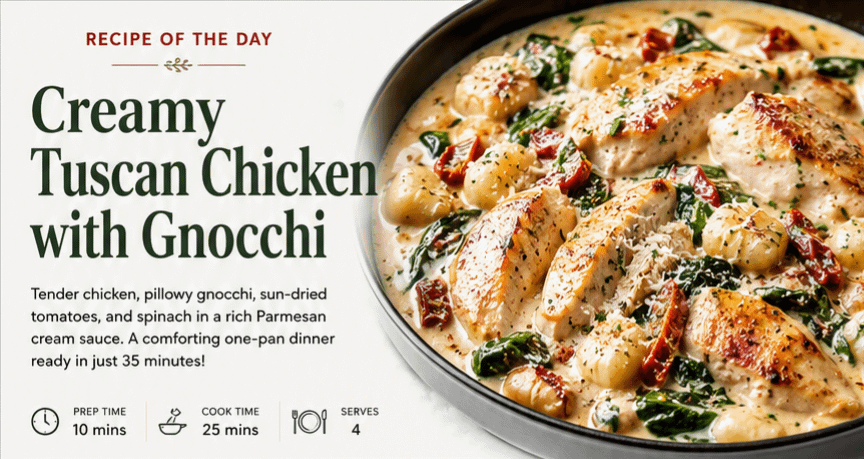
    Recipe of the Day: Creamy Tuscan Chicken with Gnocchi

    There’s something incredibly comforting about a meal that combines tender chicken, pillowy potato gnocchi, and a rich, creamy sauce in one skillet. Creamy Tuscan Chicken with Gnocchi is exactly that kind of recipe—a hearty, satisfying dinner that feels like something you’d order at a cozy Italian restaurant but is surprisingly simple to make at home.

    Featuring juicy, perfectly seasoned chicken breasts, fresh spinach, tangy sun-dried tomatoes, garlic, Parmesan cheese, and soft gnocchi, this dish delivers layers of flavor in every bite. The creamy sauce coats each piece of chicken and gnocchi beautifully, creating a meal that’s indulgent without being overly complicated.

    Whether you’re preparing dinner for your family, entertaining guests, or looking for a comforting meal after a long day, this recipe deserves a spot in your weekly dinner rotation.


    Why You’ll Love This Recipe

    Creamy Tuscan Chicken with Gnocchi has become a favorite because it offers restaurant-quality flavor with minimal effort.

    Some of the reasons people love this recipe include:

    • Rich and creamy Parmesan garlic sauce
    • Soft, fluffy potato gnocchi
    • Juicy pan-seared chicken
    • Fresh spinach adds color and nutrition
    • Sun-dried tomatoes provide a slightly sweet and tangy contrast
    • Ready in about 35 minutes
    • Made in one skillet for easy cleanup
    • Elegant enough for company but simple enough for weeknight dinners

    Every ingredient works together to create a meal that’s rich, comforting, and incredibly satisfying.


    What Makes It “Tuscan”?

    Although many “Tuscan chicken” recipes are inspired by American interpretations of Italian cuisine rather than traditional Tuscan cooking, the combination of garlic, cream, Parmesan cheese, spinach, herbs, and sun-dried tomatoes has become famous for its rich Mediterranean-inspired flavors.

    The result is a creamy sauce that’s packed with savory goodness while still allowing the fresh ingredients to shine.


    Ingredients

    For the Chicken

    • 2 large boneless, skinless chicken breasts
    • 1 teaspoon Italian seasoning
    • ½ teaspoon garlic powder
    • Salt and black pepper to taste
    • 2 tablespoons olive oil

    For the Cream Sauce

    • 1 tablespoon butter
    • 3 cloves garlic, minced
    • 1 cup chicken broth
    • 1 cup heavy cream
    • ¾ cup freshly grated Parmesan cheese
    • ½ teaspoon Italian seasoning
    • ½ teaspoon paprika
    • ¼–½ teaspoon crushed red pepper flakes (optional)
    • ½ cup chopped sun-dried tomatoes

    Vegetables

    • 2 cups fresh baby spinach

    Gnocchi

    • 1 package (16 ounces) potato gnocchi

    Garnish

    • Fresh basil
    • Parmesan cheese
    • Fresh cracked black pepper

    Step-by-Step Instructions

    Step 1: Prepare the Chicken

    Pat the chicken breasts dry using paper towels. Dry chicken browns much better and develops a beautiful golden crust.

    Season generously with:

    • Italian seasoning
    • Garlic powder
    • Salt
    • Fresh black pepper

    Allow the chicken to sit for about 10 minutes while you prepare the remaining ingredients.


    Step 2: Sear the Chicken

    Heat olive oil in a large deep skillet over medium-high heat.

    Cook the chicken for approximately 5–6 minutes per side until golden brown and fully cooked.

    The internal temperature should reach 165°F (74°C).

    Transfer the chicken to a cutting board and allow it to rest.

    Resting keeps the juices inside the meat instead of running onto the cutting board.


    Step 3: Build the Garlic Parmesan Sauce

    Lower the heat to medium.

    Add butter to the skillet.

    Once melted, stir in the minced garlic.

    Cook for about one minute until fragrant, being careful not to burn it.

    Pour in the chicken broth and scrape up all the browned bits from the bottom of the skillet.

    These flavorful bits add incredible depth to the sauce.

    Add:

    • Heavy cream
    • Parmesan cheese
    • Italian seasoning
    • Paprika
    • Crushed red pepper flakes (optional)

    Whisk until smooth.

    Allow the sauce to simmer for 4–5 minutes until it begins to thicken.


    Step 4: Add the Gnocchi

    Unlike pasta, shelf-stable gnocchi cooks very quickly.

    Add the uncooked gnocchi directly into the simmering sauce.

    Cover the skillet.

    Cook for about 4–5 minutes.

    The gnocchi will become soft while absorbing some of the creamy sauce.


    Step 5: Add Vegetables

    Stir in:

    • Sun-dried tomatoes
    • Baby spinach

    Cook another 2–3 minutes until the spinach has wilted.

    The bright green spinach balances the richness of the cream while adding vitamins and color.


    Step 6: Return the Chicken

    Slice the rested chicken into strips.

    Nestle the chicken back into the skillet.

    Spoon the creamy sauce over each piece.

    Top everything with:

    • Fresh basil
    • More Parmesan
    • Fresh cracked pepper

    Serve immediately while hot.


    Tips for Success

    Use Fresh Parmesan

    Freshly grated Parmesan melts much more smoothly than pre-packaged shredded cheese.

    It also creates a silkier sauce.


    Don’t Overcook the Chicken

    Chicken breasts dry out quickly.

    Using an instant-read thermometer ensures perfectly juicy chicken every time.


    Simmer Gently

    Avoid boiling the cream sauce.

    Gentle simmering keeps it smooth and prevents separation.


    Let the Chicken Rest

    Allowing the chicken to rest before slicing keeps it tender and juicy.


    Taste Before Serving

    Parmesan cheese contains plenty of salt.

    Taste the finished sauce before adding extra seasoning.


    Variations

    One of the best things about this recipe is how easily it can be customized.

    Chicken Thighs

    Boneless chicken thighs create an even juicier version.


    Add Mushrooms

    Sauté sliced mushrooms after cooking the garlic.

    They pair perfectly with the creamy sauce.


    Bacon Tuscan Chicken

    Cook several slices of bacon until crispy.

    Stir chopped bacon into the finished dish.

    Use a little bacon grease instead of olive oil for even more flavor.


    Shrimp Version

    Replace chicken with large shrimp.

    Shrimp only needs about 2 minutes per side, making dinner even faster.


    Salmon Version

    Pan-seared salmon works beautifully with this creamy Parmesan sauce.


    Extra Vegetables

    Consider adding:

    • Asparagus
    • Broccoli
    • Kale
    • Peas
    • Zucchini
    • Bell peppers

    Extra Cheese

    Try mixing Parmesan with:

    • Asiago
    • Romano
    • Mozzarella
    • Fontina

    Each creates a slightly different flavor profile.


    What Is Gnocchi?

    Gnocchi are soft Italian dumplings traditionally made from potatoes, flour, and eggs.

    Unlike pasta, gnocchi have a delicate, pillowy texture that pairs exceptionally well with creamy sauces.

    Shelf-stable, refrigerated, or homemade gnocchi all work well in this recipe.


    What to Serve With Creamy Tuscan Chicken

    Although this dish is filling on its own, several side dishes pair wonderfully with it.

    Great choices include:

    • Garlic bread
    • Homemade focaccia
    • Caesar salad
    • Mixed green salad
    • Roasted asparagus
    • Steamed broccoli
    • Roasted Brussels sprouts
    • Lemon green beans
    • Caprese salad

    These lighter sides balance the richness of the creamy sauce.


    Storage

    Store leftovers in an airtight container in the refrigerator for up to 3 days.

    Because the sauce thickens as it cools, add a splash of:

    • Milk
    • Chicken broth
    • Heavy cream

    when reheating.

    Warm gently over low heat while stirring frequently.


    Can You Freeze It?

    Cream-based sauces can separate after freezing, and gnocchi may lose some of their soft texture.

    While freezing is possible, this recipe tastes best when enjoyed fresh or refrigerated for a few days.


    Frequently Asked Questions

    Can I use frozen gnocchi?

    Yes. Add frozen gnocchi directly to the sauce and cook for an extra minute or two.


    Can I make this recipe ahead?

    You can prepare the chicken and sauce ahead of time, then cook the gnocchi just before serving for the best texture.


    Is there a lighter version?

    Absolutely.

    Substitute half-and-half for heavy cream and use a little less Parmesan cheese. The sauce will be lighter but still delicious.


    Can I make it gluten-free?

    Yes. Use gluten-free gnocchi and verify that your chicken broth and seasonings are gluten-free.


    Can I add more protein?

    Certainly.

    Italian sausage, shrimp, bacon, or even grilled steak slices pair wonderfully with the creamy Tuscan sauce.


    Final Thoughts

    Creamy Tuscan Chicken with Gnocchi is the kind of recipe that brings everyone to the dinner table. Rich, comforting, and packed with bold Italian-inspired flavors, it combines juicy chicken, tender potato gnocchi, vibrant spinach, and tangy sun-dried tomatoes in a velvety Parmesan garlic sauce that’s impossible to resist.

    The best part is that despite its restaurant-quality appearance and flavor, this meal is surprisingly easy to prepare in just one skillet. It’s an excellent choice for busy weeknights, cozy family dinners, or special occasions when you want to impress without spending hours in the kitchen.

    Once you try this Creamy Tuscan Chicken with Gnocchi, it’s likely to become one of those dependable recipes you turn to whenever you’re craving something warm, hearty, and undeniably delicious.

  • Breakfast of the Day: Spinach & Feta Breakfast Wrap

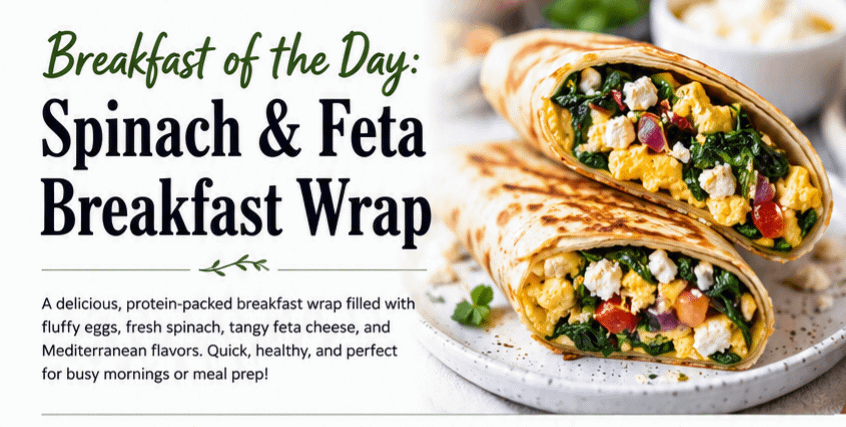
    Breakfast of the Day: Spinach & Feta Breakfast Wrap

    There’s something incredibly satisfying about starting your morning with a breakfast that is both nourishing and full of flavor. The Spinach & Feta Breakfast Wrap checks every box. It’s packed with protein, loaded with vegetables, bursting with Mediterranean-inspired flavors, and wrapped in a warm tortilla that makes it easy to enjoy at home or on the go.

    Unlike many grab-and-go breakfast options that are high in sugar, saturated fat, or refined carbohydrates, this breakfast wrap provides lasting energy from wholesome ingredients. Every bite delivers fluffy scrambled eggs, tender spinach, creamy feta cheese, and savory herbs, creating a balanced breakfast that feels indulgent while supporting a healthy lifestyle.

    Whether you’re preparing breakfast for your family, meal-prepping for the week, or simply looking for a delicious way to change up your morning routine, the Spinach & Feta Breakfast Wrap deserves a place on your breakfast menu.


    Why Breakfast Matters

    Nutrition experts have long recognized breakfast as one of the most important meals of the day. After fasting overnight, your body needs fuel to replenish energy stores and prepare for the day’s physical and mental demands.

    Eating a balanced breakfast can help:

    • Improve concentration and memory
    • Increase energy levels
    • Reduce mid-morning hunger
    • Support healthy metabolism
    • Stabilize blood sugar levels
    • Encourage healthier eating throughout the day

    Choosing meals that combine lean protein, vegetables, healthy fats, and whole grains can help you stay satisfied longer than sugary cereals or pastries that often lead to energy crashes.

    The Spinach & Feta Breakfast Wrap provides this balance in one convenient package.


    Why You’ll Love This Breakfast

    There are countless reasons this wrap has become a favorite among breakfast lovers.

    Quick and Easy

    Busy mornings don’t have to mean skipping breakfast. This recipe comes together in about 15–20 minutes, making it ideal for weekdays.

    High in Protein

    Eggs and feta cheese provide a generous amount of protein that helps keep you full for hours.

    Packed with Vegetables

    Fresh spinach adds color, flavor, and nutrients without overpowering the dish.

    Rich Mediterranean Flavor

    The salty creaminess of feta combined with garlic, oregano, and spinach creates a classic Mediterranean taste that’s both comforting and refreshing.

    Portable

    Wrapped in a tortilla, it’s easy to take with you on your commute, to school, or to the office.

    Budget Friendly

    Most of the ingredients are inexpensive and easy to find year-round.


    Ingredients

    Serves 2

    • 4 large eggs
    • 2 large flour tortillas
    • 2 cups fresh spinach
    • ½ cup crumbled feta cheese
    • 1 tablespoon olive oil
    • ¼ cup diced tomatoes (optional)
    • 2 tablespoons diced red onion (optional)
    • ½ teaspoon garlic powder
    • ½ teaspoon dried oregano
    • Salt and freshly ground black pepper
    • Fresh parsley for garnish (optional)

    Step-by-Step Instructions

    Step 1: Prepare the Vegetables

    Heat olive oil in a non-stick skillet over medium heat.

    Add the diced onions and cook for about 2 minutes until they begin to soften.

    Stir in the tomatoes and cook another minute.

    Finally, add the spinach.

    At first, the spinach may seem like too much, but it quickly cooks down into tender greens.

    Cook just until wilted to preserve its nutrients and vibrant green color.


    Step 2: Whisk the Eggs

    Crack the eggs into a bowl.

    Add:

    • Garlic powder
    • Oregano
    • Salt
    • Pepper

    Whisk until smooth and slightly frothy.

    Whisking thoroughly creates fluffier scrambled eggs.


    Step 3: Cook the Eggs

    Reduce the skillet heat to medium-low.

    Pour the eggs over the vegetables.

    Using a rubber spatula, gently stir while the eggs cook.

    Remove the eggs from the heat while they are still slightly soft.

    Residual heat will finish cooking them without becoming rubbery.

    Fold in the crumbled feta cheese.

    The cheese will soften beautifully while still maintaining its creamy texture.


    Step 4: Warm the Tortillas

    Warm each tortilla for about 15 seconds.

    Warm tortillas roll much easier and are less likely to tear.


    Step 5: Assemble

    Divide the egg mixture evenly between the tortillas.

    Fold in both sides.

    Roll tightly from the bottom upward.


    Step 6: Toast the Wrap

    Although optional, lightly grilling the wraps greatly improves the texture.

    Place the wraps seam-side down in a dry skillet.

    Toast each side for 2–3 minutes until golden brown.

    The tortilla becomes crispy while the inside stays warm and creamy.

    Serve immediately.


    The Nutritional Power of Each Ingredient

    Eggs

    Eggs are often called one of nature’s most complete foods.

    They provide:

    • High-quality protein
    • Vitamin D
    • Vitamin B12
    • Choline
    • Selenium
    • Healthy fats

    Protein supports muscle repair while choline plays an important role in brain health.


    Spinach

    Spinach is considered one of the world’s healthiest leafy greens.

    It contains:

    • Iron
    • Vitamin A
    • Vitamin C
    • Vitamin K
    • Magnesium
    • Potassium
    • Folate
    • Fiber

    Spinach also contains antioxidants that help fight inflammation and protect your cells.


    Feta Cheese

    Unlike many cheeses, feta has a bold flavor that allows you to use less while still enjoying rich taste.

    Feta provides:

    • Calcium
    • Protein
    • Vitamin B12
    • Phosphorus

    Its creamy texture pairs perfectly with eggs.


    Olive Oil

    Extra virgin olive oil contains heart-healthy monounsaturated fats and antioxidants that are staples of the Mediterranean diet.


    Tomatoes

    Tomatoes contribute:

    • Vitamin C
    • Potassium
    • Lycopene
    • Natural sweetness
    • Bright color

    They add freshness without adding many calories.


    Health Benefits

    Eating this breakfast regularly may support:

    Better Energy

    Protein and healthy fats digest more slowly than sugary breakfasts, helping maintain consistent energy.

    Improved Fullness

    Protein-rich meals naturally increase satiety, reducing the temptation to snack before lunch.

    Heart Health

    Spinach and olive oil support cardiovascular wellness.

    Strong Bones

    Feta cheese provides calcium while eggs supply vitamin D, helping maintain healthy bones.

    Brain Function

    Eggs contain choline, an important nutrient for memory and cognitive performance.


    Delicious Variations

    One of the best things about this recipe is how customizable it is.

    Greek Style

    Add:

    • Kalamata olives
    • Roasted red peppers
    • Cucumbers
    • Fresh dill

    Southwest

    Mix in:

    • Pepper Jack cheese
    • Black beans
    • Jalapeños
    • Salsa
    • Avocado

    Meat Lover’s

    Add:

    • Turkey sausage
    • Bacon
    • Diced ham
    • Chorizo

    Garden Fresh

    Include:

    • Mushrooms
    • Bell peppers
    • Zucchini
    • Asparagus
    • Broccoli

    Low-Carb Version

    Skip the tortilla entirely.

    Serve the filling inside:

    • Lettuce wraps
    • Low-carb tortillas
    • Egg wraps

    What to Serve Alongside

    Complete your breakfast with:

    Fresh Fruit

    • Strawberries
    • Blueberries
    • Grapes
    • Orange slices
    • Melon

    Dairy

    • Greek yogurt
    • Cottage cheese

    Potatoes

    • Breakfast potatoes
    • Hash browns
    • Sweet potato hash

    Drinks

    • Fresh orange juice
    • Coffee
    • Tea
    • Green smoothie
    • Fresh fruit smoothie

    Meal Prep Tips

    This breakfast is ideal for meal prepping.

    Prepare the egg filling in advance and refrigerate it for up to three days.

    Wrap individually in foil for easy grab-and-go breakfasts.

    Freeze completed wraps for up to two months.

    Reheat:

    • Microwave: 2–3 minutes
    • Air fryer: 5–7 minutes
    • Oven: 15–20 minutes

    Pro Cooking Tips

    • Use fresh spinach instead of frozen for the best texture.
    • Cook eggs slowly over medium-low heat.
    • Season eggs before cooking for better flavor.
    • Warm tortillas before rolling.
    • Toast the finished wrap for added crunch.
    • Avoid overfilling the tortilla to prevent tearing.
    • Fresh herbs like parsley or dill brighten every bite.
    • Add a squeeze of fresh lemon juice just before serving for a burst of freshness.

    Frequently Asked Questions

    Can I make these ahead of time?

    Absolutely. They’re one of the best make-ahead breakfasts and reheat beautifully.

    Can I use egg whites?

    Yes. Replace the four whole eggs with approximately eight egg whites or your favorite liquid egg substitute.

    Is this vegetarian?

    Yes. As written, the recipe is completely vegetarian.

    Can I use whole wheat tortillas?

    Definitely. Whole wheat tortillas add fiber and pair wonderfully with the Mediterranean flavors.

    What other cheeses work well?

    Goat cheese, mozzarella, Swiss, cheddar, and Monterey Jack are all excellent alternatives if feta isn’t your favorite.


    A Mediterranean Breakfast You’ll Want Again and Again

    The Spinach & Feta Breakfast Wrap is proof that healthy eating doesn’t have to be bland or complicated. It combines wholesome ingredients with bold Mediterranean flavors to create a breakfast that is satisfying, nutritious, and incredibly versatile. Every bite delivers fluffy eggs, tender spinach, creamy feta cheese, and aromatic herbs wrapped in a warm tortilla that is crisp on the outside and deliciously savory on the inside.

    Whether you’re preparing breakfast for yourself, feeding your family, or stocking your freezer with make-ahead meals, this recipe is one you’ll return to time and time again. It’s simple enough for busy weekday mornings yet flavorful enough to serve at a leisurely weekend brunch.

    If you’re searching for a breakfast that fuels your body, satisfies your appetite, and brings restaurant-quality flavor to your kitchen, the Spinach & Feta Breakfast Wrap is an excellent choice. Add it to your breakfast rotation and enjoy a wholesome start to every day.

    Read More Recipes

  • Dessert of the Day: Chocolate-Cherry Cheesecake Bars

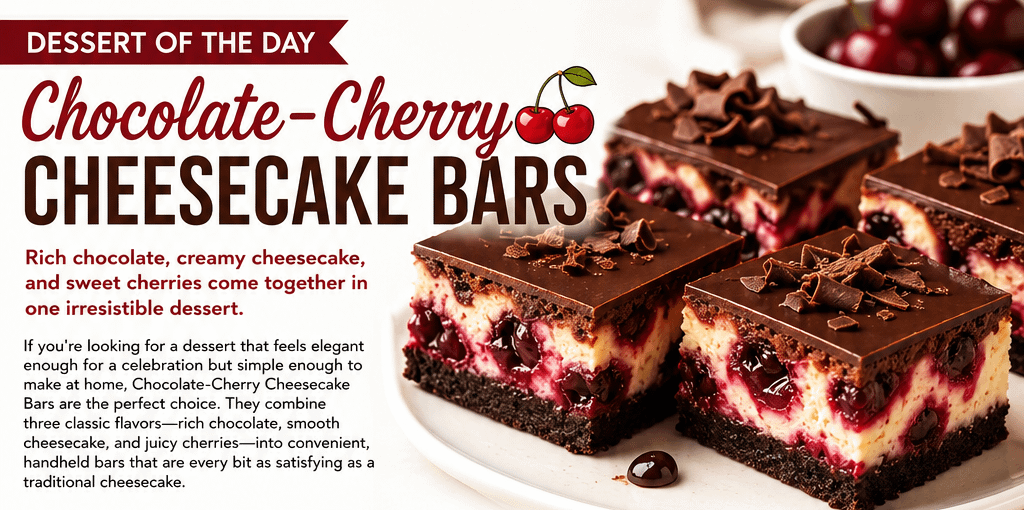
    Dessert of the Day: Chocolate-Cherry Cheesecake Bars

    Rich chocolate, creamy cheesecake, and sweet cherries come together in one irresistible dessert.

    If you’re looking for a dessert that feels elegant enough for a celebration but simple enough to make at home, Chocolate-Cherry Cheesecake Bars are the perfect choice. They combine three classic flavors—rich chocolate, smooth cheesecake, and juicy cherries—into convenient, handheld bars that are every bit as satisfying as a traditional cheesecake.

    Whether you’re serving them at a family gathering, holiday dinner, potluck, or simply treating yourself after a long day, these cheesecake bars deliver the perfect balance of creamy, fruity, and chocolaty goodness.


    Why You’ll Love These Cheesecake Bars

    Chocolate and cherries have been a beloved pairing for generations. The slight tartness of cherries perfectly complements the deep richness of chocolate, while the creamy cheesecake filling ties everything together.

    These bars are:

    • Rich and creamy
    • Easy to slice and serve
    • Great for making ahead
    • Perfect for parties and holidays
    • Delicious chilled straight from the refrigerator

    Because they’re served as bars instead of slices, they’re also much easier to transport and share.


    Ingredients

    For the Chocolate Crust

    • 2 cups chocolate cookie crumbs
    • 6 tablespoons melted butter
    • 2 tablespoons sugar

    For the Cheesecake Filling

    • 16 ounces cream cheese, softened
    • ½ cup granulated sugar
    • 2 large eggs
    • 1 teaspoon vanilla extract
    • ½ cup sour cream

    For the Cherry Layer

    • 1½ cups cherry pie filling
    • ½ teaspoon almond extract (optional)

    Chocolate Topping

    • 1 cup semi-sweet chocolate chips
    • ¼ cup heavy cream

    Optional garnish:

    • Fresh cherries
    • Chocolate curls
    • Whipped cream

    Directions

    Step 1: Prepare the Crust

    Preheat your oven to 325°F.

    Mix together the chocolate cookie crumbs, melted butter, and sugar until evenly combined.

    Press firmly into a parchment-lined 9×13-inch baking pan.

    Bake for 8 minutes.

    Allow the crust to cool slightly.


    Step 2: Make the Cheesecake Filling

    Beat the softened cream cheese until smooth.

    Mix in the sugar.

    Add eggs one at a time.

    Blend in vanilla and sour cream until creamy.

    Pour the filling evenly over the crust.


    Step 3: Add the Cherries

    Gently spoon cherry pie filling over the cheesecake mixture.

    Use a knife to lightly swirl the cherries into the batter for a marbled effect.


    Step 4: Bake

    Bake for 35–40 minutes, or until the center is just set.

    Remove from the oven and cool completely.

    Refrigerate for at least 4 hours, preferably overnight.


    Step 5: Make the Chocolate Ganache

    Heat the heavy cream until steaming but not boiling.

    Pour over chocolate chips.

    Let sit for 2 minutes.

    Stir until smooth and glossy.

    Spread over the chilled cheesecake.

    Return to the refrigerator for 30 minutes.


    Serving Suggestions

    Chocolate-Cherry Cheesecake Bars are delicious served:

    • Chilled with fresh whipped cream
    • Alongside vanilla bean ice cream
    • With fresh cherries
    • Drizzled with chocolate syrup
    • With a hot cup of coffee
    • Paired with espresso
    • Alongside a glass of cold milk

    Tips for Perfect Cheesecake Bars

    • Use room-temperature cream cheese for the smoothest filling.
    • Don’t overmix after adding the eggs.
    • Chill completely before slicing.
    • Wipe your knife clean between cuts for bakery-style bars.
    • Refrigerate overnight for the best texture and flavor.

    Delicious Variations

    Try putting your own spin on this dessert:

    • Add mini chocolate chips to the filling.
    • Use dark chocolate cookies for a richer crust.
    • Replace cherries with raspberries or blackberries.
    • Add a brownie base instead of a cookie crust.
    • Sprinkle toasted almonds on top.
    • Add crushed chocolate-covered cherries as a garnish.

    Storage

    Store leftovers in an airtight container in the refrigerator for up to 5 days.

    Freeze individual bars for up to 2 months. Thaw overnight in the refrigerator before serving.


    Why Chocolate and Cherries Work So Well

    Chocolate offers deep, rich cocoa notes, while cherries provide bright sweetness and a slight tartness that cuts through the richness of the cheesecake. The result is a perfectly balanced dessert that’s indulgent without feeling overly heavy.

    It’s a timeless flavor combination that never goes out of style.


    Final Thoughts

    Chocolate-Cherry Cheesecake Bars are the kind of dessert that looks impressive but is surprisingly easy to prepare. Every bite delivers a rich chocolate crust, velvety cheesecake filling, bursts of sweet cherries, and a silky chocolate topping that will have everyone coming back for another piece.

    Whether you’re baking for a holiday, birthday, family dinner, or simply satisfying a chocolate craving, these cheesecake bars are sure to become a favorite recipe you’ll make again and again.

    Read More Recipes

  • Healthy Recipe of the Day: Salmon, Pesto & Tomato Pasta

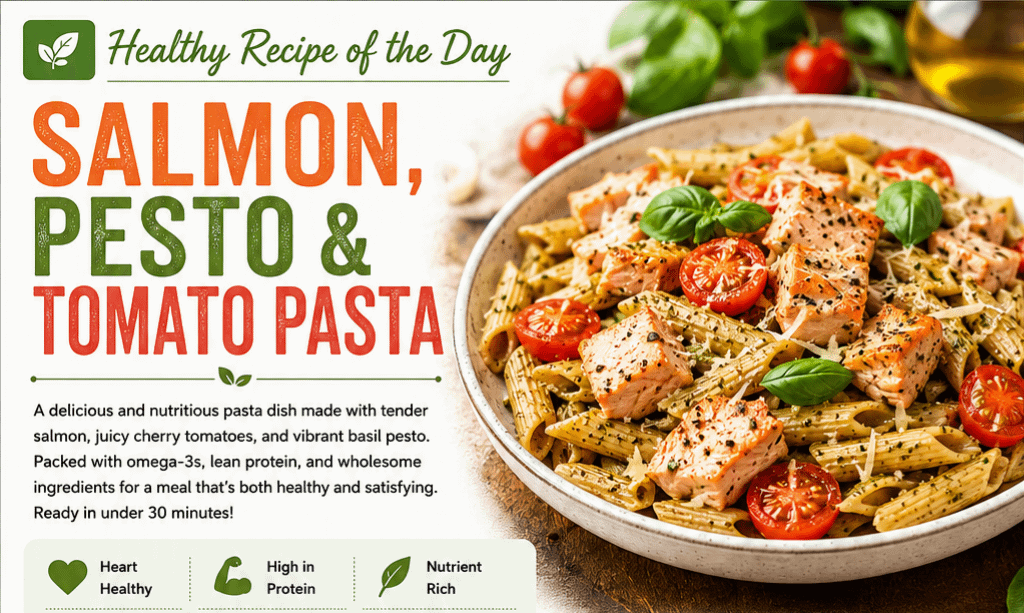
    Healthy Recipe of the Day: Salmon, Pesto & Tomato Pasta

    When you’re looking for a meal that’s both comforting and nutritious, Salmon, Pesto & Tomato Pasta checks every box. Rich, flaky salmon combines perfectly with fresh cherry tomatoes, vibrant basil pesto, and wholesome whole wheat pasta to create a dish that’s bursting with flavor while supporting a healthy lifestyle.

    This recipe is ideal for busy weeknights because it comes together in less than 30 minutes, making it easy to enjoy restaurant-quality food without spending hours in the kitchen.


    Why You’ll Love This Recipe

    • Rich in heart-healthy omega-3 fatty acids
    • Excellent source of lean protein
    • Loaded with vitamins and antioxidants
    • Ready in about 25 minutes
    • Great for meal prep
    • Colorful, fresh, and satisfying

    Health Benefits

    Salmon

    Salmon is one of the healthiest proteins you can eat. It’s packed with:

    • Omega-3 fatty acids
    • Vitamin D
    • Vitamin B12
    • Selenium
    • High-quality protein

    Omega-3s may help support:

    • Heart health
    • Brain function
    • Reduced inflammation
    • Healthy joints

    Cherry Tomatoes

    Cherry tomatoes add natural sweetness and are rich in:

    • Vitamin C
    • Vitamin A
    • Potassium
    • Lycopene

    Lycopene is a powerful antioxidant linked to heart health and healthy aging.


    Basil Pesto

    Basil pesto contains:

    • Fresh basil
    • Olive oil
    • Garlic
    • Pine nuts
    • Parmesan cheese

    Together these ingredients provide healthy fats, antioxidants, and incredible flavor with only a small amount needed.


    Whole Wheat Pasta

    Choosing whole wheat pasta increases:

    • Fiber
    • B vitamins
    • Magnesium
    • Longer-lasting energy

    The extra fiber also helps keep you feeling full longer.


    Ingredients

    • 12 ounces whole wheat penne or fusilli pasta
    • 2 salmon fillets (about 6 ounces each)
    • 1 tablespoon olive oil
    • Salt and black pepper to taste
    • 2 cups cherry tomatoes, halved
    • ¼ cup prepared basil pesto
    • 2 cloves garlic, minced
    • 2 tablespoons reserved pasta water
    • Juice of ½ lemon
    • 2 tablespoons grated Parmesan cheese
    • Fresh basil leaves for garnish
    • Optional: baby spinach or arugula

    Instructions

    Step 1: Cook the Pasta

    Bring a large pot of salted water to a boil.

    Cook the pasta according to package directions until al dente.

    Reserve ½ cup of pasta water before draining.


    Step 2: Cook the Salmon

    Pat the salmon dry and season with salt and pepper.

    Heat olive oil in a large skillet over medium-high heat.

    Cook the salmon for about:

    • 4–5 minutes per side
    • Until it flakes easily with a fork

    Transfer to a plate and gently break into large chunks.


    Step 3: Sauté the Vegetables

    In the same skillet:

    • Add garlic
    • Cook for 30 seconds
    • Add cherry tomatoes

    Cook 3–4 minutes until the tomatoes begin to soften.


    Step 4: Make the Sauce

    Reduce heat to low.

    Add:

    • Basil pesto
    • Lemon juice
    • Reserved pasta water

    Stir until smooth.


    Step 5: Combine Everything

    Add:

    • Cooked pasta
    • Salmon pieces
    • Optional spinach

    Gently toss until coated.

    Cook another minute until everything is warmed through.


    Step 6: Serve

    Top with:

    • Parmesan cheese
    • Fresh basil
    • Extra cracked pepper
    • Lemon wedges

    Serve immediately.


    Nutrition (Approximate Per Serving)

    • Calories: 520
    • Protein: 35g
    • Carbohydrates: 42g
    • Fat: 22g
    • Fiber: 7g
    • Sugar: 5g

    Healthy Variations

    Mediterranean Style

    Add:

    • Kalamata olives
    • Baby spinach
    • Artichoke hearts
    • Crumbled feta cheese

    Extra Veggie Version

    Mix in:

    • Zucchini
    • Broccoli florets
    • Asparagus
    • Bell peppers

    Dairy-Free

    Use:

    • Dairy-free pesto
    • Nutritional yeast instead of Parmesan

    Low-Carb Option

    Replace pasta with:

    • Zucchini noodles
    • Spaghetti squash
    • Hearts of palm pasta

    Tips for Success

    • Don’t overcook the salmon—it should remain moist and flaky.
    • Save some pasta water to create a silky sauce.
    • Add pesto after lowering the heat to preserve its fresh flavor.
    • Use freshly squeezed lemon juice for the brightest taste.
    • Toss gently to keep the salmon in large, tender pieces.

    What to Serve With It

    This pasta pairs wonderfully with:

    • Mixed green salad
    • Roasted asparagus
    • Garlic green beans
    • Steamed broccoli
    • Whole grain bread
    • Sparkling water with lemon

    Storage

    Store leftovers in an airtight container in the refrigerator for up to 3 days.

    Reheat gently over low heat with a splash of water or broth to loosen the sauce.


    Final Thoughts

    Salmon, Pesto & Tomato Pasta is proof that healthy eating can be both simple and delicious. The combination of tender salmon, juicy tomatoes, fragrant basil pesto, and whole wheat pasta creates a meal that’s packed with nutrition without sacrificing flavor.

    Whether you’re preparing dinner for your family, meal prepping for the week, or simply looking for a healthier comfort food option, this recipe delivers a satisfying balance of lean protein, healthy fats, whole grains, and fresh vegetables. It’s a dish you’ll find yourself making again and again.

  • Recipe of the Day: Slow Cooker Cornbread Cowboy Casserole

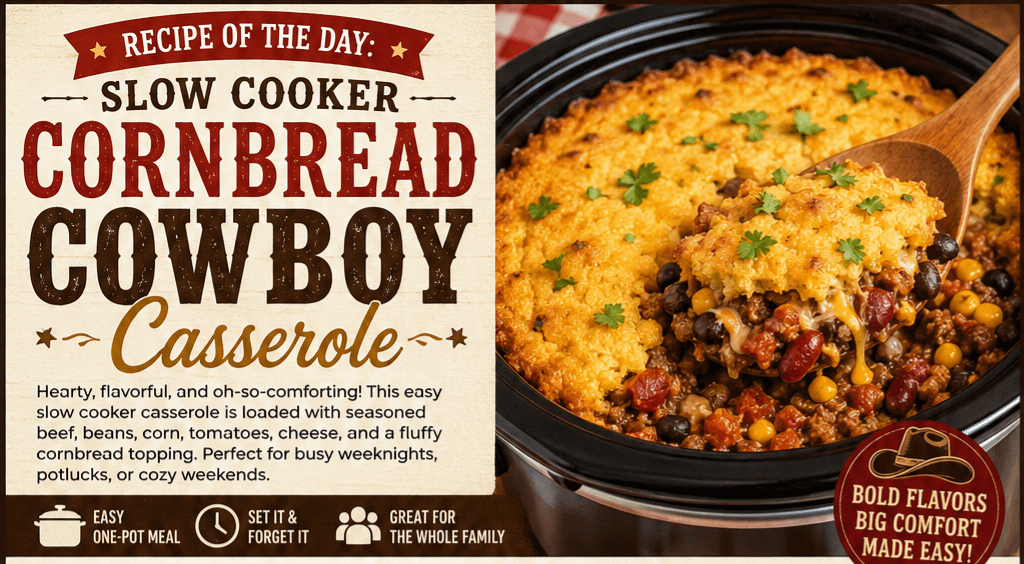
    Recipe of the Day: Slow Cooker Cornbread Cowboy Casserole

    There’s nothing quite like coming home to a warm, hearty meal waiting for you. Slow Cooker Cornbread Cowboy Casserole is the ultimate comfort food, combining seasoned ground beef, beans, sweet corn, savory tomatoes, melted cheese, and a fluffy cornbread topping—all cooked together in one slow cooker. It’s an easy, family-friendly recipe that’s perfect for busy weeknights, potlucks, or cozy weekends.

    This rustic casserole delivers the bold flavors of the American Southwest while requiring minimal prep. Simply brown the beef, layer the ingredients, and let your slow cooker do the rest.


    Why You’ll Love This Recipe

    • Easy one-pot meal with minimal cleanup
    • Perfect for busy weekdays
    • Filling and budget-friendly
    • Great for feeding a crowd
    • Freezer-friendly leftovers
    • Loaded with protein and comforting flavors

    Ingredients

    For the Filling

    • 1½ pounds lean ground beef
    • 1 medium onion, diced
    • 2 cloves garlic, minced
    • 1 (15-ounce) can kidney beans, drained and rinsed
    • 1 (15-ounce) can black beans, drained and rinsed
    • 1 (15-ounce) can whole kernel corn, drained
    • 1 (10-ounce) can Rotel tomatoes with green chilies
    • 1 (15-ounce) can tomato sauce
    • 1 tablespoon chili powder
    • 1 teaspoon smoked paprika
    • 1 teaspoon cumin
    • 1 teaspoon salt
    • ½ teaspoon black pepper
    • 1 cup shredded cheddar cheese

    Cornbread Topping

    • 1 box (8.5-ounce) cornbread mix (such as Jiffy)
    • Ingredients required by the package (typically 1 egg and ⅓ cup milk)

    Garnishes (Optional)

    • Fresh cilantro
    • Sour cream
    • Sliced green onions
    • Jalapeño slices
    • Diced avocado

    Instructions

    Step 1: Brown the Beef

    In a large skillet over medium-high heat:

    • Cook the ground beef until browned.
    • Add diced onion and cook until softened.
    • Stir in garlic for one minute.
    • Drain excess grease.

    Step 2: Build the Filling

    Transfer the beef mixture to your slow cooker.

    Add:

    • Kidney beans
    • Black beans
    • Corn
    • Rotel tomatoes
    • Tomato sauce
    • Chili powder
    • Smoked paprika
    • Cumin
    • Salt
    • Pepper

    Mix everything well.


    Step 3: Slow Cook

    Cover and cook:

    • Low: 5–6 hours
    • High: 3–4 hours

    The flavors will blend beautifully while the beef becomes incredibly tender.


    Step 4: Add Cheese

    Sprinkle shredded cheddar cheese evenly over the beef mixture.


    Step 5: Prepare Cornbread

    Mix the cornbread batter according to the package instructions.

    Carefully spread the batter evenly over the cheese layer.


    Step 6: Finish Cooking

    Cover and cook on High for an additional 45–60 minutes, or until the cornbread is fully cooked and no longer wet in the center.

    Avoid lifting the lid while the cornbread cooks.


    Tips for Success

    • Line your slow cooker with a liner for easier cleanup.
    • Browning the beef first adds richer flavor.
    • Let the casserole rest for 10 minutes before serving.
    • Check the cornbread with a toothpick before serving.
    • Use freshly shredded cheese for better melting.

    Delicious Variations

    Spicy Cowboy Casserole

    Add:

    • Jalapeños
    • Hot sauce
    • Pepper Jack cheese
    • Extra chili powder

    Tex-Mex Version

    Mix in:

    • Taco seasoning
    • Black olives
    • Bell peppers
    • Pepper Jack cheese

    Top with crushed tortilla chips before serving.


    BBQ Cowboy Casserole

    Replace half the tomato sauce with barbecue sauce for a smoky, sweet twist.


    Bacon Ranch Version

    Mix in:

    • Cooked bacon
    • Ranch seasoning
    • Monterey Jack cheese

    Chicken Cowboy Casserole

    Substitute shredded rotisserie chicken for the ground beef.


    What to Serve With It

    This casserole pairs wonderfully with:

    • Garden salad
    • Coleslaw
    • Garlic green beans
    • Roasted vegetables
    • Corn on the cob
    • Pickles
    • Homemade salsa

    Storage

    Store leftovers in an airtight container in the refrigerator for up to 4 days.

    Freeze individual portions for up to 3 months.

    Reheat in the microwave or oven until heated through.


    Recipe Tips

    • Double the recipe for parties.
    • Add extra vegetables like zucchini or bell peppers.
    • Use ground turkey for a lighter option.
    • Mix different cheeses for added flavor.
    • Top with fresh avocado and sour cream before serving.

    Nutrition (Approximate Per Serving)

    • Calories: 520
    • Protein: 31g
    • Carbohydrates: 35g
    • Fat: 28g
    • Fiber: 8g
    • Sugar: 7g
    • Sodium: 870mg

    Final Thoughts

    Slow Cooker Cornbread Cowboy Casserole is the definition of hearty comfort food. Every bite is packed with savory beef, beans, sweet corn, flavorful spices, melted cheese, and tender cornbread baked right on top. It’s an easy, satisfying meal that fills the kitchen with irresistible aromas while your slow cooker does the work.

    Whether you’re feeding a hungry family, preparing a cozy weekend dinner, or looking for a make-ahead freezer meal, this cowboy casserole is sure to become a favorite that everyone will request again and again.

    Read More Recipes

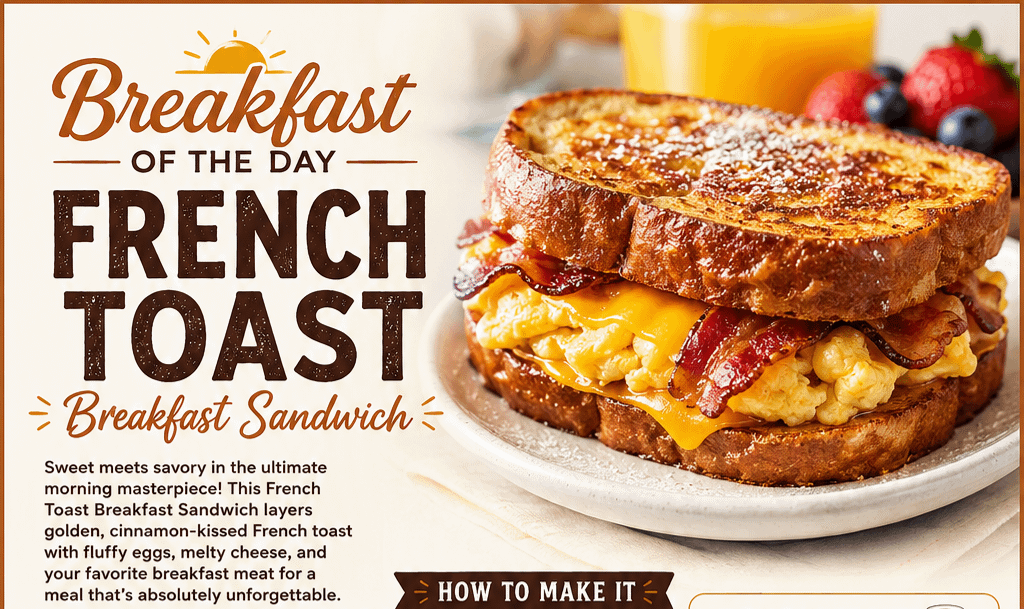
  • Breakfast of the Day: French Toast Breakfast Sandwich

    Breakfast of the Day: French Toast Breakfast Sandwich

    There are breakfast recipes that satisfy your hunger, and then there are breakfasts that turn an ordinary morning into something worth looking forward to. The French Toast Breakfast Sandwich combines two beloved breakfast classics—golden French toast and a hearty breakfast sandwich—into one delicious meal that’s sweet, savory, and incredibly satisfying.

    Whether you’re preparing a weekend brunch for the family or simply treating yourself to something special before a busy day, this recipe delivers the perfect balance of crispy bread, fluffy eggs, melted cheese, and savory breakfast meat, all wrapped between slices of cinnamon-kissed French toast.


    Why You’ll Love This Breakfast

    The French Toast Breakfast Sandwich is the best of both worlds. Instead of using plain toast, thick slices of bread are dipped in a lightly sweetened cinnamon-vanilla egg mixture and cooked until golden brown. Between those slices is a warm combination of scrambled eggs, melted cheese, and your favorite breakfast protein.

    The contrast of sweet French toast with savory fillings creates an unforgettable flavor combination that has made this breakfast a favorite in homes, cafés, and brunch restaurants alike.


    Ingredients

    For the French Toast

    • 4 thick slices of brioche or Texas toast
    • 2 large eggs
    • ¼ cup milk
    • 1 teaspoon vanilla extract
    • ½ teaspoon ground cinnamon
    • 1 tablespoon butter

    For the Sandwich Filling

    • 4 large eggs
    • Salt and pepper to taste
    • 4 slices cheddar, American, or Swiss cheese
    • 4 slices bacon, or
    • 2 sausage patties, or
    • 4 slices ham
    • Butter for cooking

    Optional Toppings

    • Maple syrup
    • Powdered sugar
    • Fresh berries
    • Avocado slices
    • Hot sauce
    • Everything bagel seasoning

    How to Make a French Toast Breakfast Sandwich

    Step 1: Cook the Breakfast Meat

    Cook bacon until crispy or prepare sausage patties or ham according to package directions. Set aside on paper towels.

    Step 2: Prepare the French Toast

    Whisk together:

    • Eggs
    • Milk
    • Vanilla
    • Cinnamon

    Dip each slice of bread into the mixture, coating both sides without soaking too long.

    Heat butter in a skillet over medium heat.

    Cook each slice for about 2–3 minutes per side until golden brown.

    Set aside.

    Step 3: Cook the Eggs

    Whisk the remaining eggs with salt and pepper.

    Cook gently over medium-low heat, stirring until soft and fluffy.


    Assemble the Sandwich

    Layer onto one slice of French toast:

    • Cheese
    • Scrambled eggs
    • Bacon, sausage, or ham

    Top with the second slice of French toast.

    If desired, return the sandwich to the skillet for one minute per side to melt the cheese completely.


    Serving Suggestions

    Serve your French Toast Breakfast Sandwich with:

    • Crispy hash browns
    • Fresh fruit salad
    • Greek yogurt
    • Breakfast potatoes
    • Fresh orange juice
    • Coffee or a latte

    For extra indulgence, drizzle a small amount of warm maple syrup over the sandwich before serving.


    Easy Variations

    Sweet & Savory

    Add a drizzle of maple syrup and a sprinkle of powdered sugar.

    Spicy Breakfast

    Use pepper jack cheese and add hot sauce or jalapeños.

    Veggie Version

    Replace the meat with sautéed spinach, mushrooms, tomatoes, and avocado.

    Gourmet

    Use brioche bread, smoked gouda, caramelized onions, and thick-cut bacon.

    Protein-Packed

    Double the eggs and use turkey sausage with reduced-fat cheese.


    Tips for the Perfect Sandwich

    • Thick bread holds up best during cooking.
    • Don’t oversoak the bread in the egg mixture.
    • Cook French toast over medium heat to prevent burning.
    • Soft scrambled eggs stay creamy inside the sandwich.
    • Freshly shredded cheese melts more smoothly than pre-shredded varieties.
    • Wrap leftovers in foil and reheat in the oven or air fryer for a quick breakfast.

    Nutritional Benefits

    While this breakfast is certainly comforting, it also provides several valuable nutrients:

    • Protein from eggs and breakfast meat helps keep you full.
    • Calcium from cheese supports healthy bones.
    • Eggs provide vitamins D, B12, and choline.
    • Whole-grain bread can add fiber when substituted for brioche or white bread.

    To make it lighter, choose turkey bacon, reduced-fat cheese, and whole-grain bread.


    Perfect for Weekend Brunch

    The French Toast Breakfast Sandwich is an impressive brunch centerpiece that’s surprisingly simple to prepare. It’s ideal for holidays, birthdays, Father’s Day, Mother’s Day, or whenever you want to elevate breakfast beyond the ordinary.

    Because each sandwich is fully customizable, everyone at the table can build one with their favorite combination of meats, cheeses, and toppings.


    Final Thoughts

    The French Toast Breakfast Sandwich proves that breakfast doesn’t have to choose between sweet and savory—you can enjoy both in one delicious bite. Crispy golden French toast, fluffy eggs, gooey melted cheese, and your favorite breakfast meat come together to create a meal that’s comforting, filling, and packed with flavor.

    Whether served with fresh fruit, crispy potatoes, or simply a hot cup of coffee, this breakfast sandwich is guaranteed to become a favorite you’ll want to make again and again.

    Read More Recipes

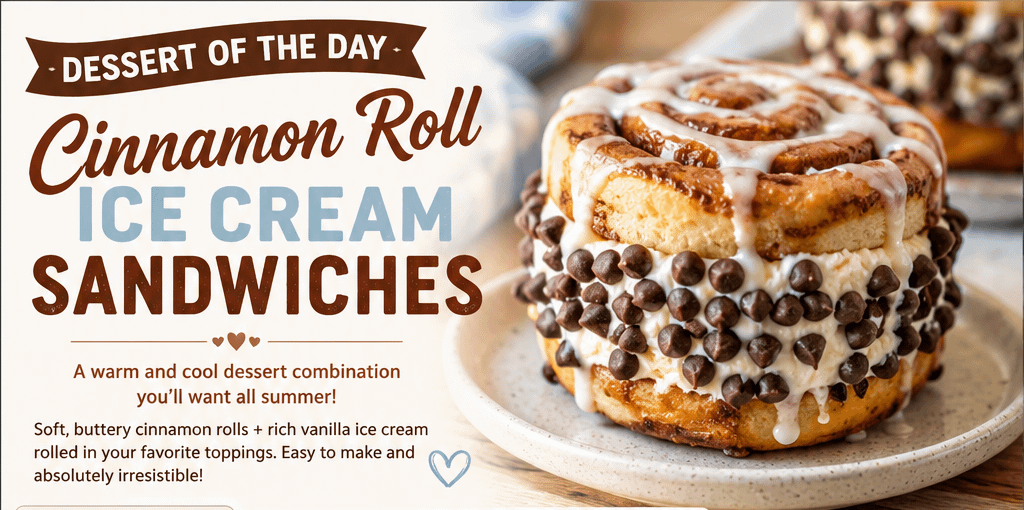
  • Dessert of the Day: Cinnamon Roll Ice Cream Sandwiches

    Dessert of the Day: Cinnamon Roll Ice Cream Sandwiches

    A Warm and Cool Dessert Combination You’ll Want All Summer

    If you’re looking for a dessert that combines the cozy flavor of fresh-baked cinnamon rolls with the refreshing creaminess of ice cream, Cinnamon Roll Ice Cream Sandwiches are the perfect treat. They bring together two classic favorites into one irresistible dessert that’s easy to make and guaranteed to impress family and friends.

    Whether you’re hosting a backyard barbecue, celebrating a birthday, or simply satisfying your sweet tooth, these ice cream sandwiches deliver bakery-style flavor with minimal effort.


    Why You’ll Love Cinnamon Roll Ice Cream Sandwiches

    This dessert has everything people love:

    • Soft, buttery cinnamon rolls
    • Rich vanilla ice cream
    • Sweet cinnamon flavor in every bite
    • Endless topping possibilities
    • Ready in less than 30 minutes (plus freezing time)

    The contrast between the tender cinnamon rolls and the cold, creamy ice cream creates an unforgettable dessert experience.


    Ingredients

    For the Sandwiches

    • 1 can refrigerated cinnamon rolls (8-count)
    • 1 quart vanilla ice cream, slightly softened

    Optional Toppings

    • Crushed pecans
    • Mini chocolate chips
    • Sprinkles
    • Caramel sauce
    • Cinnamon sugar
    • Crushed toffee bits
    • Crushed graham crackers

    Instructions

    Step 1: Bake the Cinnamon Rolls

    Bake the cinnamon rolls according to the package directions.

    Allow them to cool completely before assembling. Warm rolls will melt the ice cream too quickly.

    Step 2: Slice the Rolls

    Using a serrated knife, carefully slice each cinnamon roll in half horizontally like a hamburger bun.

    Step 3: Add the Ice Cream

    Place a generous scoop of slightly softened vanilla ice cream onto the bottom half of each cinnamon roll.

    Spread gently so the ice cream reaches the edges.

    Step 4: Make the Sandwich

    Top with the remaining cinnamon roll half and gently press together.

    Step 5: Add Toppings

    Roll the exposed ice cream edges in your favorite toppings.

    Popular choices include:

    • Chopped pecans
    • Chocolate chips
    • Sprinkles
    • Cinnamon sugar
    • Crushed cookies

    Step 6: Freeze

    Place the sandwiches on a baking sheet lined with parchment paper.

    Freeze for at least 2 hours until firm.

    Serve immediately after removing from the freezer.


    Tips for the Best Ice Cream Sandwiches

    Let the Ice Cream Soften Slightly

    Ice cream that’s too hard is difficult to spread, while overly melted ice cream creates a mess.

    Cool the Rolls Completely

    Patience is key. Warm cinnamon rolls will quickly melt the filling.

    Wrap Individually

    Wrap each sandwich in plastic wrap after freezing.

    This keeps them fresh and makes them easy to grab whenever you’re craving dessert.


    Delicious Flavor Variations

    Salted Caramel

    Use caramel ice cream and drizzle with salted caramel sauce.


    Cookies & Cream

    Swap vanilla for cookies and cream ice cream and roll the edges in crushed chocolate sandwich cookies.


    Pumpkin Spice

    Perfect for fall.

    Use pumpkin spice cinnamon rolls and pumpkin ice cream.


    Chocolate Lover’s Dream

    Fill with chocolate ice cream and drizzle with hot fudge before serving.


    Strawberry Cheesecake

    Use strawberry cheesecake ice cream with crushed graham crackers around the edges.


    Coffee Delight

    Coffee ice cream pairs beautifully with the warm cinnamon flavor.


    Make Them Homemade

    Feeling adventurous?

    Bake homemade cinnamon rolls instead of using refrigerated dough.

    Fresh bakery-style rolls make this dessert even more decadent.


    Great for Parties

    These desserts are ideal for:

    • Summer cookouts
    • Birthday parties
    • Family gatherings
    • Holiday celebrations
    • Pool parties
    • Movie nights
    • Potlucks

    Because they’re individually wrapped, guests can simply grab one from the freezer.


    Storage

    Store wrapped sandwiches in an airtight freezer container.

    They’ll stay fresh for up to 2 weeks, although they’re usually gone much sooner.


    Serving Ideas

    Serve alongside:

    • Fresh strawberries
    • Hot coffee
    • Cold brew
    • Chocolate milk
    • Frozen mocha
    • Caramel latte

    For an extra indulgent presentation, drizzle with warm caramel or chocolate sauce just before serving.


    Final Thoughts

    Cinnamon Roll Ice Cream Sandwiches combine everything people love about comfort food and frozen desserts into one unforgettable treat. The sweet cinnamon flavor, soft pastry, and creamy ice cream make every bite rich, satisfying, and perfect for any occasion.

    Whether you’re making them for a family dessert night or preparing a batch ahead of time for summer entertaining, these sandwiches are sure to become a favorite recipe you’ll return to again and again.

    If you’re searching for a dessert that’s fun, easy, and guaranteed to impress, Cinnamon Roll Ice Cream Sandwiches deserve a place at the top of your recipe list.

    Read More Recipes

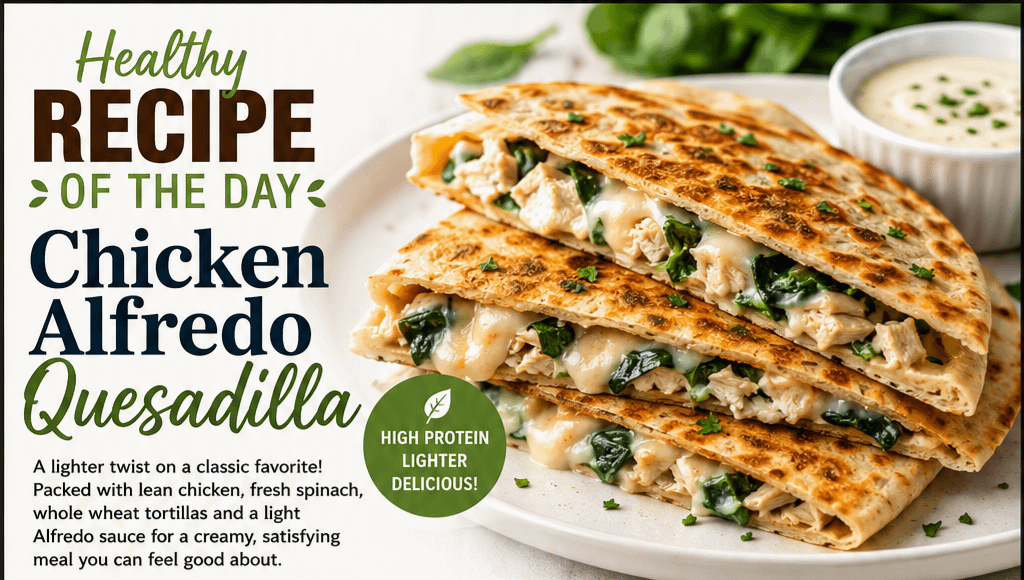
  • Healthy Recipe of the Day: Chicken Alfredo Quesadilla

    Healthy Recipe of the Day: Chicken Alfredo Quesadilla

    If you’re craving the creamy comfort of Chicken Alfredo but want something lighter and quicker to prepare, this Healthy Chicken Alfredo Quesadilla is the perfect solution. It combines tender grilled chicken, fresh vegetables, a light homemade Alfredo sauce, and melty mozzarella cheese inside a crispy whole wheat tortilla.

    Ready in less than 30 minutes, this recipe offers all the rich flavors you love while keeping calories and fat under control. It’s an excellent choice for busy weeknights, meal prep, or a satisfying lunch.


    Why You’ll Love This Recipe

    • High in lean protein
    • Made with whole wheat tortillas for added fiber
    • Uses a lighter Alfredo sauce instead of heavy cream
    • Loaded with spinach for extra nutrients
    • Crispy outside, creamy inside
    • Ready in under 30 minutes

    Ingredients

    For the Quesadilla

    • 2 whole wheat tortillas (10-inch)
    • 2 cups cooked grilled chicken breast, shredded or diced
    • 1 cup baby spinach, chopped
    • 1 cup shredded part-skim mozzarella cheese
    • ¼ cup grated Parmesan cheese
    • 1 teaspoon olive oil

    Light Alfredo Sauce

    • 1 tablespoon butter
    • 2 cloves garlic, minced
    • 1 tablespoon whole wheat flour
    • 1 cup low-fat milk
    • ¼ cup grated Parmesan cheese
    • Salt and black pepper to taste
    • ½ teaspoon Italian seasoning

    Instructions

    Step 1: Make the Alfredo Sauce

    In a small saucepan, melt the butter over medium heat.

    Add garlic and cook for about 30 seconds until fragrant.

    Whisk in the flour and cook for one minute.

    Slowly whisk in the milk until smooth.

    Continue stirring until the sauce begins to thicken.

    Add Parmesan cheese, Italian seasoning, salt, and pepper.

    Cook another minute until creamy.


    Step 2: Prepare the Filling

    In a bowl combine:

    • Grilled chicken
    • Chopped spinach
    • Half of the mozzarella cheese
    • ¼ cup Alfredo sauce

    Mix until everything is evenly coated.


    Step 3: Assemble

    Lay one tortilla flat.

    Spread the chicken mixture evenly across half the tortilla.

    Sprinkle with remaining mozzarella.

    Fold the tortilla over.

    Repeat with the second tortilla.


    Step 4: Cook

    Heat olive oil in a large non-stick skillet.

    Cook each quesadilla 3–4 minutes per side until golden brown and crispy.

    Allow to cool for two minutes before slicing.

    Serve with a small bowl of the remaining Alfredo sauce for dipping.


    Healthy Tips

    Swap regular tortillas for high-fiber or low-carb tortillas.

    Add mushrooms, broccoli, or bell peppers for more vegetables.

    Use rotisserie chicken to save time.

    Replace mozzarella with reduced-fat cheese.

    Serve alongside a fresh green salad instead of fries.


    Nutrition (Approximate Per Serving)

    • Calories: 430
    • Protein: 38g
    • Carbohydrates: 29g
    • Fat: 17g
    • Fiber: 6g
    • Sugar: 5g

    Nutrition values may vary depending on ingredients used.


    Serving Suggestions

    Pair this healthy quesadilla with:

    • Mixed garden salad
    • Fresh fruit
    • Roasted asparagus
    • Steamed broccoli
    • Cucumber tomato salad
    • Greek yogurt ranch dip

    Storage

    Refrigerate leftovers in an airtight container for up to 3 days.

    Reheat in a skillet or air fryer for the crispiest texture.

    Freeze cooked quesadillas individually for up to 2 months.


    Variations

    Buffalo Chicken Alfredo

    Add buffalo sauce and blue cheese crumbles.

    Southwest Alfredo

    Mix in black beans, corn, and diced green chilies.

    Veggie Alfredo

    Replace the chicken with sautéed mushrooms, zucchini, and spinach.

    Spicy Alfredo

    Add jalapeños and crushed red pepper flakes.


    Final Thoughts

    This Healthy Chicken Alfredo Quesadilla delivers everything you love about creamy Italian comfort food with a lighter, more nutritious twist. Lean grilled chicken, fresh spinach, reduced-fat cheese, and a homemade light Alfredo sauce come together in a crispy whole wheat tortilla for a meal that’s both wholesome and satisfying.

    Whether you’re looking for a quick family dinner, an easy meal-prep recipe, or a healthier way to enjoy comfort food, this recipe checks every box. Serve it with a fresh salad or steamed vegetables, and you’ll have a balanced meal that’s sure to become a regular favorite in your kitchen.

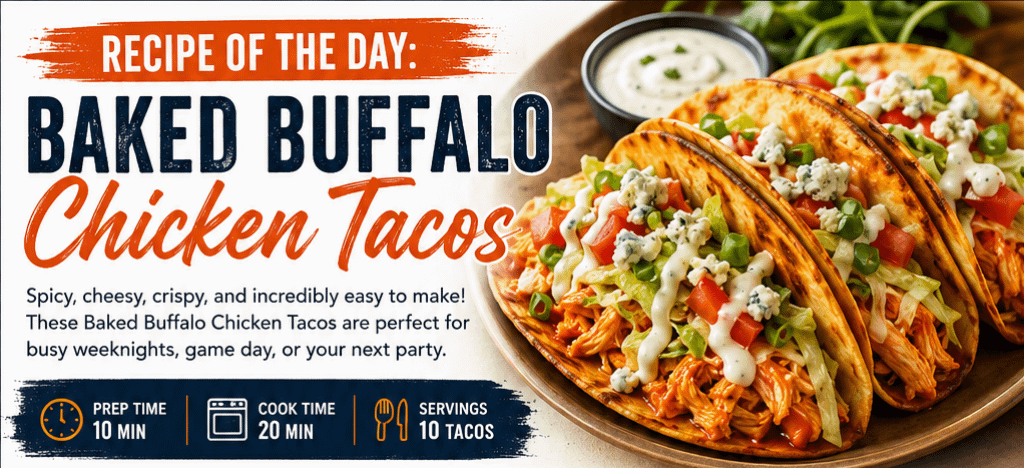
  • Recipe of the Day: Baked Buffalo Chicken Tacos

    Recipe of the Day: Baked Buffalo Chicken Tacos

    Spicy, cheesy, crispy, and incredibly easy to make, these Baked Buffalo Chicken Tacos are the perfect weeknight dinner or game-day favorite. Packed with tender shredded chicken tossed in tangy Buffalo sauce, melted cheese, and baked until golden and crispy, every bite delivers bold flavor with just the right amount of heat.

    If you love Buffalo wings but want something a little less messy, these tacos are the perfect solution. They’re easy enough for a family dinner yet impressive enough to serve at parties, making them a recipe you’ll come back to again and again.


    Why You’ll Love These Buffalo Chicken Tacos

    These tacos combine everything people love about Buffalo chicken into one crispy handheld meal.

    • Crispy baked taco shells
    • Loaded with cheesy Buffalo chicken
    • Ready in about 30 minutes
    • Great for meal prep
    • Easy to customize
    • Perfect for game day, parties, or family dinners

    Baking the tacos instead of frying them creates a delicious crunch while keeping cleanup simple.


    Ingredients

    For the Buffalo Chicken

    • 3 cups cooked shredded chicken (rotisserie chicken works great)
    • ½ cup Buffalo wing sauce
    • 2 tablespoons ranch dressing
    • 1 tablespoon melted butter
    • 1 teaspoon garlic powder
    • ½ teaspoon onion powder

    For the Tacos

    • 10 flour tortillas (street taco size)
    • 2 cups shredded Monterey Jack cheese
    • 1 cup shredded cheddar cheese
    • Cooking spray or olive oil

    Toppings

    • Shredded lettuce
    • Diced tomatoes
    • Green onions
    • Crumbled blue cheese
    • Ranch dressing
    • Sour cream
    • Fresh cilantro
    • Diced avocado
    • Jalapeños (optional)

    Instructions

    Step 1: Prepare the Filling

    Preheat your oven to 400°F (200°C).

    In a large bowl combine:

    • Shredded chicken
    • Buffalo sauce
    • Ranch dressing
    • Melted butter
    • Garlic powder
    • Onion powder

    Mix until every piece of chicken is evenly coated.


    Step 2: Assemble the Tacos

    Lightly grease a baking sheet.

    Lay out each tortilla and sprinkle a layer of Monterey Jack cheese.

    Add about ¼ cup of Buffalo chicken.

    Top with cheddar cheese.

    Fold each tortilla in half and gently press closed.

    Arrange on the baking sheet with space between each taco.

    Lightly spray or brush the tops with olive oil.


    Step 3: Bake

    Bake for 8–10 minutes.

    Carefully flip each taco.

    Bake another 5–7 minutes until both sides are crispy and golden brown.

    The cheese should be melted and bubbling.


    Build Your Perfect Taco

    Top with your favorites:

    • Crisp shredded lettuce
    • Fresh tomatoes
    • Ranch drizzle
    • Blue cheese crumbles
    • Sour cream
    • Avocado slices
    • Green onions
    • Fresh cilantro

    The cool toppings balance the spicy Buffalo sauce beautifully.


    Serving Suggestions

    Serve alongside:

    • French fries
    • Sweet potato fries
    • Celery sticks
    • Carrot sticks
    • Macaroni salad
    • Coleslaw
    • Potato wedges
    • Corn on the cob

    Pair with a cold lemonade, iced tea, or your favorite beverage.


    Tips for Success

    Use rotisserie chicken to save time.

    Don’t overfill the tacos. Too much filling can make them difficult to crisp.

    Cheese near the edges helps seal the tortillas while baking.

    Flip carefully using a spatula to keep them intact.

    Serve immediately for maximum crunch.


    Make It Your Own

    Extra Spicy

    Add diced jalapeños or extra Buffalo sauce.

    Mild Version

    Use mild Buffalo sauce or mix Buffalo sauce with more ranch dressing.

    Low-Carb Option

    Swap tortillas for low-carb tortillas.

    Cheese Lovers

    Mix mozzarella, pepper jack, Monterey Jack, and cheddar for extra gooey tacos.

    Bacon Buffalo Tacos

    Add crispy chopped bacon before baking for incredible flavor.


    Storage

    Store leftover tacos in an airtight container in the refrigerator for up to 3 days.

    Reheat in the oven or air fryer at 375°F for 5–7 minutes to restore crispiness.

    Avoid microwaving if possible, as the shells will soften.


    Nutrition (Approximate Per Taco)

    • Calories: 330
    • Protein: 23g
    • Carbohydrates: 19g
    • Fat: 18g
    • Fiber: 2g
    • Sugar: 2g

    Values will vary depending on toppings and tortilla size.


    Final Thoughts

    Baked Buffalo Chicken Tacos bring together everything you love about Buffalo wings with the convenience of tacos and the satisfying crunch of oven-baked shells. They’re quick enough for busy weeknights, crowd-pleasing enough for parties, and customizable to suit every taste. Whether you’re feeding your family, hosting friends for the big game, or simply craving something spicy and cheesy, this recipe delivers restaurant-quality flavor with minimal effort.

    Once you try these crispy Buffalo Chicken Tacos, they’ll quickly earn a permanent place in your dinner rotation.

    Read More Recipes

  • Breakfast of the Day: Cowboy Breakfast Burrito

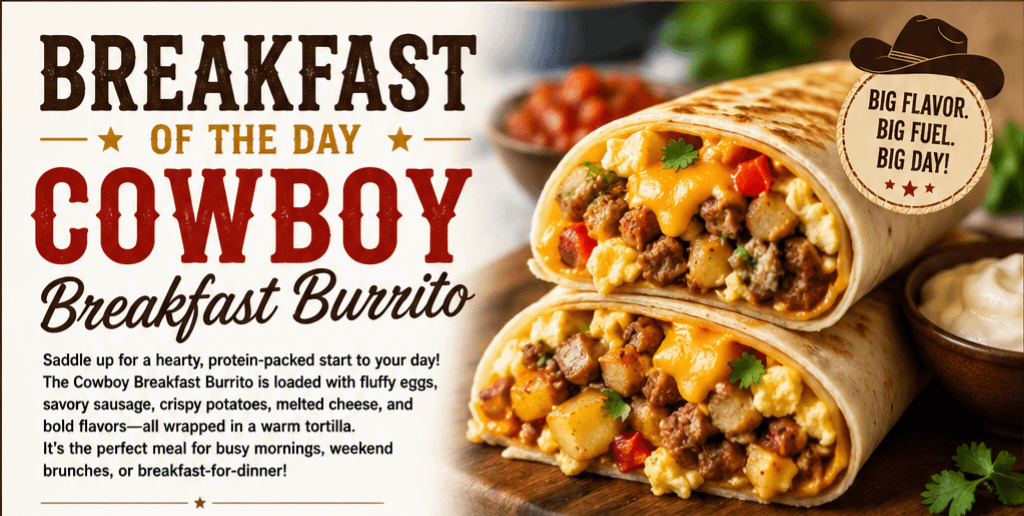
    Breakfast of the Day: Cowboy Breakfast Burrito

    Start your morning with a hearty breakfast that’s packed with bold flavors, protein, and enough energy to keep you going all day. The Cowboy Breakfast Burrito combines fluffy scrambled eggs, savory sausage or bacon, crispy potatoes, melted cheese, and fresh toppings, all wrapped inside a warm flour tortilla. It’s a satisfying meal that’s perfect for busy mornings, weekend brunches, or even breakfast-for-dinner.

    Whether you’re heading out to work, preparing for a family adventure, or simply craving a filling breakfast, this burrito delivers comfort in every bite.

    What Is a Cowboy Breakfast Burrito?

    A Cowboy Breakfast Burrito is a large breakfast wrap inspired by the hearty meals traditionally enjoyed on ranches and around campfires. Designed to fuel long days of hard work, it features protein-rich ingredients combined with potatoes, cheese, and flavorful seasonings.

    Unlike lighter breakfast options, this burrito is meant to satisfy big appetites while remaining easy to customize based on your favorite ingredients.

    Why You’ll Love This Breakfast

    • High in protein to help keep you full.
    • Perfect for meal prepping.
    • Easy to customize with your favorite fillings.
    • Great for breakfast, brunch, or dinner.
    • Freezer-friendly for quick weekday meals.
    • Delicious with salsa, hot sauce, or sour cream.

    Cowboy Breakfast Burrito Recipe

    Ingredients

    • 4 large flour tortillas
    • 6 large eggs
    • ¼ cup milk
    • 1 pound breakfast sausage (or bacon, ham, or chorizo)
    • 2 cups frozen hash browns or diced breakfast potatoes
    • 1½ cups shredded cheddar cheese
    • 2 tablespoons butter
    • ½ teaspoon garlic powder
    • ½ teaspoon onion powder
    • Salt and pepper to taste
    • ½ cup diced onions
    • ½ cup diced bell peppers (optional)
    • Fresh chopped cilantro (optional)

    Optional Toppings

    • Salsa
    • Pico de gallo
    • Avocado slices
    • Sour cream
    • Jalapeños
    • Hot sauce

    Directions

    Step 1: Cook the Potatoes

    Heat a skillet over medium-high heat. Cook the hash browns or diced potatoes until crispy and golden brown. Season with salt and pepper. Set aside.

    Step 2: Cook the Meat

    Brown the breakfast sausage until fully cooked, breaking it into crumbles as it cooks. If using bacon, cook until crispy and chop into bite-sized pieces.

    Drain any excess grease.

    Step 3: Scramble the Eggs

    Whisk together the eggs, milk, garlic powder, onion powder, salt, and pepper.

    Melt butter in a skillet and gently scramble the eggs until just cooked but still soft.

    Step 4: Warm the Tortillas

    Heat each tortilla for about 20 seconds in a dry skillet or microwave until soft and flexible.

    Step 5: Assemble the Burritos

    Layer each tortilla with:

    • Scrambled eggs
    • Crispy potatoes
    • Cooked sausage
    • Shredded cheddar cheese
    • Onions
    • Bell peppers
    • Salsa or your favorite toppings

    Fold in the sides and roll tightly into a burrito.

    Step 6: Toast (Optional)

    Place the burritos seam-side down in a hot skillet for 2–3 minutes per side until golden brown and slightly crispy.

    Delicious Variations

    Steakhouse Cowboy Burrito

    Use grilled steak instead of sausage and add sautéed mushrooms with pepper jack cheese.

    Southwest Cowboy Burrito

    Mix in black beans, corn, green chilies, pepper jack cheese, and chipotle sauce.

    Spicy Ranch Burrito

    Use chorizo, jalapeños, pepper jack cheese, and spicy salsa.

    Veggie Cowboy Burrito

    Replace the meat with sautéed mushrooms, spinach, peppers, and black beans.

    Smoked BBQ Burrito

    Add pulled pork, barbecue sauce, cheddar cheese, and crispy onions for a smoky twist.

    Tips for the Best Cowboy Breakfast Burrito

    • Cook potatoes until crispy for the best texture.
    • Avoid overcooking the eggs—they’ll continue cooking inside the burrito.
    • Warm tortillas before rolling to prevent cracking.
    • Drain excess grease from meats to keep the burritos from becoming soggy.
    • Wrap tightly so the filling stays inside.

    Make-Ahead and Freezer Instructions

    Cowboy Breakfast Burritos are excellent for meal prep.

    Allow the fillings to cool completely before assembling.

    Wrap each burrito individually in foil or plastic wrap and freeze for up to 3 months.

    To reheat:

    • Microwave: 2–3 minutes from frozen.
    • Oven: Bake at 350°F for about 30 minutes.
    • Air Fryer: 350°F for 10–12 minutes.

    Serving Suggestions

    Pair your Cowboy Breakfast Burrito with:

    • Fresh fruit
    • Hash browns
    • Breakfast potatoes
    • Salsa and guacamole
    • Orange juice
    • Fresh coffee
    • Iced tea

    Nutritional Benefits

    Depending on your ingredients, each burrito provides:

    • High-quality protein from eggs and meat
    • Calcium from cheese
    • Potassium from potatoes
    • Vitamins from peppers and onions
    • Long-lasting energy from carbohydrates and protein

    You can also lighten the recipe by using turkey sausage, reduced-fat cheese, whole-wheat tortillas, or adding extra vegetables.

    Final Thoughts

    The Cowboy Breakfast Burrito is the ultimate comfort breakfast. Loaded with savory ingredients, wrapped in a warm tortilla, and endlessly customizable, it’s a meal that satisfies both hungry families and busy individuals alike.

    Whether you’re enjoying it fresh off the skillet, packing it for work, or freezing a batch for future breakfasts, this hearty burrito is sure to become one of your favorite morning recipes.

    So grab a skillet, warm those tortillas, and enjoy a breakfast that’s as bold and satisfying as the Wild West itself.

    Read More Recipes