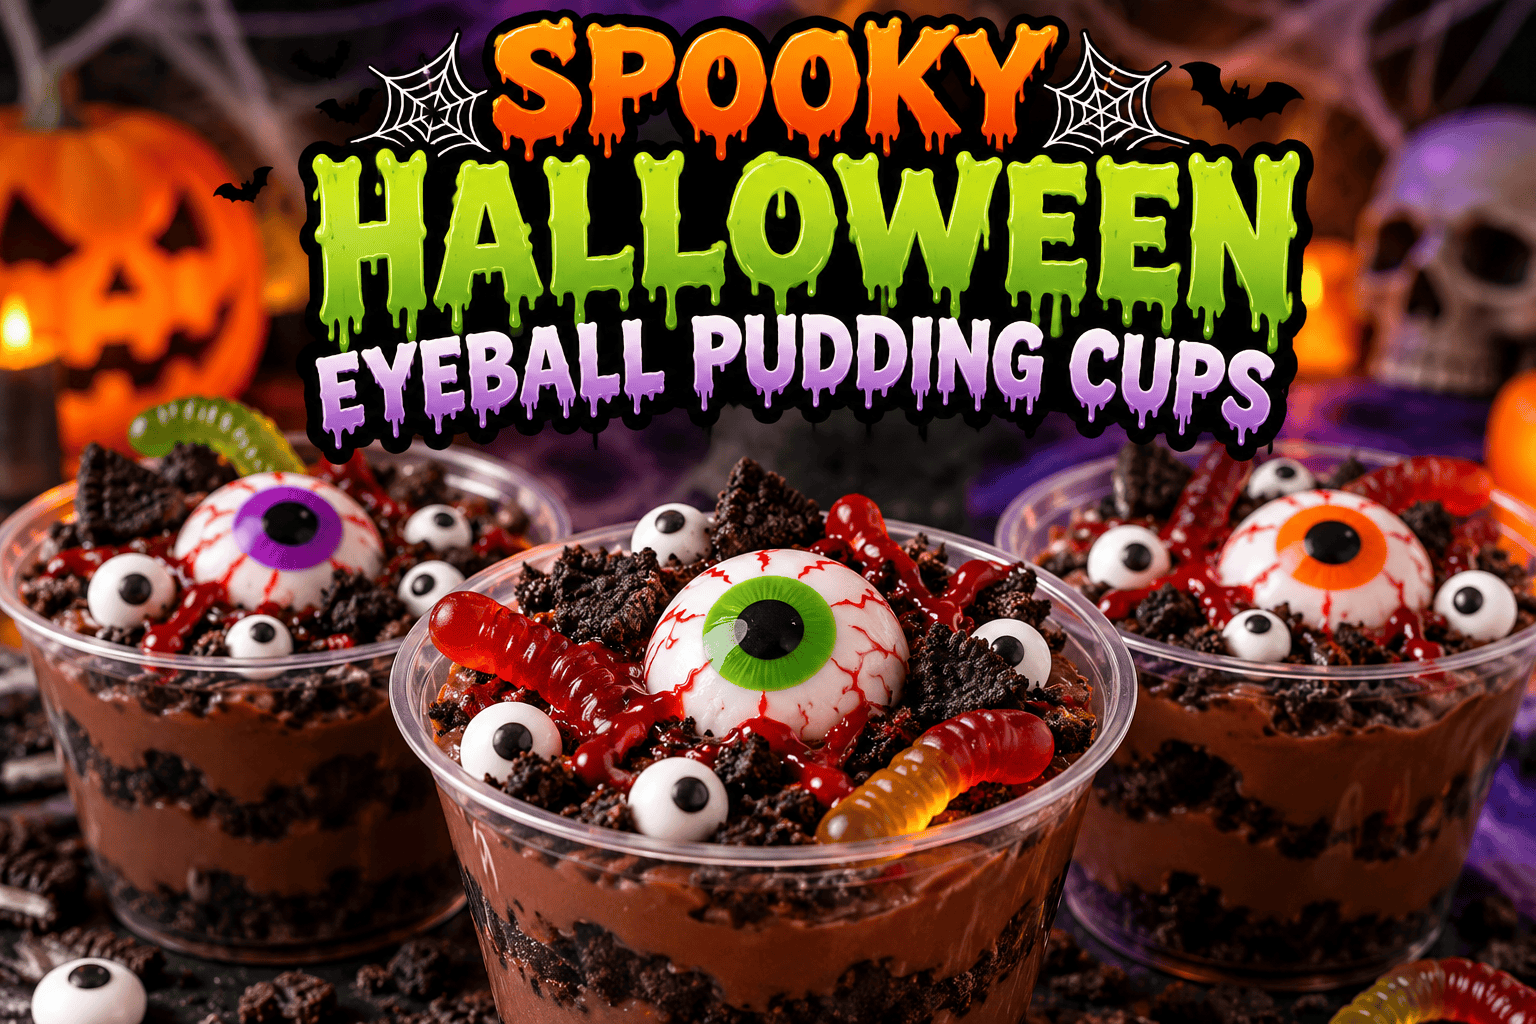
Halloween is the perfect time to turn ordinary desserts into something delightfully spooky. Whether you’re hosting a Halloween party, preparing treats for a classroom celebration, or planning a fun family movie night, Spooky Halloween Eyeball Pudding Cups are guaranteed to bring a little fright and plenty of sweetness to the table.
These creepy pudding cups combine rich, creamy chocolate pudding, crunchy chocolate cookie crumbs, and edible candy eyeballs to create a dessert that looks like something straight out of a haunted laboratory. The best part? They’re incredibly easy to make, require no baking, and can be prepared ahead of time.
With just a handful of ingredients and a little creativity, you can transform simple pudding cups into an unforgettable Halloween treat.
Why You’ll Love These Spooky Halloween Eyeball Pudding Cups
Halloween desserts don’t have to be complicated to make an impression. Sometimes the simplest recipes create the biggest reactions.
Here’s why these spooky pudding cups deserve a place on your Halloween dessert table.
-
No baking required: Perfect when you want a festive dessert without turning on the oven.
-
Quick and easy preparation: Most of the work takes less than 20 minutes.
-
Kid-friendly: Children can help crush cookies, layer pudding, and decorate the eyeballs.
-
Budget-friendly: Uses affordable ingredients available at most grocery stores.
-
Perfect for parties: Individual servings make these desserts easy to distribute.
-
Customizable: Change the pudding flavors, candy colors, and decorations to create different spooky designs.
-
Make-ahead friendly: Prepare the pudding in advance and decorate before serving.
Whether you’re making a dozen cups or enough for a large Halloween gathering, this recipe is easy to scale.
Spooky Halloween Eyeball Pudding Cups Recipe
Difficulty: Easy
Cooking Method: No-bake
Total Time: Approximately 50 minutes
Ingredients
For the chocolate pudding layers:
-
2 packages (3.9 ounces each) instant chocolate pudding mix
-
4 cups cold milk
-
16 chocolate sandwich cookies, crushed
-
1 cup whipped topping, optional
For the spooky eyeball decorations:
-
8 large gummy eyeball candies or edible candy eyeballs
-
16–24 additional small candy eyeballs
-
¼ cup red decorating gel
-
¼ cup green or purple candy melts, optional
-
Halloween sprinkles, optional
-
Gummy worms, optional
Additional supplies:
-
8 clear plastic dessert cups (approximately 9 ounces each)
-
Mixing bowl
-
Whisk
-
Spoon or piping bag
-
Resealable plastic bag for crushing cookies
How to Make Spooky Halloween Eyeball Pudding Cups
Step 1: Prepare the Chocolate Pudding
In a large mixing bowl, combine the instant chocolate pudding mixes with four cups of cold milk.
Whisk continuously for approximately two minutes, or until the mixture begins to thicken.
Allow the pudding to rest for five minutes so it develops a smooth, creamy consistency.
For a lighter texture, gently fold in one cup of whipped topping after the pudding has thickened.
Step 2: Crush the Chocolate Cookies
Place the chocolate sandwich cookies into a resealable plastic bag.
Using a rolling pin or the bottom of a sturdy cup, crush the cookies into small crumbs.
For a realistic graveyard dirt appearance, create a mixture of fine crumbs and slightly larger cookie pieces.
Set aside approximately half a cup of crumbs for the final topping.
Step 3: Assemble the Pudding Cups
Place approximately two tablespoons of crushed cookies into the bottom of each clear dessert cup.
Add a generous layer of chocolate pudding.
Sprinkle another thin layer of crushed cookies over the pudding.
Continue layering until the cups are approximately three-quarters full.
Finish with a smooth layer of chocolate pudding, leaving enough room for the eyeball decorations.
Step 4: Add the Creepy Eyeballs
Place one large gummy eyeball in the center of each pudding cup.
Position several smaller candy eyeballs around it, creating the appearance of mysterious creatures staring out of the chocolate.
For an especially creepy effect, press some of the eyeballs halfway into the pudding so they appear to be emerging from beneath the surface.
Use red decorating gel to draw thin, branching lines around the large eyeballs, creating a bloodshot appearance.
For food safety, make sure all decorations are edible and suitable for the people being served.
Step 5: Create a Spooky Graveyard Effect
Sprinkle the remaining crushed chocolate cookies around the eyeballs.
Add gummy worms crawling out of the cookie crumbs.
For additional Halloween color, drizzle a small amount of melted green or purple candy melts over selected areas.
Finish with Halloween sprinkles if desired.
Step 6: Chill and Serve
Cover the pudding cups and refrigerate for at least 30 minutes before serving.
For the best appearance, add gummy eyeballs, cookie toppings, and other decorations shortly before serving. This helps prevent the candies from becoming too soft and the cookies from losing their crunch.
Serve chilled.
Tips for Making the Best Halloween Eyeball Pudding Cups
Use Clear Dessert Cups
Transparent cups allow everyone to see the layers of chocolate pudding and cookie crumbs.
This makes the dessert visually appealing and helps create the illusion of a spooky underground creature hiding in the dirt.
Choose Different Eyeball Sizes
Using a combination of large and small edible eyeballs makes each dessert more interesting.
Try placing one oversized eyeball in the center with smaller eyeballs surrounding it.
Keep the Pudding Thick
Follow the instant pudding package directions for the correct milk ratio if they differ from this recipe.
Thick pudding supports the candy decorations and prevents the eyeballs from sinking completely.
Don’t Overfill the Cups
Leave space at the top for the decorations.
Overfilled cups can become messy, especially when children are helping decorate.
Decorate Just Before Serving
Although the pudding can be prepared ahead of time, candy decorations often look their best when added shortly before the party.
This is particularly important when using gummy eyeballs or colored decorating gel.
Creative Halloween Eyeball Pudding Cup Variations
One of the best things about this recipe is how easily it can be customized.
1. Bloody Eyeball Pudding Cups
Create a more dramatic Halloween appearance by adding red strawberry dessert sauce around the candy eyeballs.
The red sauce against the dark chocolate pudding creates a striking contrast.
For thicker, more controlled decorations, use red piping gel instead.
2. Monster Slime Eyeball Pudding Cups
Replace chocolate pudding with instant vanilla pudding tinted green using food coloring.
Add crushed chocolate cookies and candy eyeballs to create a creepy monster slime dessert.
This variation is especially fun for children’s Halloween parties.
3. Cookies and Cream Eyeball Cups
Use cookies and cream pudding instead of chocolate.
Layer the pudding with crushed chocolate sandwich cookies and finish with colorful candy eyeballs.
The lighter pudding helps the eyeball decorations stand out.
4. Purple Monster Eyeball Cups
Tint vanilla pudding purple and decorate it with green candy eyeballs.
Add purple and black Halloween sprinkles for a fun monster-inspired dessert.
5. Pumpkin Patch Eyeball Pudding Cups
Use pumpkin-flavored pudding or a pumpkin spice pudding mixture.
Top with chocolate cookie crumbs and edible eyeballs.
Add small pumpkin candies for a festive combination of Halloween flavors and decorations.
How to Make Homemade Edible Eyeballs
If you cannot find candy eyeballs at the grocery store, you can make simple edible eyeball decorations at home.
Ingredients
-
½ cup white candy melts
-
2 tablespoons dark chocolate candy melts
-
Red decorating gel
Instructions
-
Melt the white candy melts according to the package instructions.
-
Spoon small circles onto a parchment-lined baking sheet.
-
Allow the circles to partially set.
-
Melt the dark chocolate candy melts.
-
Add a small dark chocolate dot to the center of each white circle to create a pupil.
-
Allow the eyeballs to harden completely.
-
Use red decorating gel to create bloodshot details.
For added color, use green or blue candy melts to create irises before adding the dark pupils.
These homemade eyeballs can be prepared in advance and stored in an airtight container in a cool, dry place until needed.
How to Serve Halloween Eyeball Pudding Cups at a Party
Presentation can turn a simple dessert into one of the highlights of your Halloween celebration.
Arrange the finished pudding cups on a black serving tray surrounded by Halloween decorations.
Use battery-operated candles to create a mysterious glow.
You can also add small Halloween-themed labels with names such as:
-
Monster Eye Surprise
-
Creepy Creature Cups
-
Haunted Eyeball Pudding
-
Graveyard Monster Eyes
-
Mad Scientist Eyeball Dessert
-
Zombie Eye Pudding
For a mad scientist-themed Halloween party, serve the pudding cups alongside other creepy desserts and use laboratory-inspired decorations.
If you’re preparing treats for children, consider using smaller cups and providing spoons decorated with Halloween stickers.
Make-Ahead and Storage Instructions
Can You Make Eyeball Pudding Cups Ahead of Time?
Yes! These Halloween pudding cups are excellent make-ahead desserts.
Prepare the pudding and assemble the basic layers up to 24 hours before serving.
Cover each cup tightly and refrigerate.
Add the candy eyeballs, cookie crumbs, and decorative toppings shortly before serving for the freshest appearance.
How Long Do They Last?
Prepared pudding cups can generally be stored in the refrigerator for up to three days, provided the ingredients are fresh and the pudding has been handled and refrigerated properly.
For the best texture and appearance, enjoy them within one to two days.
Can You Freeze Halloween Pudding Cups?
Freezing is not recommended.
Instant pudding can separate or become watery after thawing, and the candy decorations may lose their original texture.
Refrigeration is the better storage option.
Food Safety Tips
Keep pudding cups refrigerated at 40°F or below until serving.
Do not leave them at room temperature for more than two hours, or more than one hour when temperatures exceed 90°F.
For younger children, avoid large, chewy, or hard candy eyeballs that could present a choking hazard. Use age-appropriate edible decorations instead.
Frequently Asked Questions
Can I Use Store-Bought Pudding Cups?
Absolutely.
Store-bought chocolate pudding cups are a convenient shortcut.
Simply remove the lids, add crushed cookies, and decorate with candy eyeballs.
This option is perfect for last-minute Halloween parties.
Can I Make These Without Chocolate?
Yes.
Vanilla, butterscotch, cookies and cream, and banana pudding can all work.
Vanilla pudding is particularly useful because you can tint it with Halloween colors.
What Can I Use Instead of Candy Eyeballs?
You can create edible eyeballs using white chocolate, small chocolate candies, or frosting.
Mini marshmallows with small chocolate dots can also work as a simple alternative.
Are Halloween Eyeball Pudding Cups Good for Kids?
Yes, with age-appropriate decorations.
Children can help assemble the layers, sprinkle cookie crumbs, and arrange edible eyeballs.
Younger children should be supervised when handling small candies.
Can I Make a Dairy-Free Version?
Yes.
Choose dairy-free pudding or a pudding mix specifically designed to set with plant-based milk.
Some traditional instant pudding mixes do not thicken properly with certain milk alternatives, so check the package instructions.
Use dairy-free cookies and decorations as needed.
How Many Pudding Cups Does This Recipe Make?
This recipe makes approximately eight medium-sized dessert cups, depending on the size of the cups and the amount of toppings used.
For larger Halloween gatherings, simply double or triple the ingredients.
Why These Eyeball Pudding Cups Are Perfect for Halloween
Halloween is about having fun, being creative, and enjoying treats that capture the spirit of the season.
Spooky Halloween Eyeball Pudding Cups accomplish all three.
They are creepy enough to impress Halloween enthusiasts, sweet enough to satisfy dessert lovers, and simple enough for beginner cooks.
Unlike complicated cakes or elaborate pastries, these individual desserts require minimal equipment and preparation.
They also give everyone the opportunity to personalize their own creation.
Some guests may prefer a single oversized eyeball staring out of the pudding, while others might enjoy filling their cups with dozens of tiny monster eyes.
That creativity makes this recipe more than just a dessert. It can become a fun Halloween activity.
Final Thoughts
Spooky Halloween Eyeball Pudding Cups are proof that you don’t need complicated ingredients or advanced baking skills to create an unforgettable Halloween dessert.
With creamy chocolate pudding, crunchy cookie crumbs, creepy candy eyeballs, and colorful decorations, these no-bake treats offer the perfect combination of delicious flavor and spooky presentation.
Whether you’re preparing them for a classroom celebration, a haunted house party, a family Halloween gathering, or a cozy October movie night, these pudding cups are sure to bring smiles, laughter, and a few playful screams.
This Halloween, skip the ordinary desserts and serve something that stares right back at you.
What would you add to your Spooky Halloween Eyeball Pudding Cups to make them even creepier: gummy worms, bloody strawberry sauce, or extra candy eyeballs?

Leave a Reply