Some desserts are light, delicate, and subtle.
Devil’s Playground Cake is none of those things.
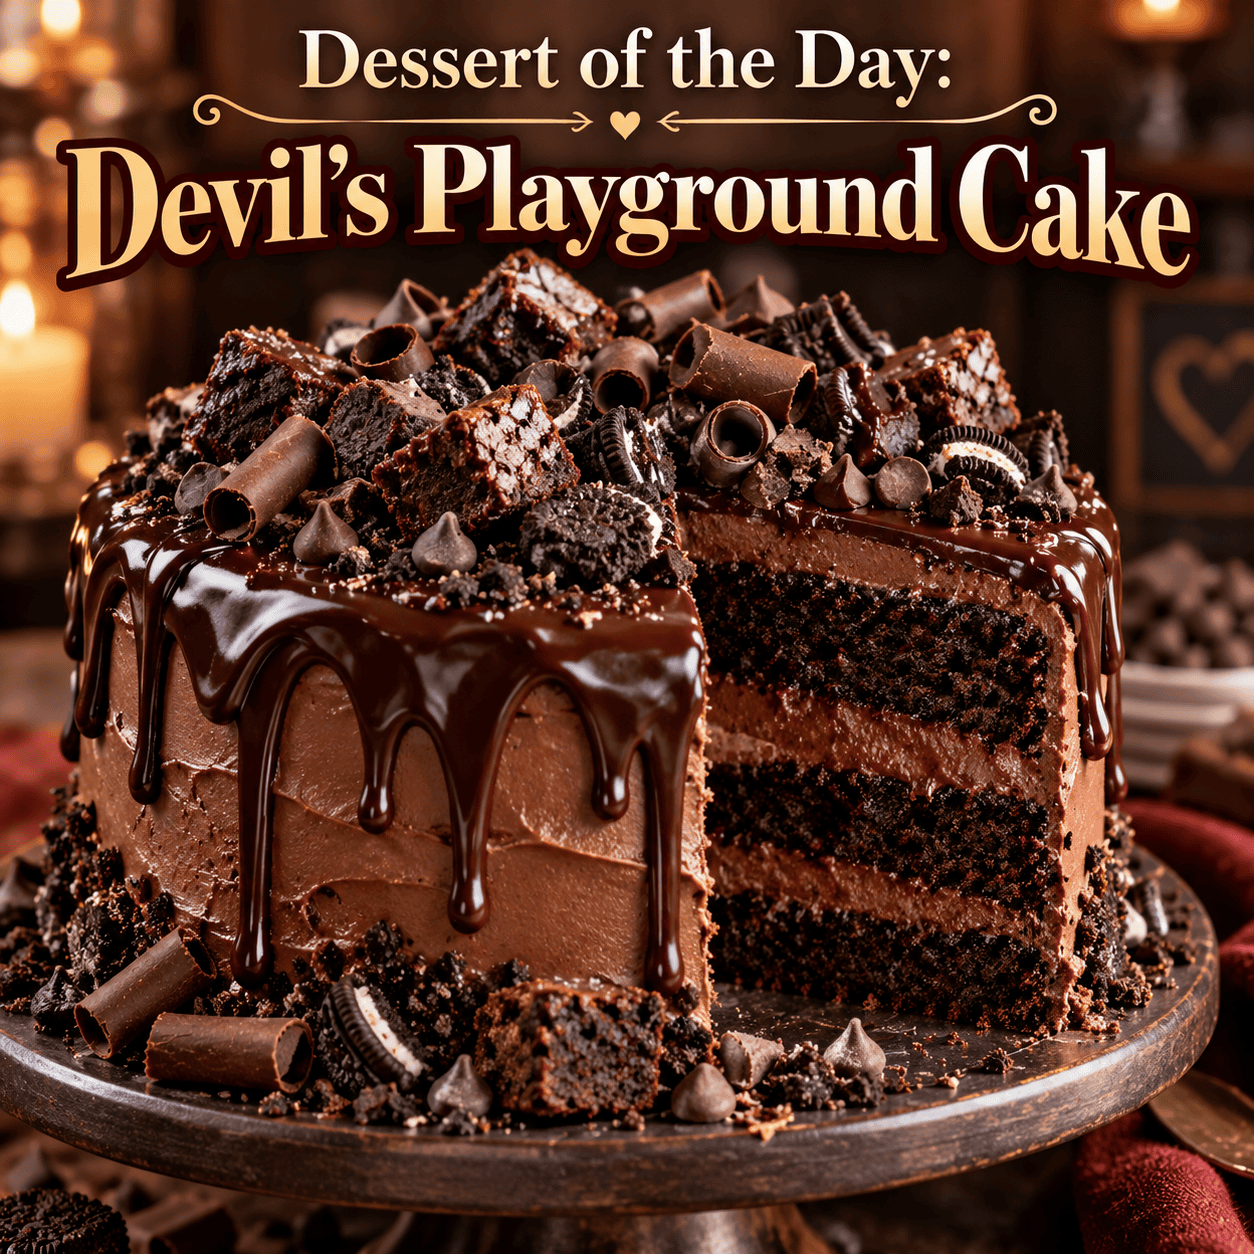
This is the kind of dessert you make when you want chocolate to be the undisputed star of the table. It is dark, rich, dramatic, decadent, and completely unapologetic. Layers of moist chocolate cake, creamy chocolate filling, silky frosting, chocolate drizzle, and crunchy toppings come together to create a dessert that feels like a celebration of everything chocolate lovers crave.
Devil’s Playground Cake gets its name from its over-the-top personality. Instead of stopping with a traditional chocolate layer cake, this dessert keeps going. There is chocolate in the cake, chocolate between the layers, chocolate covering the outside, and even more chocolate scattered across the top.
It is messy in the best possible way.
It is rich enough for a special occasion but fun enough for a weekend baking project. Whether you are celebrating a birthday, hosting friends, planning a holiday dessert table, or simply craving something seriously indulgent, Devil’s Playground Cake is designed to make an impression.
A Cake Made for Chocolate Lovers
Chocolate cake comes in countless varieties, but the best versions balance sweetness with deep cocoa flavor.
That is especially important with a cake this rich.
The cake layers should be moist and intensely chocolatey without being overwhelmingly sweet. The frosting brings additional sweetness, while the ganache adds a smooth, luxurious finish.
Then come the toppings.
Chocolate chips, crushed cookies, brownie pieces, candy pieces, chocolate curls, or anything else you enjoy can transform the top of the cake into what looks like a chocolate playground.
There really are no strict rules.
That is part of the fun.
Why This Cake Is So Good
The secret to Devil’s Playground Cake is contrast.
You have soft cake against creamy frosting.
Smooth ganache against crunchy cookie pieces.
Dark cocoa against sweet chocolate candy.
Every bite can be slightly different depending on which toppings you include.
Coffee is also used in the cake batter. You do not need to worry about the finished cake tasting like coffee. Coffee simply helps deepen the chocolate flavor and makes the cocoa taste richer.
If you prefer, hot water can be substituted.
Devil’s Playground Cake
Ingredients
For the Chocolate Cake
- 2 cups all-purpose flour
- 2 cups granulated sugar
- 3/4 cup unsweetened cocoa powder
- 2 teaspoons baking soda
- 1 teaspoon baking powder
- 1 teaspoon salt
- 2 large eggs
- 1 cup buttermilk
- 1/2 cup vegetable oil
- 2 teaspoons vanilla extract
- 1 cup hot brewed coffee
For the Chocolate Buttercream
- 1 cup unsalted butter, softened
- 3 1/2 cups powdered sugar
- 3/4 cup unsweetened cocoa powder
- 1/2 teaspoon salt
- 2 teaspoons vanilla extract
- 1/3 cup heavy cream, plus more if needed
For the Chocolate Ganache
- 1 cup semi-sweet chocolate chips
- 1/2 cup heavy cream
Optional Playground Toppings
Use any combination you like:
- Mini chocolate chips
- Chocolate sandwich cookies, crushed
- Brownie chunks
- Chocolate-covered pretzels
- Chocolate candy pieces
- Mini peanut butter cups
- Chocolate curls
- Fudge pieces
- Chopped chocolate bars
- Chocolate sprinkles
- Crushed chocolate cookies
- Caramel drizzle
How to Make Devil’s Playground Cake
Step 1: Prepare the Cake Pans
Preheat the oven to 350°F.
Grease two 9-inch round cake pans.
Line the bottoms with parchment paper and lightly grease the parchment. This makes removing the cakes much easier once they have cooled.
Step 2: Combine the Dry Ingredients
In a large mixing bowl, whisk together the flour, sugar, cocoa powder, baking soda, baking powder, and salt.
Mix until everything is evenly distributed.
Breaking apart any cocoa powder lumps now will help create a smoother cake batter.
Step 3: Add the Wet Ingredients
Add the eggs, buttermilk, vegetable oil, and vanilla.
Mix until combined.
The batter will be thick at this stage.
Slowly pour in the hot coffee while mixing on low speed.
Once incorporated, the batter will become much thinner.
That is normal.
A thinner chocolate cake batter helps create the soft, moist texture that makes this cake so good.
Step 4: Bake the Cakes
Divide the batter evenly between the prepared cake pans.
Bake for approximately 30 to 35 minutes, or until a toothpick inserted into the center comes out clean or with just a few moist crumbs attached.
Avoid overbaking.
Chocolate cake can dry out quickly when left in the oven too long.
Allow the cakes to cool in their pans for about 10 minutes.
Carefully remove them from the pans and transfer them to wire racks.
Let them cool completely before frosting.
Make the Chocolate Buttercream
Place the softened butter in a large bowl and beat until smooth and creamy.
Gradually add the powdered sugar and cocoa powder.
Add the salt and vanilla.
Slowly pour in the heavy cream while continuing to beat the frosting.
Whip for several minutes until the frosting becomes light, fluffy, and easy to spread.
If the frosting seems too thick, add another tablespoon of heavy cream.
If it seems too soft, add a little additional powdered sugar.
Make the Chocolate Ganache
Place the chocolate chips in a heat-safe bowl.
Heat the heavy cream until it is hot but not boiling.
Pour the cream over the chocolate.
Allow it to sit undisturbed for approximately two minutes.
Then gently stir until the chocolate has completely melted and the ganache becomes smooth and glossy.
Allow the ganache to cool slightly before pouring it over the cake.
You want it thick enough to drip slowly down the sides rather than immediately running off.
Assemble the Cake
Place one cooled cake layer on a serving plate or cake stand.
Spread a generous layer of chocolate buttercream across the top.
For an even more decadent version, sprinkle crushed cookies, mini chocolate chips, or chopped chocolate pieces over the frosting.
Place the second cake layer on top.
Cover the entire cake with chocolate buttercream.
Smooth the frosting or leave it textured for a more rustic appearance.
This cake does not need to look perfect.
In fact, the slightly chaotic appearance fits the Devil’s Playground theme perfectly.
Add the Ganache
Slowly spoon or pour the cooled ganache around the outer edge of the cake.
Allow some of it to drip down the sides.
Then spread additional ganache over the top.
You can completely cover the surface or leave some of the buttercream visible underneath.
Build the Playground
Now comes the best part.
Pile your favorite chocolate treats across the top.
Break chocolate sandwich cookies into pieces.
Scatter brownie chunks around the center.
Add chocolate chips.
Place mini peanut butter cups around the edges.
Add chopped chocolate bars, chocolate curls, or fudge pieces.
Drizzle additional ganache or caramel across everything.
There is no perfect arrangement.
The goal is to make the top look overflowing with chocolate.
Make It Even More Extreme
If you really want to turn Devil’s Playground Cake into a showstopper, add even more layers of flavor.
Try spreading chocolate hazelnut spread between the cake layers.
Add a thin layer of caramel sauce beneath the buttercream.
Use crushed peanut butter cups between the layers.
Mix crushed chocolate cookies into the frosting.
Add a layer of brownie pieces in the center.
You can even use chocolate mousse as part of the filling.
Just remember that the richer the filling becomes, the smaller the slices probably need to be.
This cake can become extremely decadent very quickly.
Chocolate Peanut Butter Version
Chocolate and peanut butter are one of dessert’s most popular combinations.
To create a peanut butter version, replace the center layer of chocolate buttercream with peanut butter frosting.
Mix:
- 1/2 cup softened butter
- 1 cup creamy peanut butter
- 2 cups powdered sugar
- 1 teaspoon vanilla
- 2 to 4 tablespoons heavy cream
Beat until smooth and fluffy.
Spread the peanut butter frosting between the chocolate cake layers and decorate the top with mini peanut butter cups.
Cookies-and-Cream Version
For a cookies-and-cream Devil’s Playground Cake, crush approximately 12 chocolate sandwich cookies.
Mix half into the buttercream.
Use the remaining crumbs between the layers and over the top.
Finish with whole or broken sandwich cookies placed vertically into the frosting.
The black-and-white cookies create a dramatic contrast against the dark chocolate cake.
Salted Caramel Version
Chocolate and salted caramel create another excellent variation.
Drizzle salted caramel sauce over the frosting between the layers.
Once the cake is decorated, drizzle caramel across the top along with the chocolate ganache.
Finish with a small sprinkle of flaky sea salt.
The salt helps balance some of the sweetness while intensifying the chocolate flavor.
Serve It With Ice Cream
Devil’s Playground Cake is already rich enough on its own, but serving it slightly warm with ice cream takes things to another level.
Vanilla ice cream works beautifully because its mild flavor balances the intense chocolate.
You could also try:
Chocolate ice cream for maximum chocolate overload.
Coffee ice cream for a deeper, slightly bitter contrast.
Peanut butter ice cream if you added peanut butter cups.
Salted caramel ice cream if caramel is part of your cake.
Cookies-and-cream ice cream if you used sandwich cookies as toppings.
A small slice of warm chocolate cake beside a scoop of melting ice cream can turn this dessert into something that feels straight from a restaurant dessert menu.
How to Store Devil’s Playground Cake
Store the cake covered at room temperature for approximately one to two days if your kitchen is cool.
For longer storage, keep it refrigerated.
Because refrigeration can make cake firmer, allow individual slices to sit at room temperature for about 20 to 30 minutes before serving.
This helps restore the softer texture of the cake and frosting.
The cake can generally be refrigerated for about four days when properly covered.
Can You Make It Ahead?
Yes.
In fact, preparing the cake layers ahead of time can make assembling the dessert much easier.
Bake the cake layers one day before you plan to decorate them.
Once completely cooled, wrap each layer tightly in plastic wrap.
Store them at room temperature overnight.
The following day, prepare the buttercream and ganache and assemble everything.
You can also refrigerate the unfrosted layers if needed.
Freeze the Cake Layers
Chocolate cake layers freeze surprisingly well.
Once completely cooled, wrap each layer tightly in plastic wrap followed by aluminum foil.
Freeze for up to approximately two months.
When you are ready to decorate the cake, allow the layers to thaw while still wrapped.
Some bakers actually find slightly chilled cake layers easier to frost because they create fewer crumbs.
Tips for the Best Chocolate Cake
Do not skip the buttermilk.
Its slight acidity helps create a softer cake.
Use good cocoa powder.
Since cocoa is one of the dominant ingredients, its quality matters.
Do not overmix the batter.
Mix only until the ingredients are combined.
Use hot coffee.
Hot liquid helps bloom the cocoa powder, making the chocolate flavor stronger.
Cool the cakes completely.
Frosting a warm cake can cause the buttercream to melt and slide.
Let the ganache thicken.
If the ganache is too hot and thin, it will run down the cake instead of creating beautiful chocolate drips.
Perfect for Celebrations
Devil’s Playground Cake is not an everyday-looking dessert.
That makes it especially fun for celebrations.
Serve it for:
- Birthdays
- Halloween parties
- Family gatherings
- Game nights
- Holiday dessert tables
- Chocolate-themed parties
- Potlucks
- Dinner parties
- Weekend celebrations
It can also work wonderfully for Halloween because of its dark chocolate appearance and dramatic name.
Add dark chocolate curls, cookie crumbs, and chocolate candy for an especially dramatic presentation.
Why Homemade Chocolate Cake Is Worth It
Boxed cake mixes are convenient, but homemade chocolate cake has a depth of flavor that can be difficult to reproduce.
Using cocoa powder, buttermilk, vanilla, and coffee creates layers of flavor rather than simple sweetness.
The result is a cake that tastes intensely chocolatey without becoming one-dimensional.
And because you control every part of the dessert, you can adjust it to your own preferences.
Prefer dark chocolate?
Use dark chocolate ganache.
Love milk chocolate?
Use milk chocolate candy pieces as toppings.
Want something crunchy?
Add chocolate-covered pretzels.
Want something salty?
Add salted caramel.
Want pure chocolate chaos?
Use all of them.
The Fun Is in Making It Your Own
There is something satisfying about desserts that do not need to look perfectly polished.
Devil’s Playground Cake should look abundant.
Maybe even slightly ridiculous.
Chocolate drips down the sides.
Cookie pieces stand at different angles.
Brownie chunks sit beside candy pieces.
Chocolate curls tumble across the frosting.
That imperfect abundance is exactly what makes the cake so appealing.
It invites everyone at the table to look closer and wonder what they will find in their slice.
Dessert of the Day
Today’s Dessert of the Day is not about restraint.
Devil’s Playground Cake is about embracing chocolate in all its rich, messy, delicious glory.
Moist chocolate cake provides the foundation. Creamy buttercream adds richness. Silky ganache creates an irresistible finish. And the toppings transform an ordinary cake into something unforgettable.
Make it elegant.
Make it messy.
Make it completely overloaded.
There really is no wrong way to build your own Devil’s Playground.
Just make sure there is plenty of chocolate.
Because sometimes dessert should not be sensible.
Sometimes it should be ridiculously decadent, overflowing with toppings, and impossible to ignore.
And that is exactly what Devil’s Playground Cake was made to be.
What would you put on top of your ultimate Devil’s Playground Cake?


Leave a Reply